
Playbook summary
Grow your subscriber lists by providing an offer to new shoppers in exchange for their email address and phone number. Then turn those subscribers into customers with follow-up campaigns that draw them further down the funnel.
- Industry:Ecommerce
- Metrics affected:List growth
- Campaign type:General
Tools you'll need
Quick setup
Growing your email and SMS lists is crucial to own your audience and reduce your reliance on paid ads. But a generic opt-in form won’t cut it.
And beyond having an enticing welcome popup, an optimized welcome funnel is essential to convert more of your new subscribers.
A well-designed welcome offer funnel can 2-3x your opt-in rate and encourage a shopper’s first purchase 💥
With strategies used by top ecommerce brands, you’ll learn how to:
- Create a high-converting welcome offer campaign
- Launch a welcome series for subscribers who don’t purchase right away
- Personalize your website experience using customer data gathered from your email & SMS signup form
- Promote your welcome offer across channels to grow your email & SMS lists
<why>The power of the welcome offer funnel<why>
Your email and SMS signup form is the gateway to turning anonymous site visitors into known contacts that you can remarket to and learn more about to personalize your marketing efforts.
And with the right welcome offer, you can encourage them to buy now.
Own your audience
First-party data reigns in a world with restricted third-party data access.
You don’t own your social following or ad audiences. Information about them is limited, making personalization difficult. And access to those audiences can change at any time.
Obtaining an email or phone number empowers you to build direct relationships with potential customers.
As those identified contacts interact with your brand on owned channels (like email, SMS, website, or your app), you learn about their behavior and interests so you can:
- Suggest products that are likely to appeal to them
- Highlight product benefits that align with their lifestyle and values
- Understand their habits to show relevant and timely marketing messages
Ultimately, you can convert more browsers into buyers and keep customers coming back.
Incentivize the first purchase
The first purchase is a key milestone in the customer journey.
But getting them past their hesitations or desire to wait to purchase can be challenging.
Your welcome offer gives shoppers a compelling reason to buy now.
Stay connected with shoppers who aren’t ready to purchase
If you don’t gather contact information, you miss out on the chance to engage shoppers and keep them in your conversion funnel.
If they leave without making a purchase, you have to invest more in paid ads to bring them back—and you may never reach them again.

But if they subscribe, you can educate them about your brand and products and remind them of their first-purchase offer.
This increases your odds of turning them into paying customers.
Cultivate loyalty and retention long after the first purchase
According to Smile.io, 41% of an ecommerce store’s revenue is generated by just 8% of its customers. That means most online stores rely heavily on returning customers.
In fact, Smile.io data also shows that first-time customers have a 27% chance of returning to your store. That balloons to 49% after two purchases and a whopping 62% after three purchases.
But you need a way to stay top of mind for customers and bring them back for that next purchase.
Bottom line: Email and SMS are essential channels for customer retention.
They strengthen your relationship with shoppers through valuable and entertaining content. And they keep your customers up-to-date on your brand so they can take advantage of sales and launches.
And with a well-crafted email and SMS program you can send personalized flows to subscribers based on their interests and behavior to bring them back to your store.
<strategy>Strategy: How to 2-3x your subscriber opt-in rate like a pro<strategy>
The first step in your welcome funnel is to gather shoppers’ contact information. But that doesn’t mean you can just turn on a basic email popup and hope it works.
Without a compelling offer surfaced at the right time and place, you lose out on the opportunity to scale your subscriber base.
But with an effective strategy, you can 2-3x your opt-in rate compared to a basic popup or landing page.
So before you create your campaign, lay out your welcome offer strategy.
1. Identify the types of campaigns you need for your opt-in forms
There are several ways to gather contact information from your audience.
You can create a:
- Popup that triggers when someone arrives on a webpage or takes another action on your website
- Sticky bar that appears at the top or bottom of a page
- Landing page that customers come to directly through an ad or social media
- Embedded form that can be added to an existing page or in key locations on your website, like your site footer
At the base level, most ecommerce stores will want a popup that greets new website visitors.
After you create your primary email & SMS popup, you can move on to create other campaigns for different use cases.
2. Determine where you'll surface your popup
Starting with your popup campaign, you’ll want to decide where on your website your welcome popup will appear.
Show your popup on your:
- Home page: This is the most common place to surface a popup. It's the first page many shoppers often see when they arrive at your store, so it's a great opportunity to introduce them to your welcome offer.
- Collection & product pages: Shoppers are showing interest in your products, so a welcome offer could nudge them to purchase now
- Blog: Blog readers are showing interest in what you have to say. So getting them on your subscriber list can help them stay in the loop for your content while you sprinkle in product education and promos.
Energy supplement brand Joggy shows its popup as a non-intrusive hook popup on the home page:

⚠️ You won't want to show a popup on every webpage.
Because popups are designed to grab attention by appearing in front of a webpage’s content, you could bother shoppers if it appears when it's not relevant.
Avoid surfacing your popup on pages where the shopper is clearly not interested in shopping right now—like your support page, policy pages, and FAQs.
And don’t show your popup on pages where you're trying to encourage the shopper to take a specific action—like on a quiz, landing page, in the cart, or on your checkout page.
Most of the time, you won't want to interrupt their experience with yet another call-to-action (CTA). That said, a welcome offer popup might be useful on these pages in specific scenarios like when a shopper:
- Shows exit-intent
- Has been on the page for a long time, or
- Has scrolled to the bottom of a landing page without taking action
In these cases, you'll want to adjust your popup's trigger or opt for less intrusive options than an overlay popup, like a slide-in message or two-tap floating button that appears in the corner of the screen.
3. Decide on the perfect timing for your popup
There are a few ways to determine when your popup will appear. For a welcome popup, a time-based trigger is the most common.
Here are a few time triggers to try for your core campaign:
1. Basic: Five to 10 seconds after the page loads
This is the standard for most welcome popups and is a great baseline to start with.
2. Intermediate: 50% of your average time on page
If your average time on page is one minute, you'd set your popup to appear once a visitor has been on the page for 30 seconds.
With this method, you give shoppers a chance to follow their curiosity and grow their interest before showing your welcome offer.
After all, a popup that shows immediately can be too soon for many shoppers and they'll just close your popup anyways.
3. Advanced: Start with a longer delay and reduce until you find the sweet spot
One DTC operator on Twitter recommends that you determine your baseline revenue and contribution margin per session. Then give your popup a longer time trigger of 60 to 90 seconds.
Reduce that by five second increments until you find a delay that maximizes your profits without giving away too much up front to shoppers who would have purchased anyways.
4. Choose an enticing incentive
Shoppers don't want to join your email or SMS list for the heck of it. So give them a compelling offer that makes it worth their while.
Here are a few common incentives you can experiment with:
1. Discounts
Discounts are the most common incentive, usually in the form of a percentage, but can be a flat dollar amount as well.
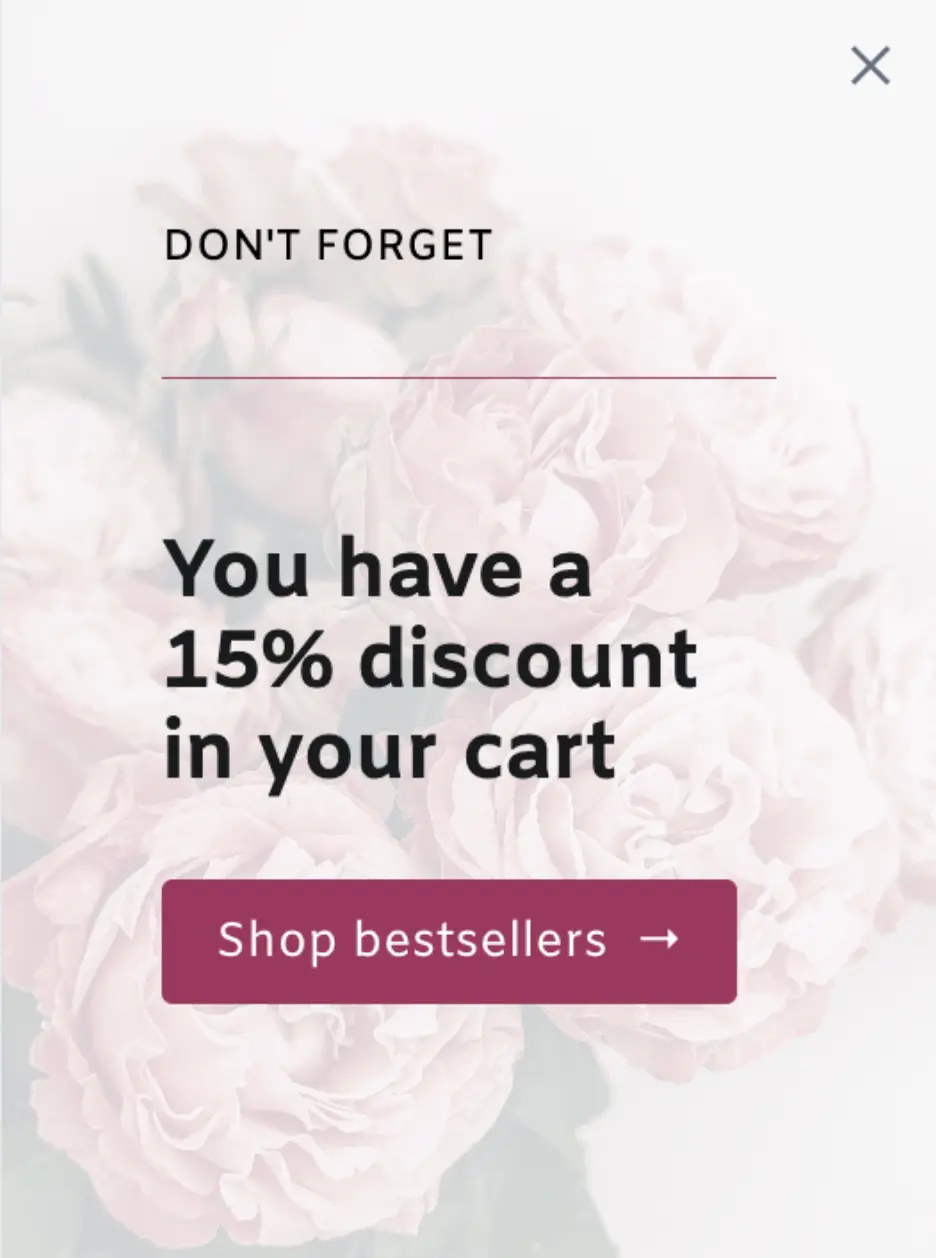
Skincare brand L’AMARUE offers 15% off in its welcome popup:
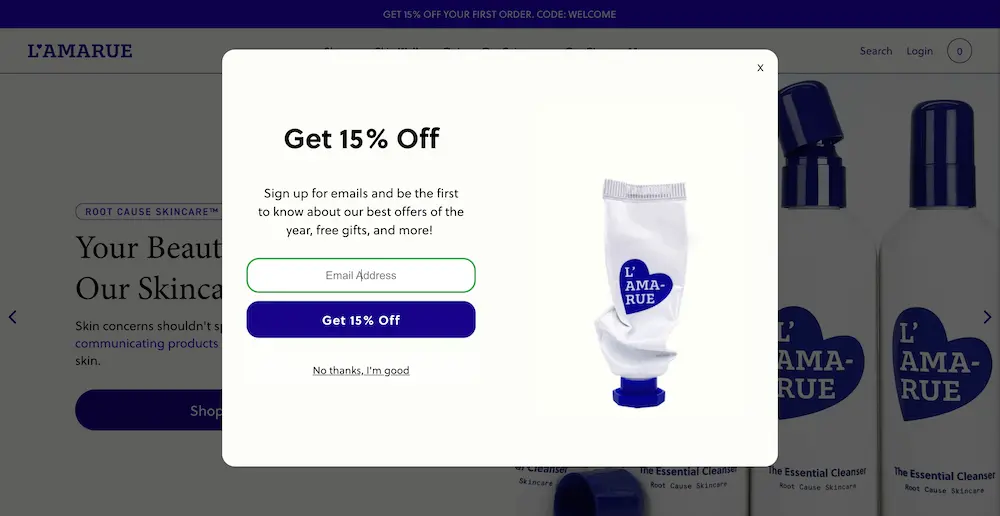
The amount you choose depends on your products, margins, and repeat purchase rate (RPR).
If you have a low RPR—which is common for investment products like a mattress or bicycle—be cautious not to eat into your margins too much. Since most of your customers are new, many won't be buying at full-price.
Meanwhile if you have a high RPR—which is common for consumable products like L’AMARUE—you can afford to offer a better discount. Because once a customer is hooked, you'll earn back money lost on the discount from future purchases.
2. Cashback
Similar to a discount, cashback uses money-saving as an incentive to sign up to a subscriber list. But instead of offering the reward up front, shoppers earn their choice of store credit or cash back after making their first purchase.
This increases first-order profitability and encourages repeat purchases.
Plus, not all shoppers redeem their offer even though it prompted them to make their first purchase.
In fact, cashback app Fondue has found that half of cashback incentives are never redeemed at all, while 20% are redeemed as a gift card back to the store.
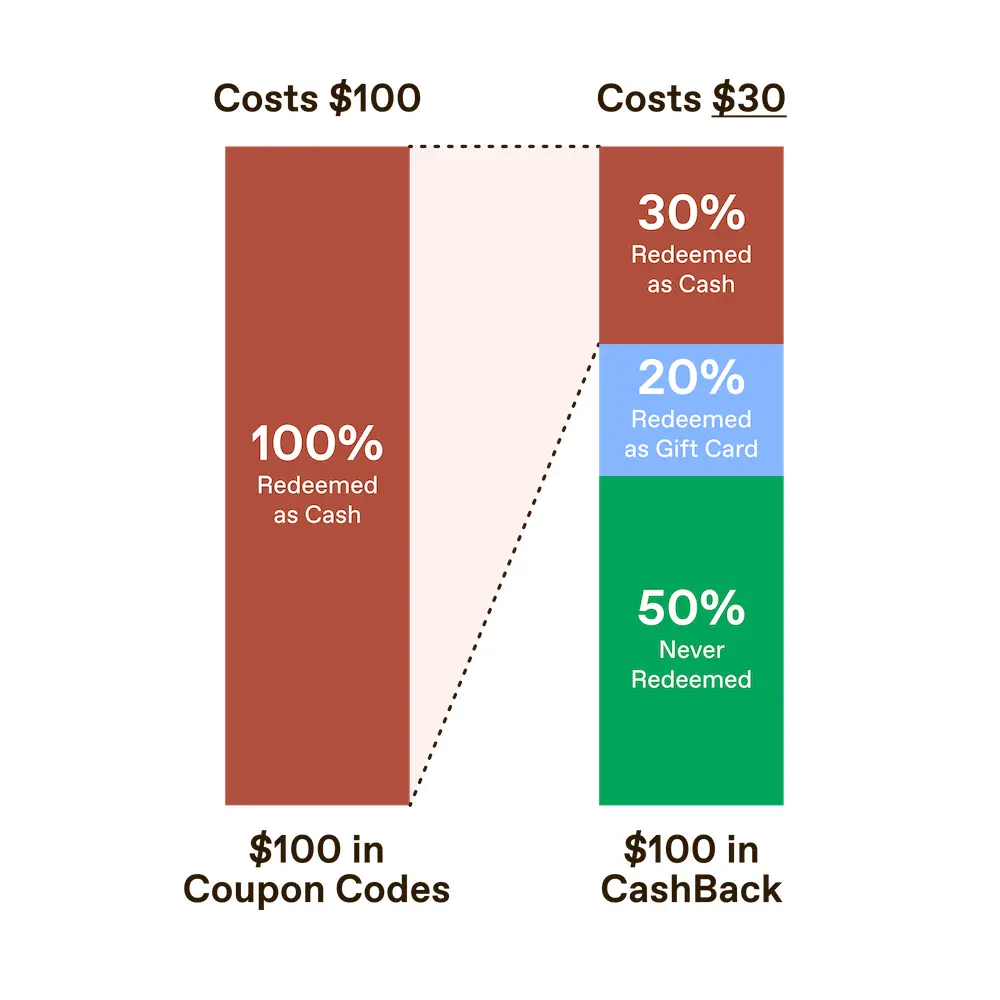
That allows you to provide a more enticing offer that earns more opt-ins.
Leisure sports brand CROSSNET offers $20 cashback in its two-step welcome popup:
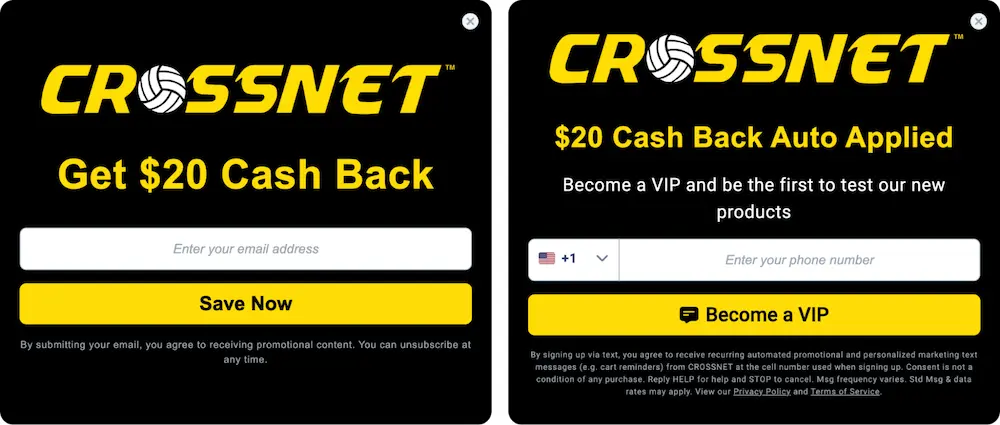
When asking for a phone number in the second step, shoppers are offered VIP status to make them feel special. And they’ll be first to hear about new products.
By offering cashback, CROSSNET has reduced welcome discount payouts by 50.8% and boosted email & SMS signups by 15.9% and 43.8% respectively.
👉🏾 Want to learn more about cashback offers? Head to the cashback popup playbook.
3. Free gift
Offer a gift like a sample, full-sized product, or swag to include with a customer's first order.
Awara Sleep offers a free bedding bundle with every mattress:
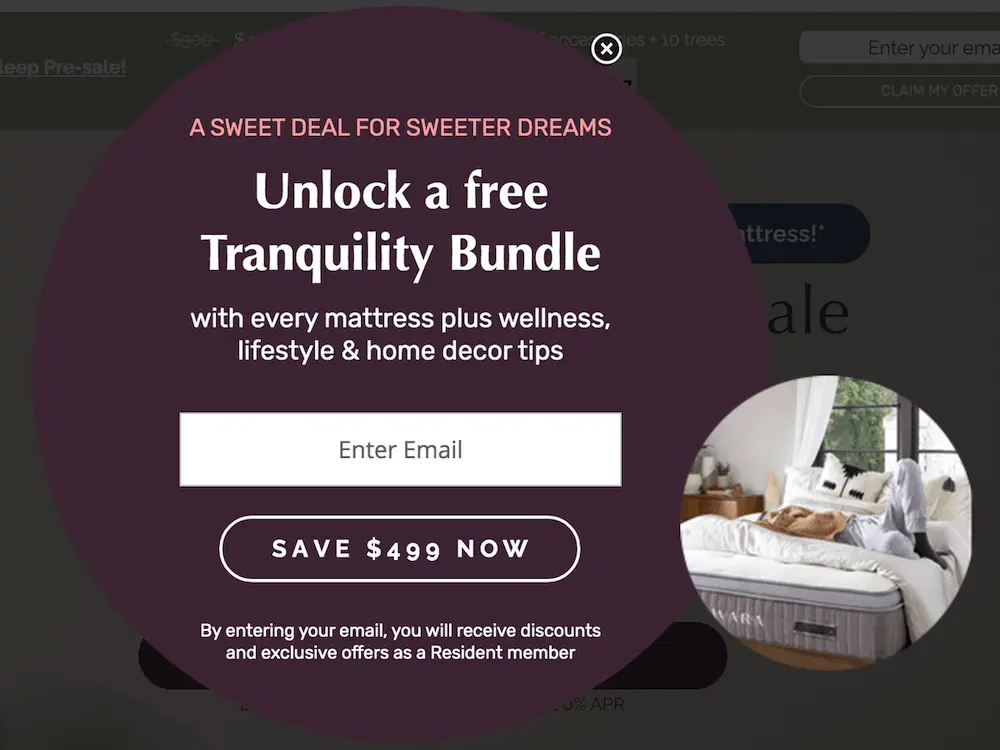
And the CTA button, “save $499 now” is actionable and highlights the value of the gift.
This incentive gives shoppers something to look forward to in their order.
To make your offer feel more exclusive, you could even offer limited edition colors or flavors or a product that aren’t normally available for purchase.
4. Free shipping
Paying for shipping can be prohibitive to customers who want to try a product for the first time. So eliminate the risk with a free shipping offer.
Cookware brand Caraway offers subscribers free shipping on orders of $90 or more in its full-screen overlay popup:
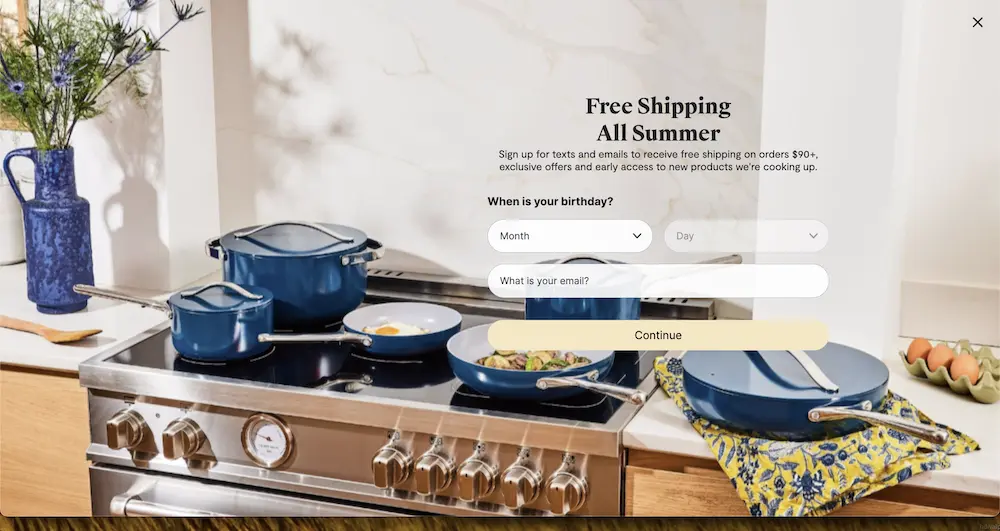
The $90 limit encourages shoppers to invest in the brand’s more game-changing cookware (like eco-friendly nonstick pans). Those are more likely to lead shoppers to becoming lifelong fans of the brand compared to buying the more generic, lower-priced accessories (like a cooling rack).
5. Discounted first month or free trial
For membership or subscription-based brands, your job is to get customers to experience the value of your products so they'll want it on a recurring basis.
A discounted first month or free trial encourages shoppers to make it part of their routine.
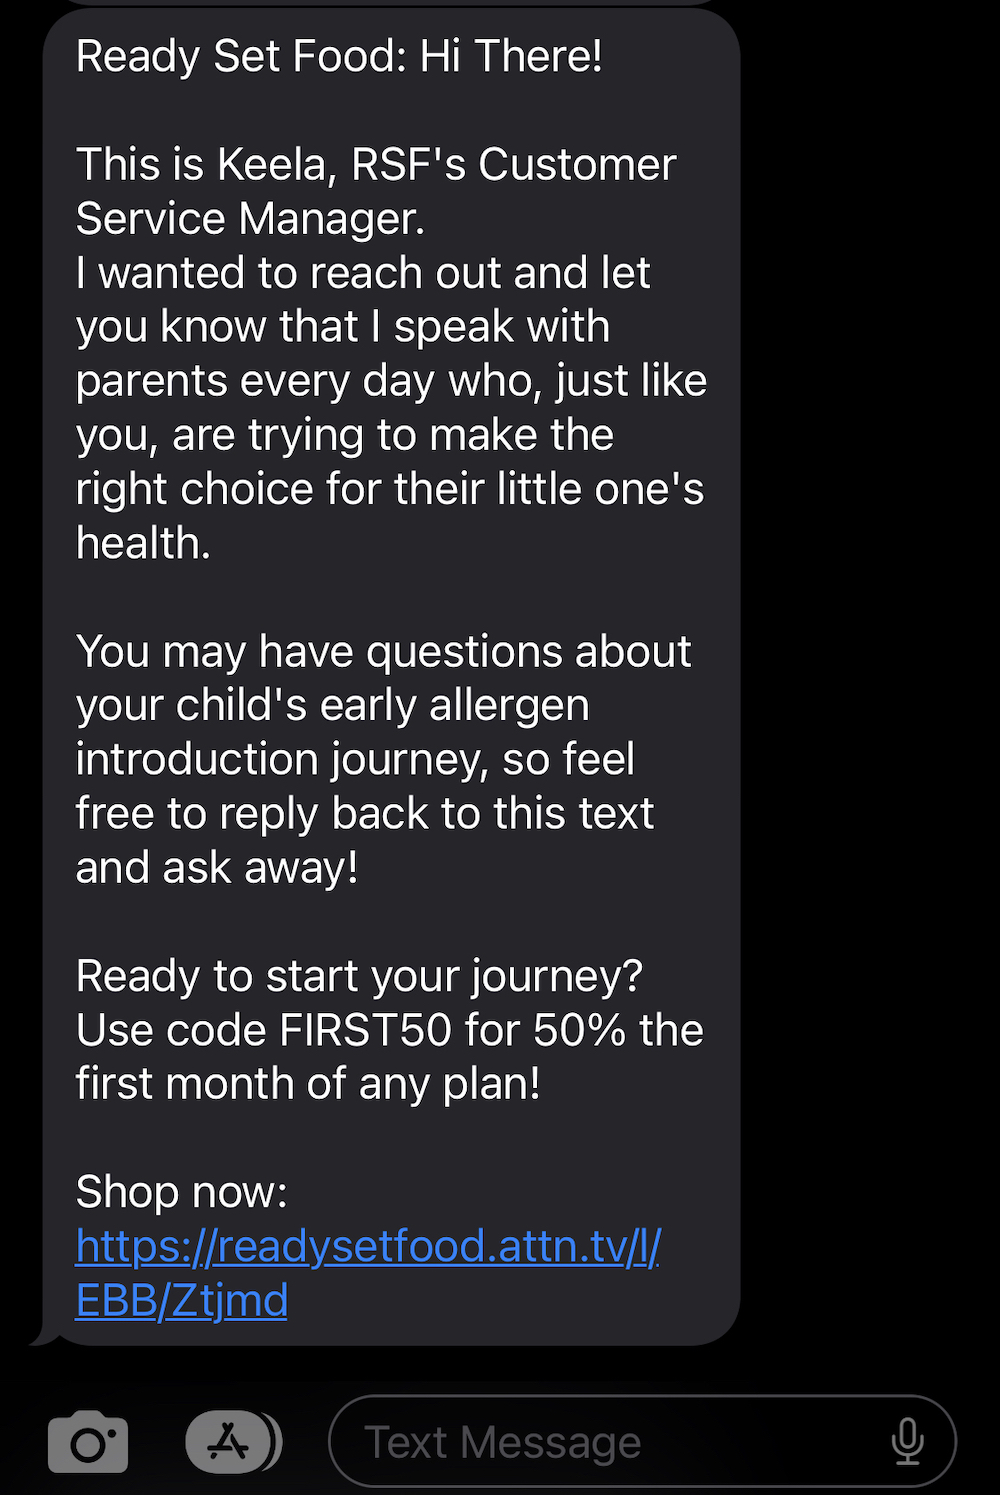
That's why Ready. Set. Food! offers a heavy discount on the first month of any plan as an incentive:
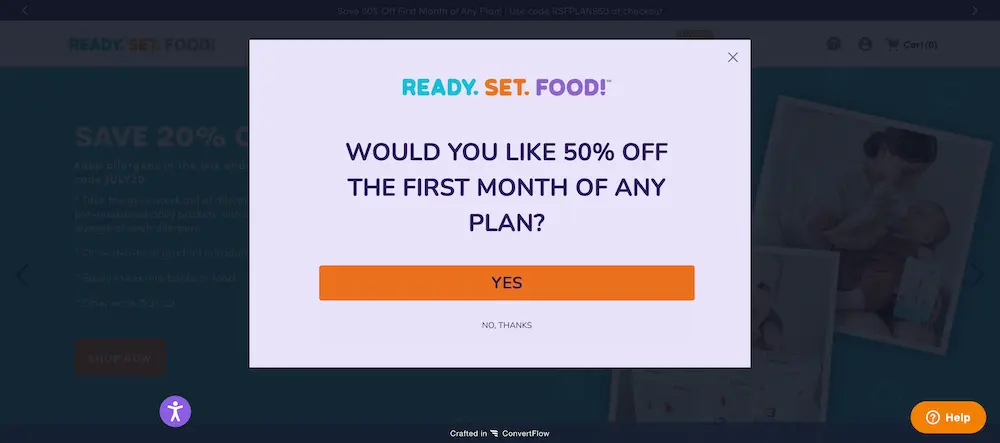
Ready. Set. Food! is a brand that helps parents and caregivers prevent food allergies in children. The process requires consistent, controlled exposure to allergens through the brand’s products.
So it makes sense for customers to commit to a six to 12 month plan over buying a one-month supply. The deep discount makes that choice more appealing.
6. Helpful content
Discounting isn’t for everyone. If you don’t want to use any form of discounting as an incentive for sign up, you could offer helpful content that’s relevant to your products instead.
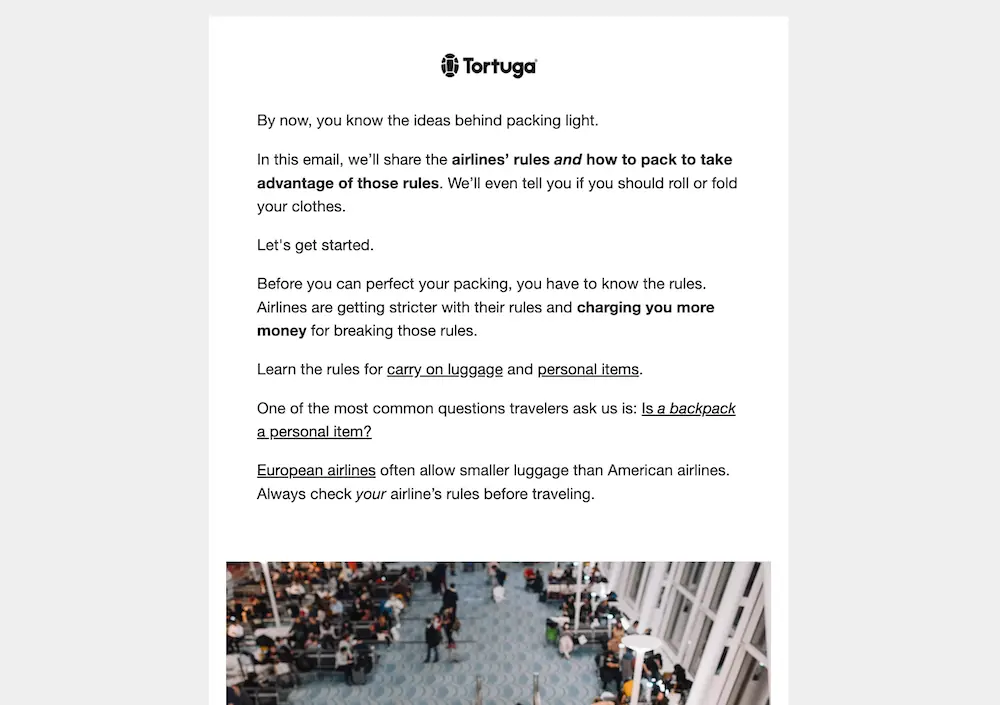
Travel backpack brand Tortuga offers a free carry on packing list to earn email signups:
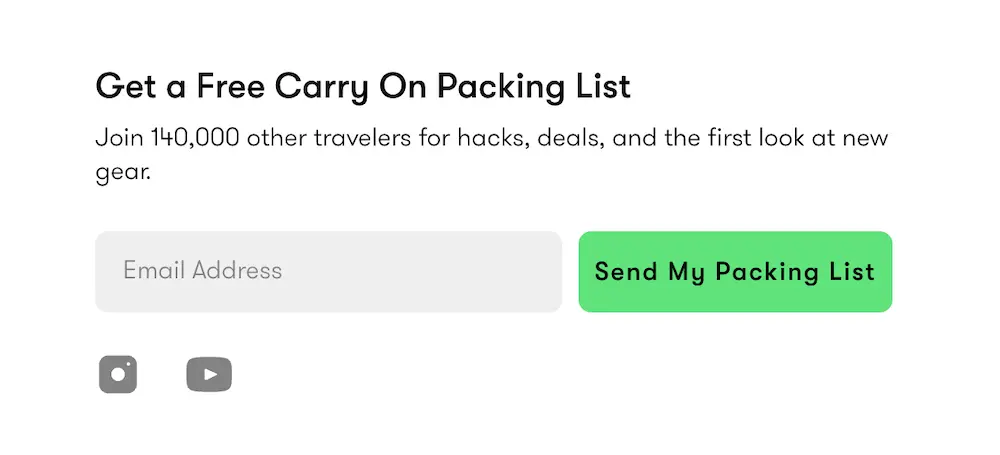
This is directly related to Tortuga’s products and shows off the brand’s travel expertise, which builds trust.
Tortuga CEO Fred Perrotta has written at length on not using discounts to encourage shoppers to buy something they don’t actually need, so this is a good alternative.
While it won’t prompt shoppers to buy now, you’ll be able to grow your relationship with subscribers and encourage them to become fans of your brand through content first.
The key to creating a successful content offer is to make something that shoppers could use with your product—like recipes for cookware or tutorials for makeup.
⚠️ Skip these incentives
A couple tactics we don't recommend:
- Spin-to-win campaigns: Spin-to-win campaigns offer a variety of incentives like discounts, free shipping, or free product. What the shopper ends up with is a surprise. That gamification factor tends to lead to higher engagement than other welcome offers, but the lead quality tends to be lower. Spin-to-wins also have a greater potential to frustrate customers if they don’t get the prize they wanted. And tech-savvy customers can fix the results in their favor, so you might give out more than you bargained for.
- Entry to a giveaway: Giving shoppers the chance to win a pricey product or bundle for free can earn you signups with less investment than a discount or gift with every order. But this incentive can draw in subscribers that have no intent in purchasing and just want free stuff.
Instead, choose an offer where everybody wins. And prioritize tactics that give shoppers a reward for purchasing so that you’re adding subscribers with purchase intent.
5. Craft an eye-catching headline
A strong headline is fundamental to attracting attention and driving more signups.
Use your headline to communicate your offer and show off your brand's personality like dog food brand A Pup Above does:
Don't try to communicate too much at once. You can add details like conditions for earning the incentive and benefits of joining in smaller text.
6. Highlight the benefits of joining your email & SMS lists
Shoppers might be hesitant to give out their email or phone number if they don't know how you're going to use it. So consider letting them know the perks that come with joining your list.
That could be something like:
- Content or tips relevant to your niche
- Exclusive access to offers and sales
- First to know about product launches
For example, Buoy’s subscribers can look forward to mocktail recipes from the wellness brand:
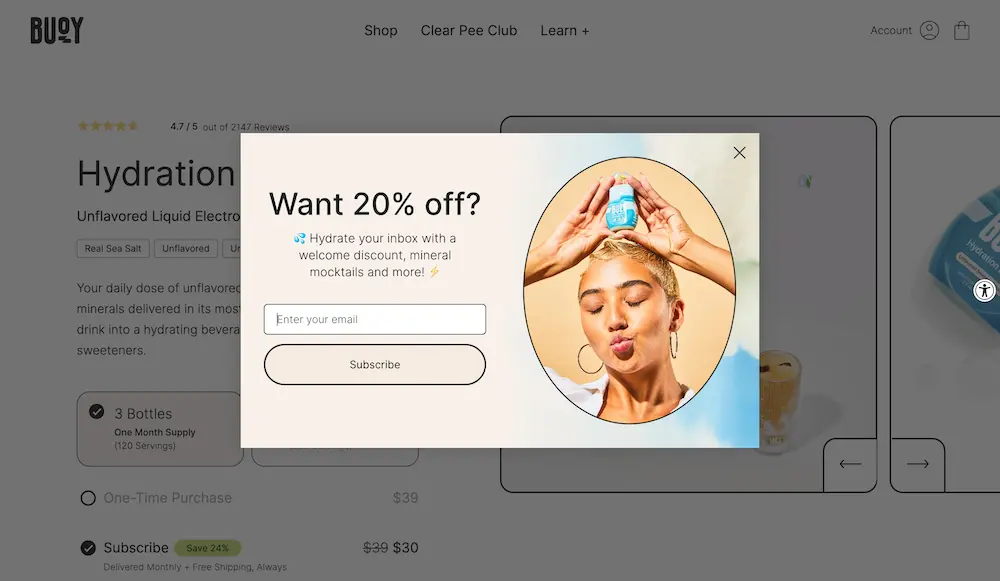
Differentiate the value of your email and SMS lists as well, so shoppers will see a benefit to being on both.
For instance, while your email list might receive sales announcements, your SMS subscribers will be the first to know—and may get exclusive sales events.
7. Design a compelling call-to-action button
Designing your button isn’t just about aesthetics—it’s about sparking action.
Make your campaign’s button compelling to click by using a contrasting color and clear, concise language.
Use your button's copy to communicate the value visitors will get by signing up, like Girlfriend Collective does with its "Get 25% Off" button:
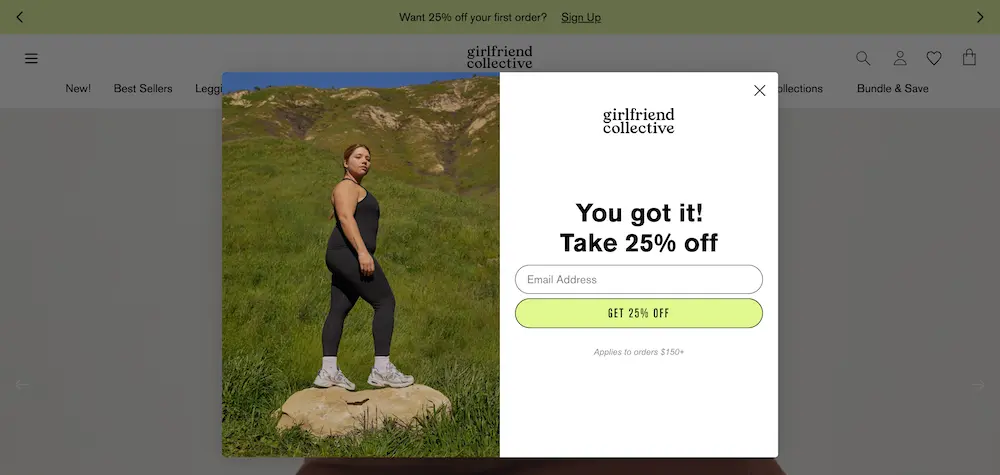
In most cases you’ll want just one button to keep shoppers focused on the action you want them to take.
8. Collect contact details over two steps
Asking for too much information all at once can create more resistance to filling out your opt-in form and reduce your signups.
So instead of asking for an email address and phone number at the same time, split your popup into two steps. Then if a shopper only completes the first step, you still have one contact detail to stay in touch.
Custom stuffed animal brand Cuddle Clones’ has a simple popup that offers a strong discount and collects an email and phone number over two steps:
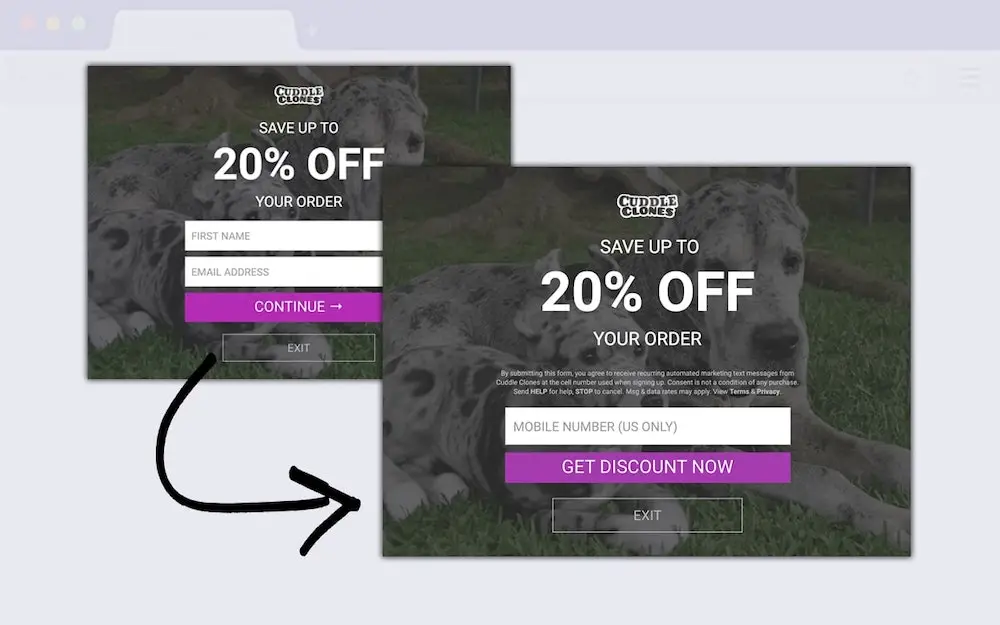
We recommend asking for an email address first to increase the chance of submission. A phone number is more personal, so shoppers could feel more resistant to giving it out.
👉 Read more: Cuddle Clones' popup, designed in ConvertFlow, earned the brand more than 150,000 email & SMS leads in 12 months.
9. Enable a two-tap floating button for your popup
A two-tap floating button is a small button that displays in the corner of the screen and teases your welcome offer.
You can show it to visitors when they close your popup without providing their contact information, like body care brand Curie does:
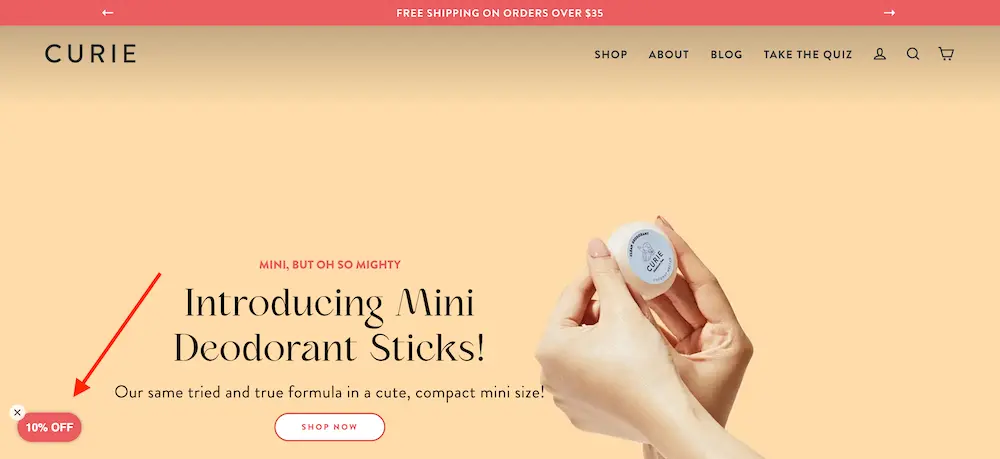
Then, when customers are ready to take advantage of your incentive, they can click the button to re-open your welcome popup:
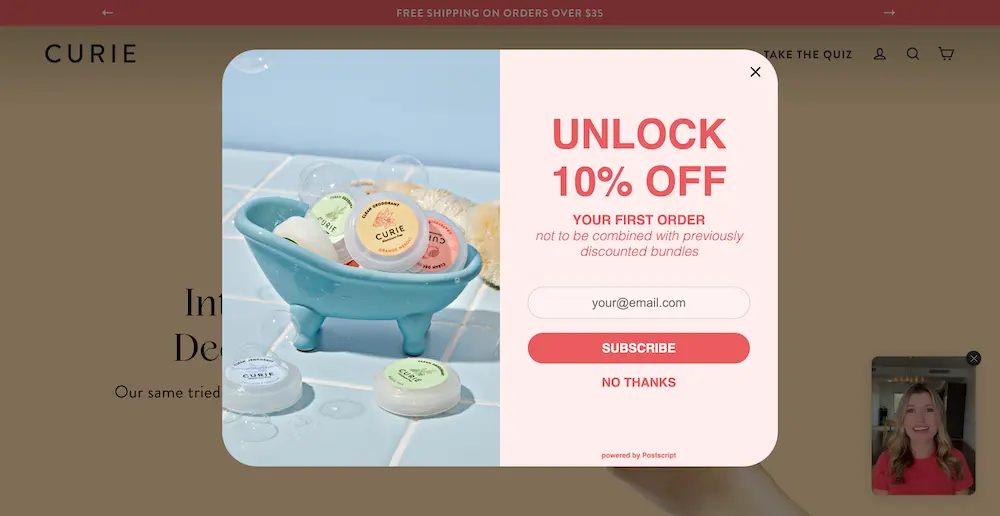
Usually the button will communicate the incentive in just a few characters, like "Free Gift" or "10% off."
10. Power personalization with extra fields that add value
Adding custom form fields can help you understand customers so you can personalize recommendations and make relevant offers.
But too many fields can deter shoppers from opting in.
So focus on one or two key things that will give you context into your subscribers that will help you earn that first purchase.
For your brand that might be learning about:
- What kinds of pets a shopper has
- Their skin type
- What gender products they’re interest in
- What home improvement project they're working on
- Etc.
Skincare brand Pipette asks shoppers who they’re shopping for:
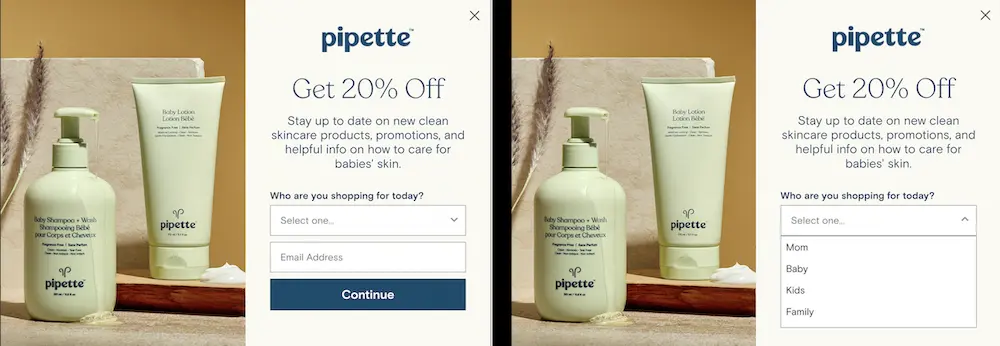
That allows the brand to send targeted content to engage subscribers with relevant products.
Avoid using this space for basic information (like the shopper's name) that isn’t geared toward earning that first purchase.
11. Add elements that drive signups
Consider trying these savvy tactics to boost opt-ins:
💡 Use a micro-yes to build up to the signup.
Starting with a micro-yes can amp up your popup’s performance.
In fact, Jacob Sappington, Director of Strategy at Homestead Studio, used the micro-yes concept to 2.75x the opt-in rates of a welcome campaign—without even changing the offer:
A micro-yes is something that's easy to say "yes" to that builds commitment toward a bigger ask.
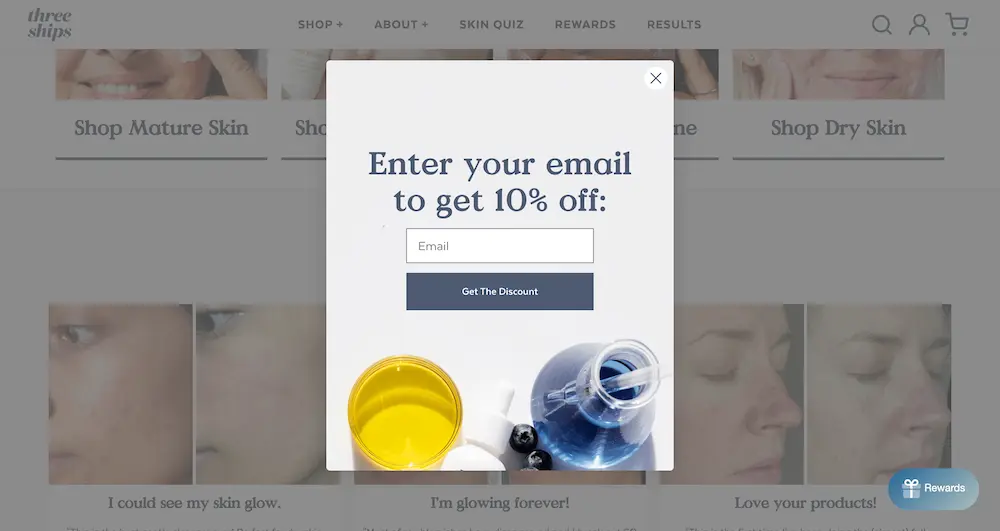
For example, Three Ships Beauty asks, "Would you like 10% off?"
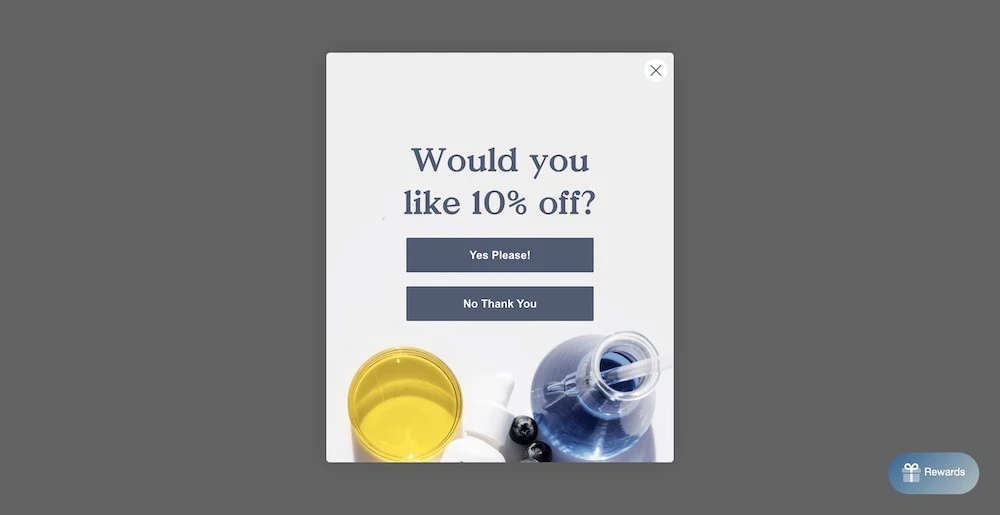
Then asks for their email in the next step:
Based on psychology, a micro-yes prevents cognitive dissonance by gradually leading to a question with more commitment instead of asking for too much up front.
In the context of a welcome offer campaign, this involves asking a simple question that’s an obvious “yes” before asking for contact information. Like, “Do you want 15% off your first order?”
💡 Stir up FOMO with a countdown timer.
Add a timer to your welcome campaign to make your offer available for a limited time like dental care brand Snow does:
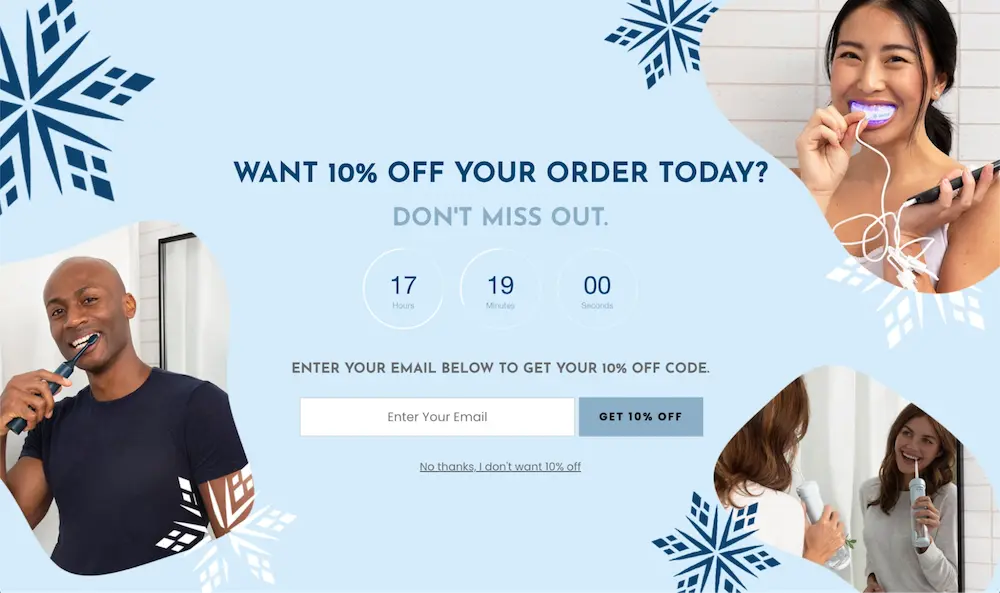
This can urge shoppers to act fast so they don't miss out on a good deal. But we recommend only using timers when they’re tied to a real deadline—like the expiration of a special sale or offer.
Otherwise, if you fake a deadline, shoppers will lose trust in your brand and the timer won’t mean anything. They’ll realize they can just open a browser tab in incognito mode to get your offer on their own terms.
<advanced-tactics>Advanced tactics to take your welcome campaigns to the next level<advanced-tactics>
The tactics you’ve learned so far will help you create a high-converting welcome campaign. But there are a couple additional techniques you can deploy to magnify opt-ins and first purchases even further.
Advanced tactic #1: Personalize your campaign based on context
Personalizing your campaign can take performance to new heights.
In fact according to McKinsey, 76% of consumers are more likely to purchase from brands that personalize their experience. And 78% are likely to repurchase from and recommend those brands.
So consider how you might personalize your campaign based on the shopper’s context.
For example, you can personalize your welcome campaign based on:
💡 Webpage
You could develop different iterations of your campaign depending on the page a shopper is visiting.
For example, if a shopper is on a product page for a crockpot, you could adjust the copy to say something like, "Save 20% on this crockpot."
You could even visualize the savings on that product by showing the dollar amount saved. That makes the offer more relevant and tangible to the shopper.
We recently grew opt-ins by 235% for Valyou Furniture using a collection-specific popup:
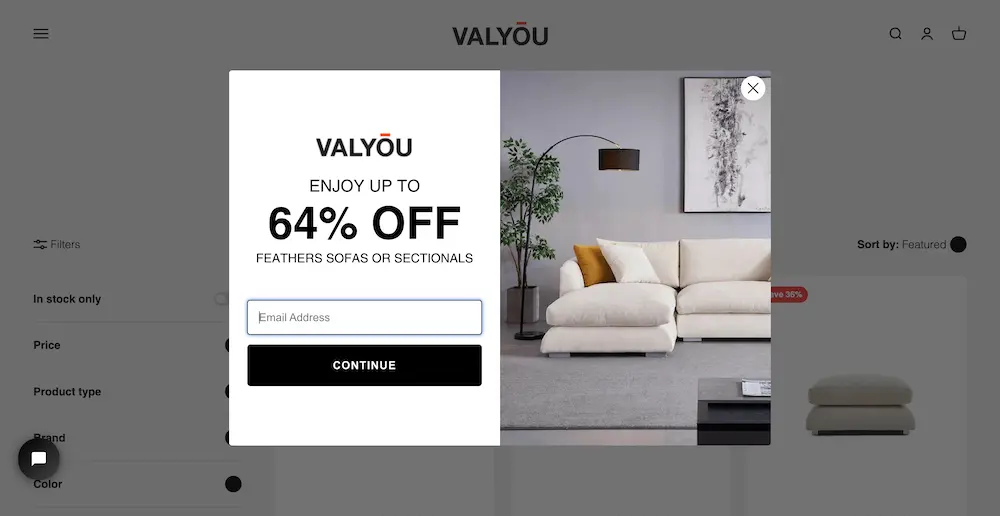
This popup appears when a shopper is on Valyou’s Feathers collection in place of their generic home page popup.
Learn how we ran this strategy:
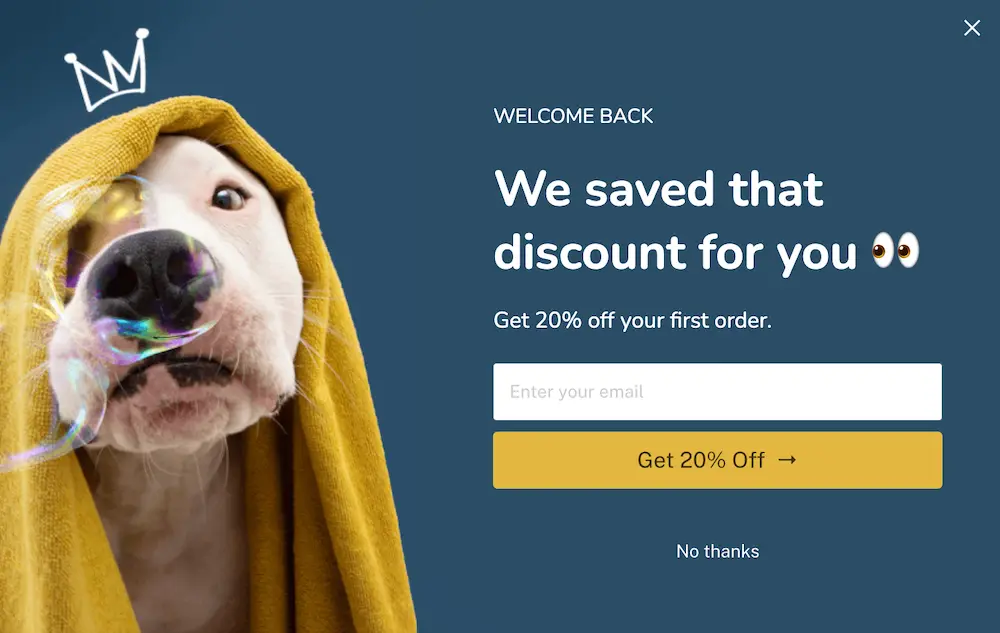
💡 Visitor status
If this is the first time a shopper is coming to your website, your standard popup will work. But what if they’ve visited your website (and closed out your popup) before?
Or what if they’ve shopped with your brand without signing up to your subscriber list?
You can make variations of your welcome popup for these folks that speak to their relationship to your brand.
For example, for returning site visitors, you could say something like, “We saved that discount for you.”
And for existing customers who aren’t on your email list, you could say something like, “Welcome back! Want a discount on your next purchase?”
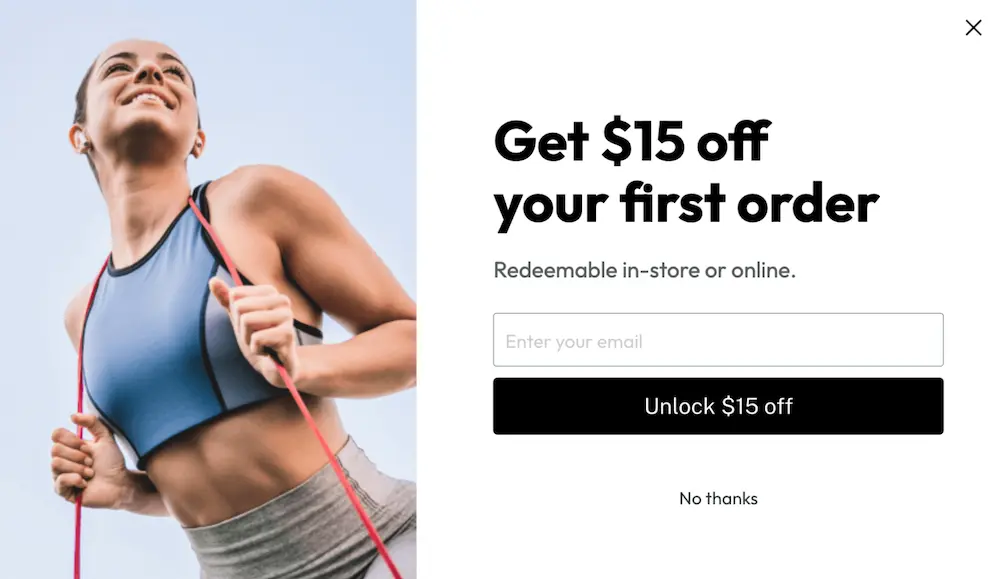
💡 Geolocation
You can use a customer’s location to make your offer, copy, or imagery more relevant.
For example, say you have retail locations. For customers within driving distance of a store, you might add copy to your campaign that says, “Redeemable in-store or online.”
Or say you sell outdoor gear. For someone in a cold climate, you might show imagery of a person bundled up in the snow. And for someone in a warm climate, you could show someone hiking on a sunny day.
💡 Referrer
Consider customizing your welcome campaign to reflect how a shopper discovered your brand—for example via an ad, affiliate, organic search, etc.
For example, let's say you're running a sponsorship with a podcaster named Morgan and are guiding podcast listeners to a specific landing page on your website.
For those shoppers, you could consider surfacing a welcome popup that says something like, "20% off Morgan’s favorites:"
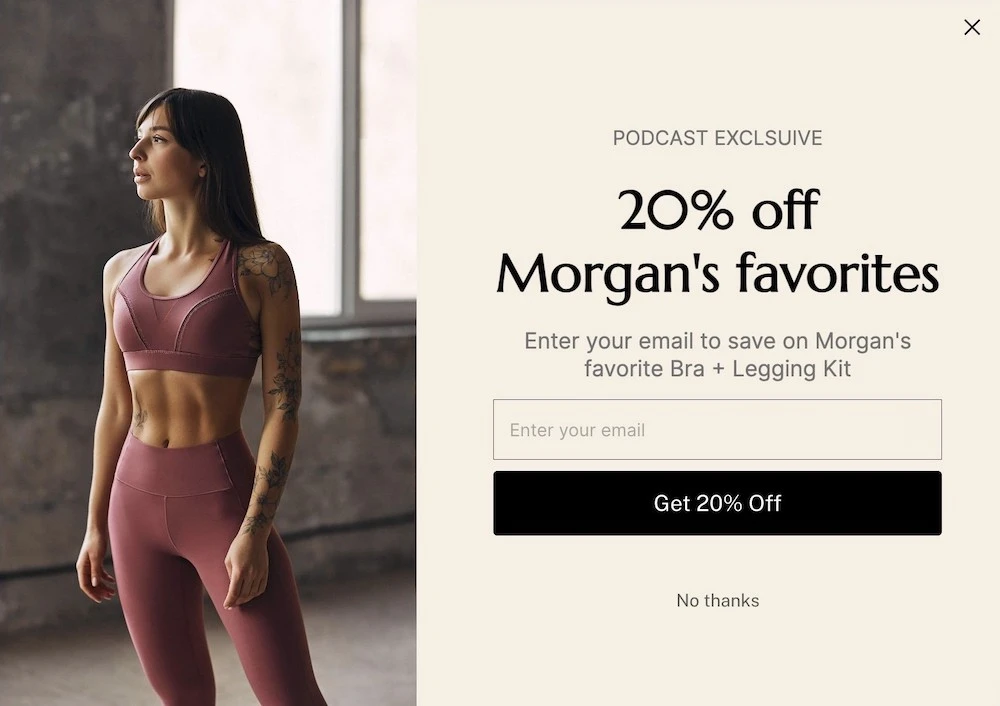
Remember: Off-site marketing campaigns all ideally lead to landing pages with specific CTAs you’re optimizing for. So adjust your popup’s format to be less intrusive or trigger it to appear later.
Advanced tactic #2: Guide shoppers to the next step in the customer journey
Many brands leave shoppers hanging after submitting their contact info. So they're left to browse your site with no guidance. They might get overwhelmed by the options and leave without making a purchase.
Instead, guide the shopping journey by connecting the last step of your welcome offer campaign to another campaign to help customers find products they love without getting lost on your website.
That could be a:
- Product recommendation quiz
- Collection of your bestsellers
- Welcome kit that bundles together the most common items a new customer buys
Snyder Furniture includes a brief survey question as the last step of its welcome popup:

Each button takes customers to a collection page for furniture for that specific room so they can start shopping.
We recommend including a product recommendation quiz for most brands. It'll help shoppers navigate your product catalog based on their needs and interests and give you valuable information for personalization.
👉🏾 No quiz yet? When you're done building your welcome campaigns, head over to the product quiz playbook for guidance to build your quiz.
<build>Build your welcome offer campaign in ConvertFlow<build>
Now that you’ve laid out your blueprint, you’re ready to create your welcome campaigns 🤩
While the built-in signup form tool in your email & SMS software has some basic functionality, you'll need a third-party tool for functionality like:
- Advanced targeting
- Elements like timers and progress bars
- Syncing products from your Shopify store
- Connecting seamlessly to other on-site campaigns
- Other campaign formats like landing pages or sticky bars
By using one tool for all your website campaigns, you can build a cohesive funnel that converts shoppers better.
And it's easier to manage and monitor your campaigns from a single dashboard.
That's where ConvertFlow comes in.
ConvertFlow is an all-in-one funnel builder for ecommerce stores that are ready to scale their growth and improve their ROAS.
Create your popups, quizzes, landing pages, forms, and more at a fraction of the cost of individual tools. No need to know how to code.
Let's start by building your first welcome popup together. For this demo, we’ll pretend to be a fitness apparel brand.
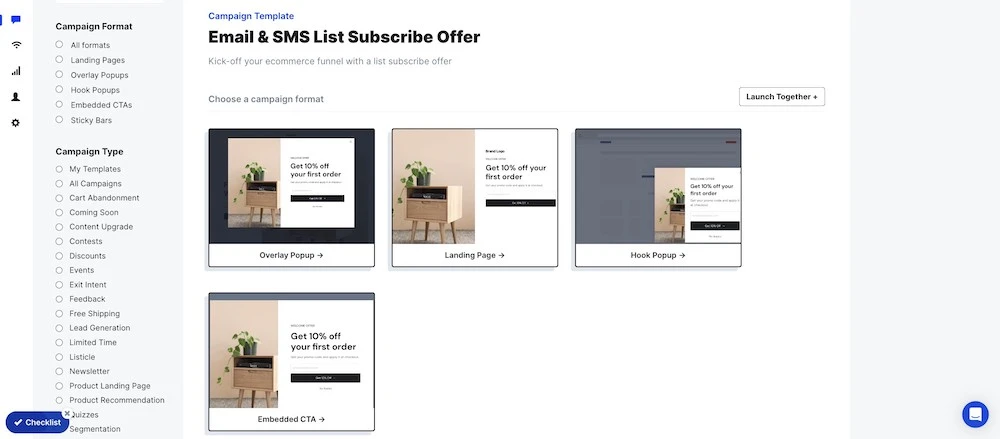
Step 1: Choose a template for your popup
ConvertFlow has dozens of preset welcome offer templates for different goals and verticals to make building your popup easy. Browse the popup template library to find a design that you like.
Here are a few to get started with:
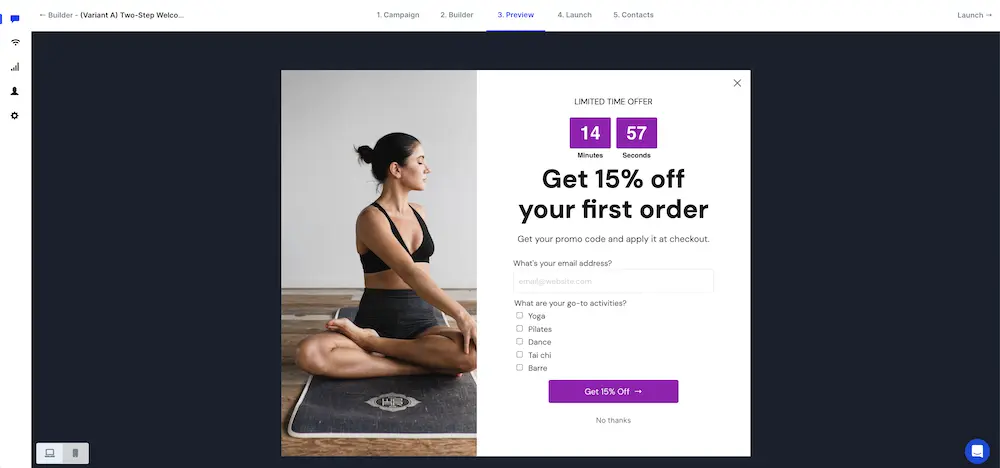
We'll use this simple welcome offer popup as an example:
It has the two essential steps to collect an email address and phone number. And the final step connects to a quiz to continue the customer journey.
Whatever template you choose will be easy to customize so you can apply the tactics you’ve identified for your strategy.
Step 2: Select your welcome offer's format
Depending on the template you choose, you may have different campaign formats to choose from, like:
- Landing page
- Overlay popup
- Hook popup
- Embedded CTA.
Pick the right style for your campaign.
For now, we'll choose an overlay popup.
Step 3: Customize your popup's theme
Once you've chosen your format, you'll be taken to ConvertFlow's drag-and-drop funnel builder:
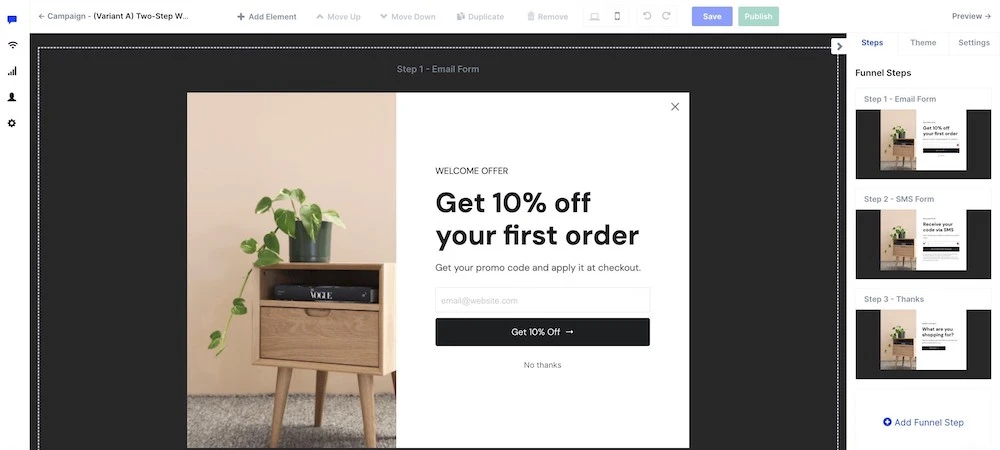
Here, you can edit everything about your template including:
- Images
- Copy
- Forms
- Additional elements like timers and products
Let's kick things off by updating your popup’s aesthetic design.
In ConvertFlow, you can change your popup's design in two ways:
- At the theme level: This will set your popup's style across your campaign, including any new elements you add
- At the element level: This overrides theme-level settings for more customization
We recommend starting at the theme level, then changing individual elements as needed.
To set your welcome popup's theme, click the "Theme" tab in the right-side panel:
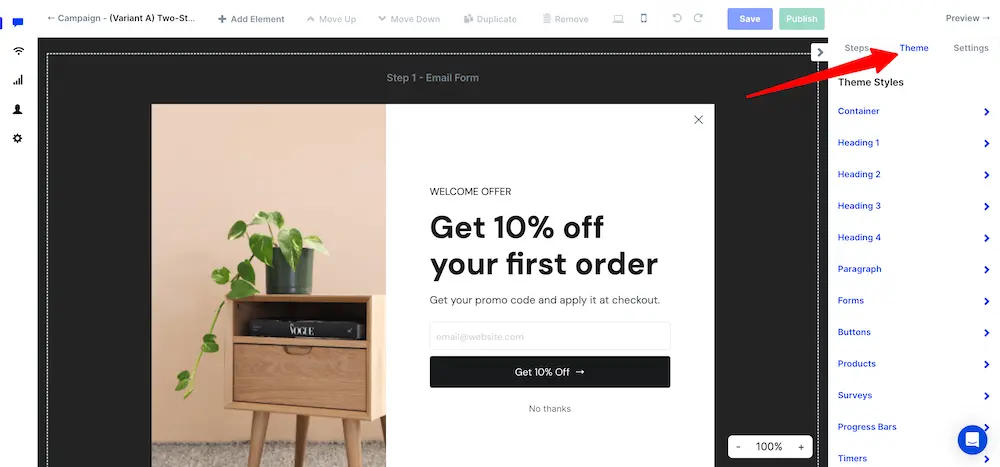
Here you'll see a full list of element types that you can set the design for.
For our popup, we'll update the button colors to match our brand by expanding the “Buttons” theme category and choosing a button color:
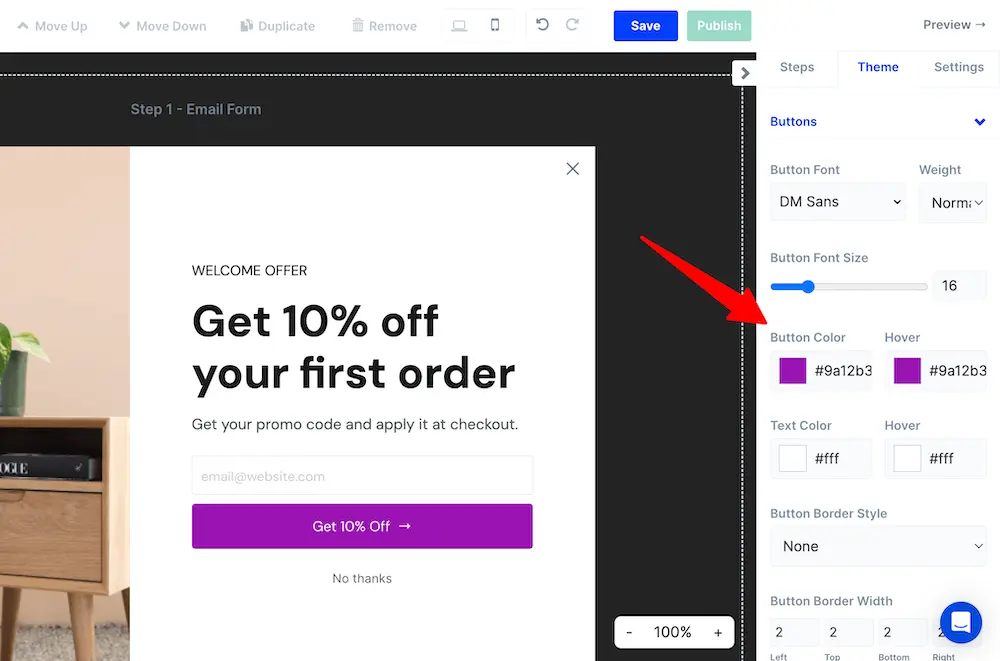
You'll notice this updates the buttons’ colors in each step of our campaign, making it easy to set the design.
Continue updating each theme element to match your brand's style including fonts, colors, and text sizes.
If there are elements you don't think you'll use, no need to edit the theme for those. But if you add an element later, come back to the theme tab to update its design.
Step 4: Edit your popup's copy
Now that your theme is set, update your welcome offer popup’s content.
Start with your copy. That includes your:
- Offer
- Headline
- Benefits of joining
To update an element in the builder, click on the one you want to edit. The side panel will show you the options you can control for that element:
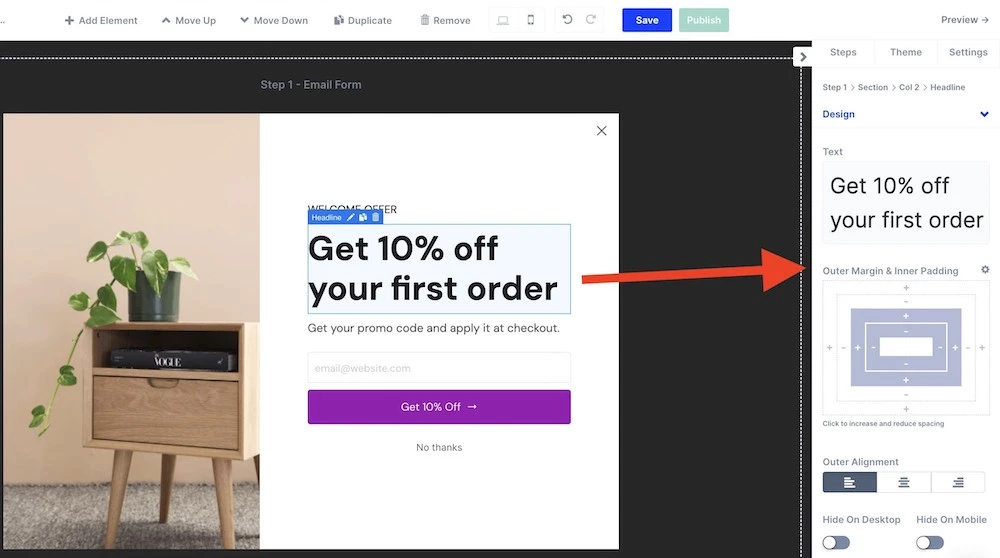
We'll update our header with a 15% discount and adjust the copy, then the button's text to match:

Step 5: Add additional elements to your design
You can add other elements to your campaign by clicking "Add element" at the top of the builder and dragging your desired design element into place:
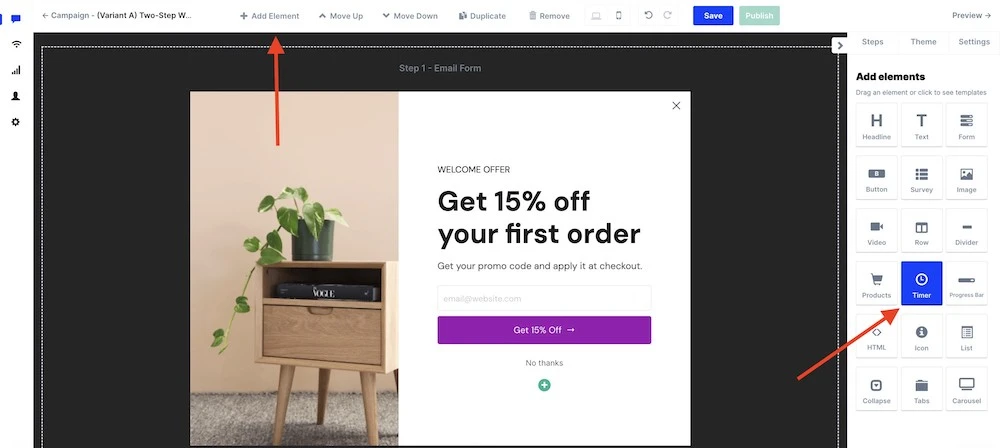
We'll add a Timer element to create some FOMO for our campaign and click the text elements to center them with the timer:

Step 6: Replace images with on-brand assets
If you’ve picked an industry-themed template or one without an image, you might not need to update your image at all. But the template we chose has a picture of furniture and we’re an athletic apparel brand. So let’s change that image.
This is a background image rather than a separate element. That enables you to place text and other elements on top of it if you like.
To edit the background image, click “Theme”, then “Container”. Click the “Upload Image” button to choose your background image:

Here you can use your own images or use the Unsplash integration to search for stock images right in ConvertFlow.
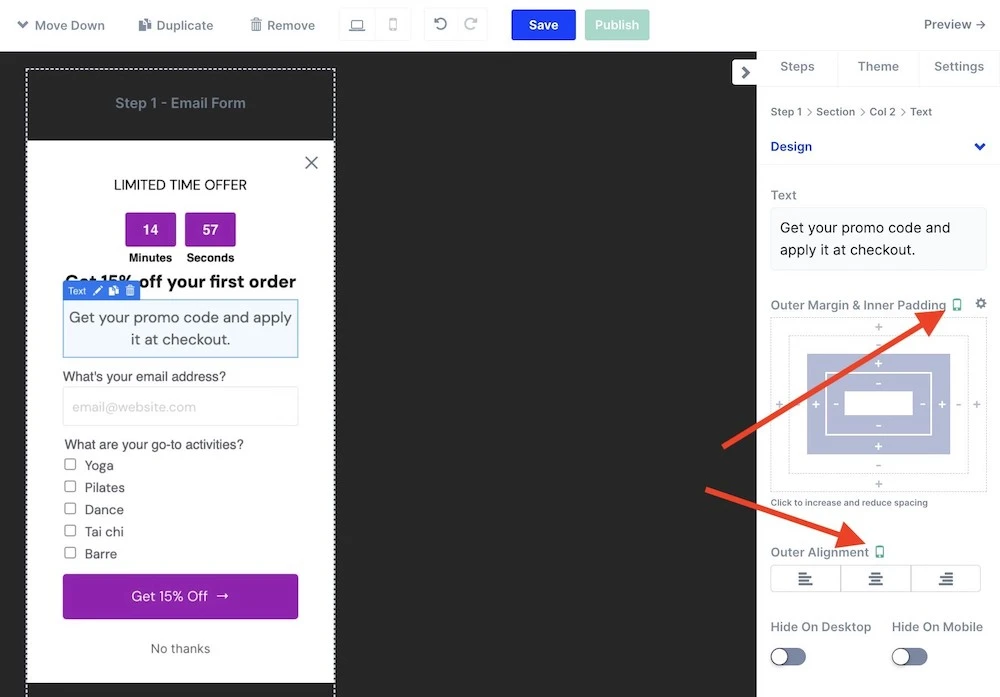
Step 7: Customize your form fields
If you’ve identified one or two pieces of data that will be helpful to collect on customers, let’s add that to our form now.
Click on the form element in the builder. You’ll see several predefined fields you can toggle on and off.
You can also add a new field by clicking “Add Field.”
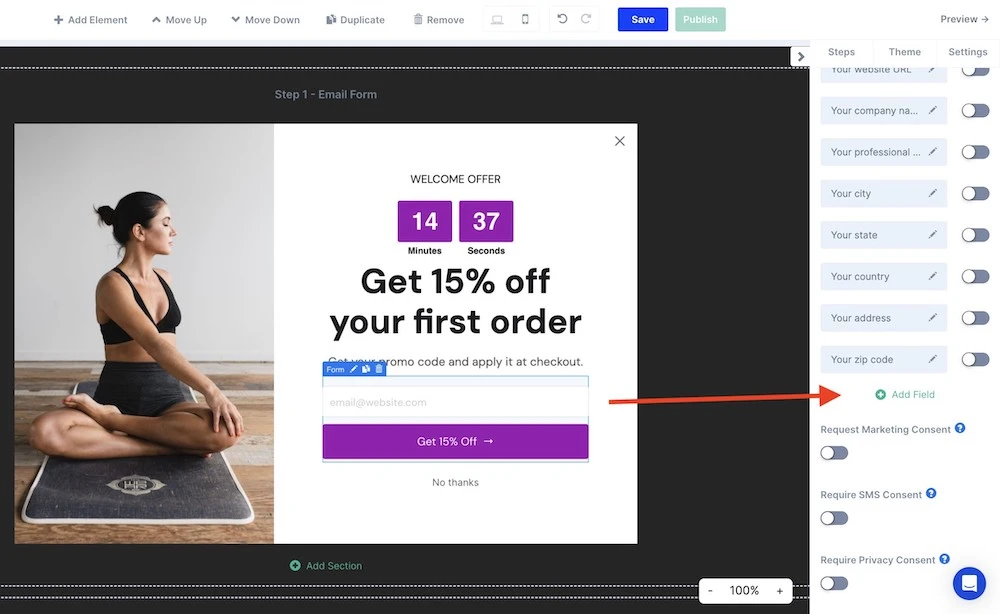
A new form field will appear in the list of fields. Click the pencil icon to edit it.
In the modal that appears, under “Map to Custom Field,” select “New Field Name +.”
Add a descriptive name for your field for the back end:
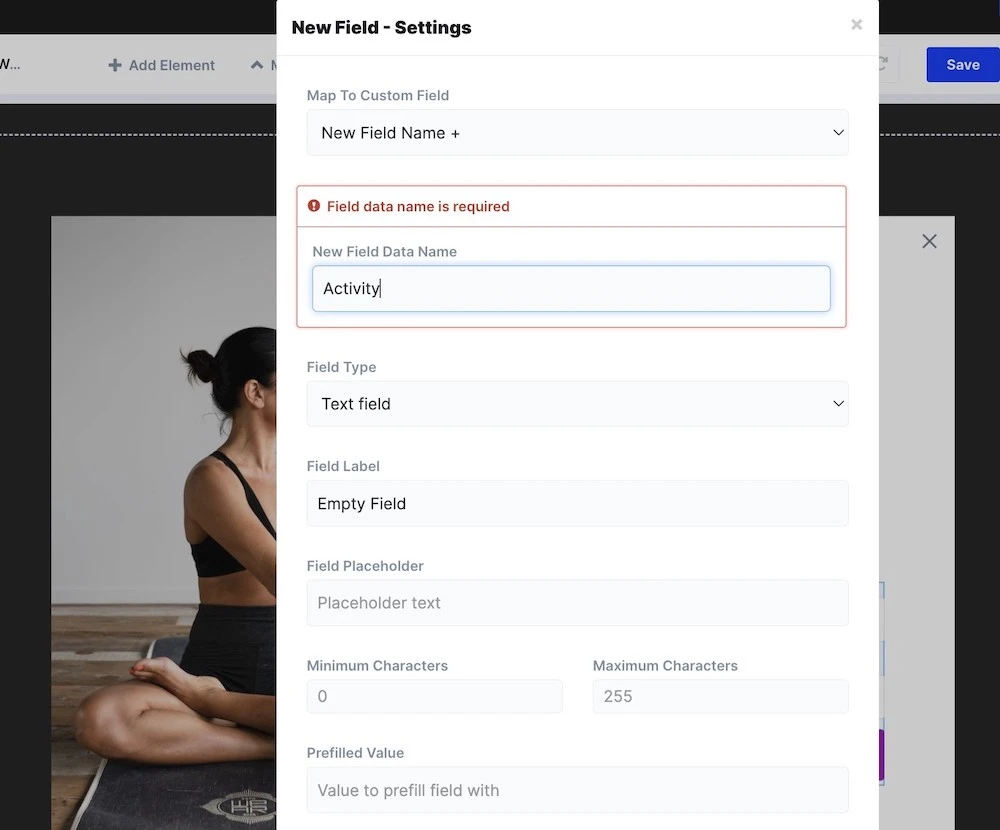
Then define your:
- Field Type: The format of your field (e.g., text field, dropdown, checkbox, etc.)
- Field Label: To caption the field for site visitors
- Field Placeholder: The content a shopper will see in the form field (e.g. an example of the format you’re looking for or a descriptor)
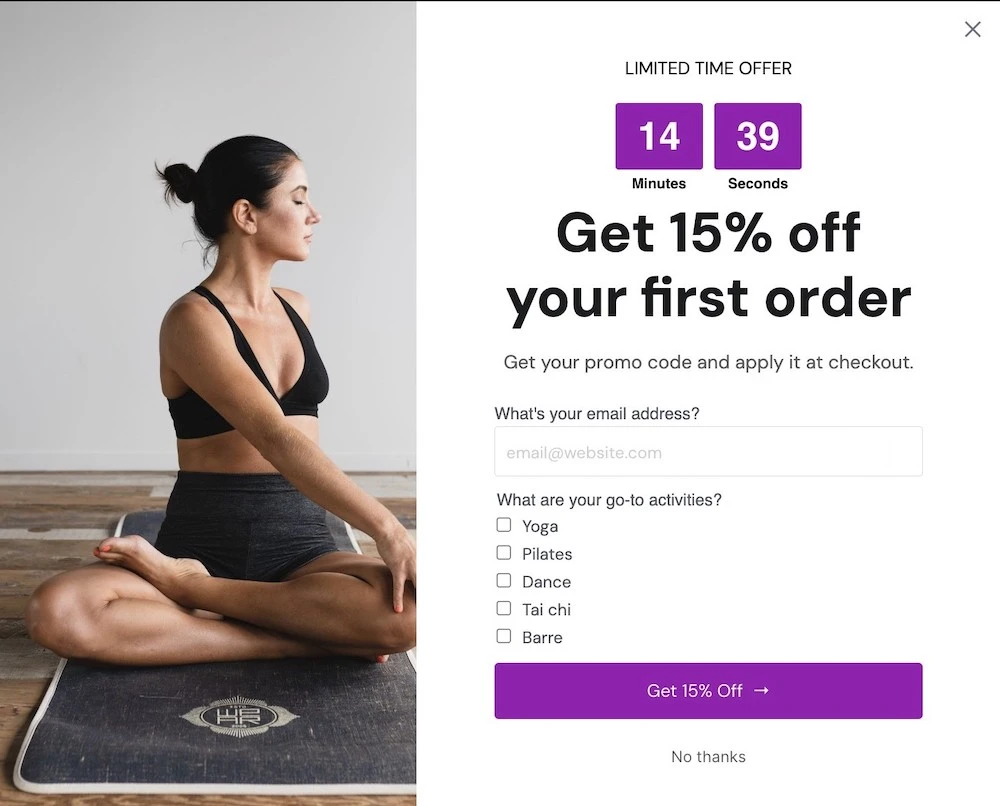
We want to know how our subscribers like to be active so we can recommend the right apparel for them. So the settings for our new field will look like this:
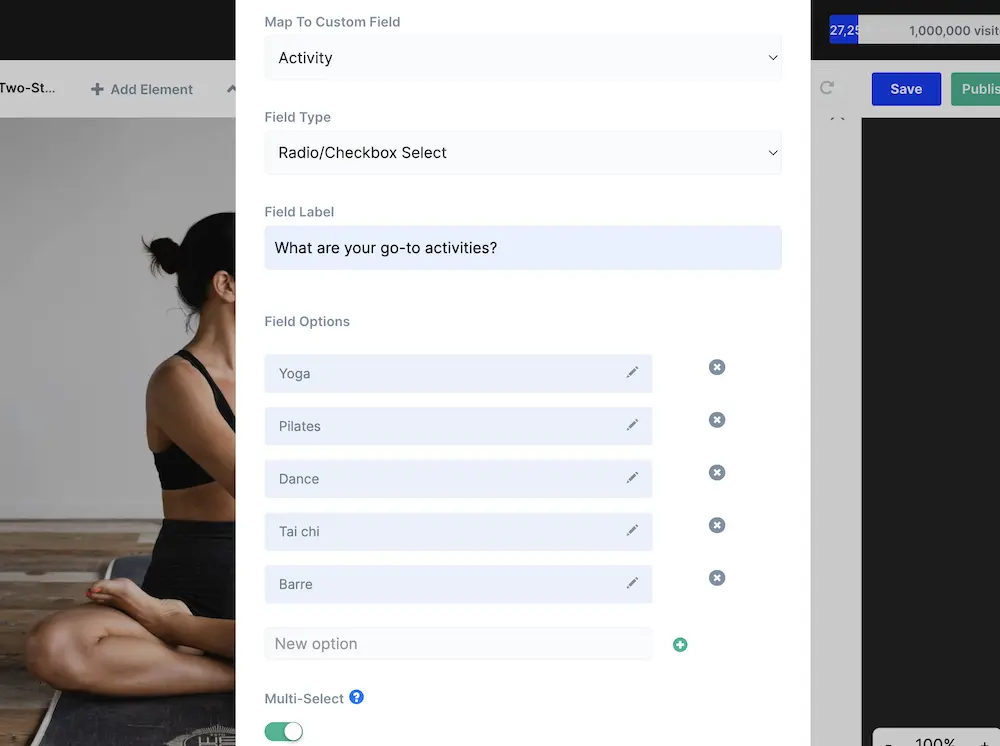
Click “Done” to save your new field.
Since our new question has a label, we’ll add a label to our email form field, too. To add one, just click the pencil icon next to the email field and title it under Field Label.
Our new form looks like this:
Step 8: Enable the SMS consent field
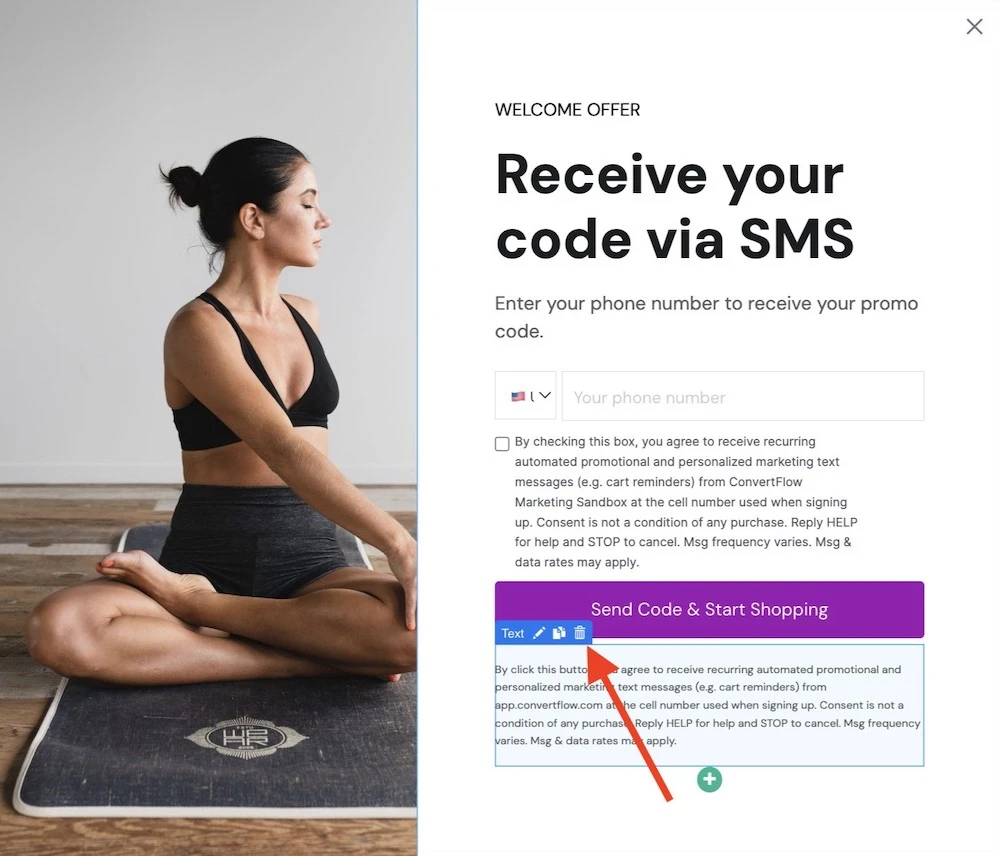
The Telephone Consumer Protection Act (TCPA) requires marketers to obtain explicit consent before sending any marketing messages via text.
So enable the SMS consent field.
In the second step of your popup, click the form field. Then toggle the “Require SMS consent” switch:
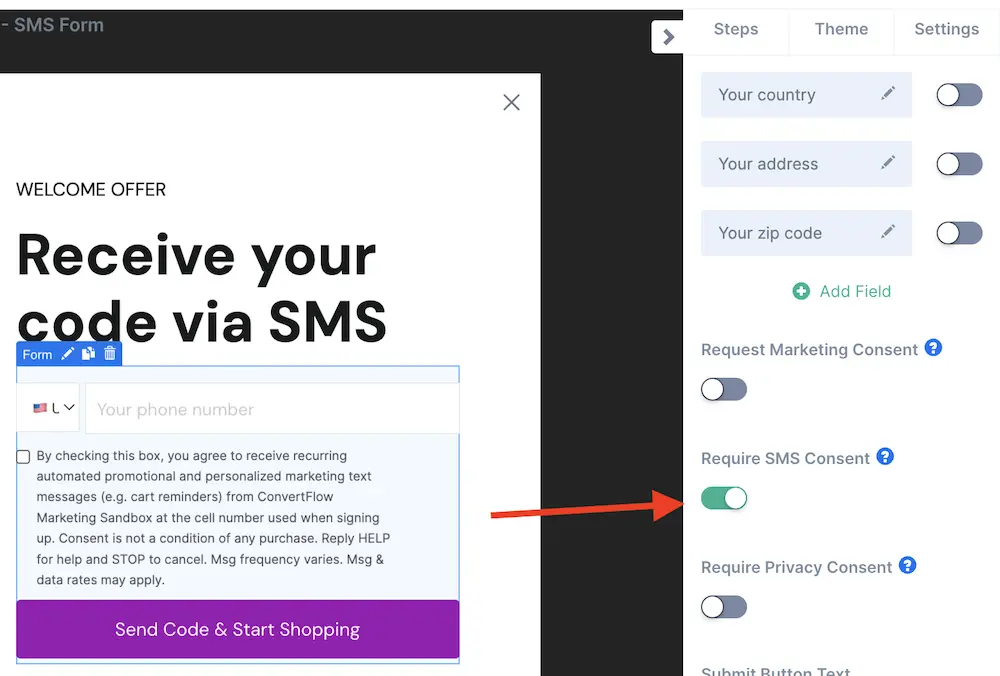
This is more explicit consent than the text at the bottom and will be logged in our SMS software. So we can delete the paragraph at the bottom by hovering over it and clicking the trash icon:
Step 9: Connect your email & SMS software to ConvertFlow
Now, connect your email marketing and SMS tools so you can pass on subscriber information to your database.
We'll use Klaviyo as an example, but the process will be similar no matter which software you use.
To connect the software, select the form element in the first step. Click "Manage Actions" in the side panel:
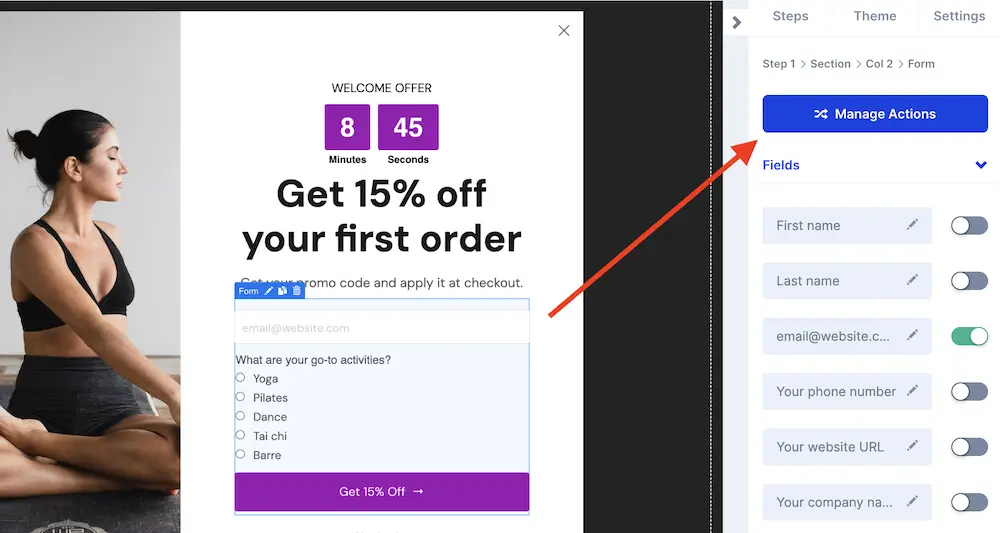
Then, click "Manage Integrations" and find Klaviyo in the integrations menu:

Click "Connect" and follow the on-screen instructions to complete the integration.
<map-fields>Step 10: Map form fields to your email & SMS software<map-fields>
Now, with your email & SMS tool connected, you can link the form fields in your popup to your software. Then your form submissions will create customer profiles with contact details that you can market to.
We’ll use Klaviyo again, but you can find specific instructions for other integrations in our help docs.
After connecting your software, you'll be brought back to the "Manage Actions" window. Click "Add automation:"
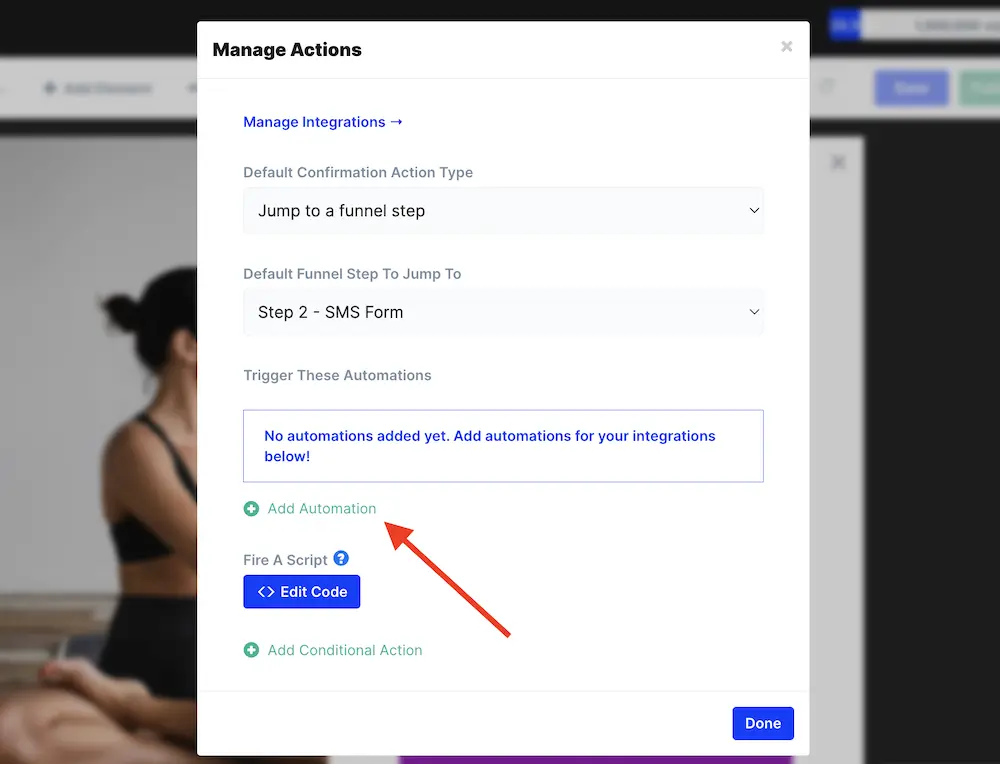
Select your automation type.
In this case, we want to add subscribers to a list in Klaviyo. So we'll select "Klaviyo - Add to list."
Then, choose the Klaviyo list you want to add subscribers to from the Lists dropdown menu:
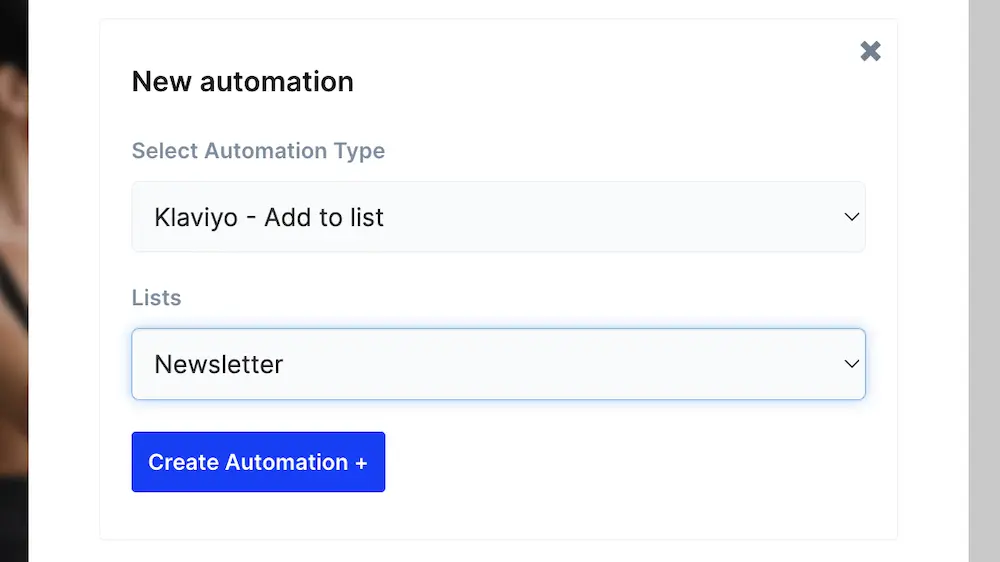
Click "Create Automation."
Now all new subscribers will automatically be added to your Klaviyo list, along with responses to any form fields you added. 🤩
Repeat this process for the SMS form in the second step of the popup, choosing the right list for SMS subscribers.
Step 11: Customize the final step in your welcome popup
The last step in the popup template we chose prompts shoppers to take a quiz. This is a great tactic to continue guiding your customers' experience and help them find relevant products.
But you can make this last step anything you want. You can connect that final step to a specific product collection or prompt shoppers to learn more about a welcome kit.
Or, you can remove the button and make the last step a simple confirmation message.
We'll connect our final step to our quiz for maximum personalization 🔥
Start by updating the last step’s copy:
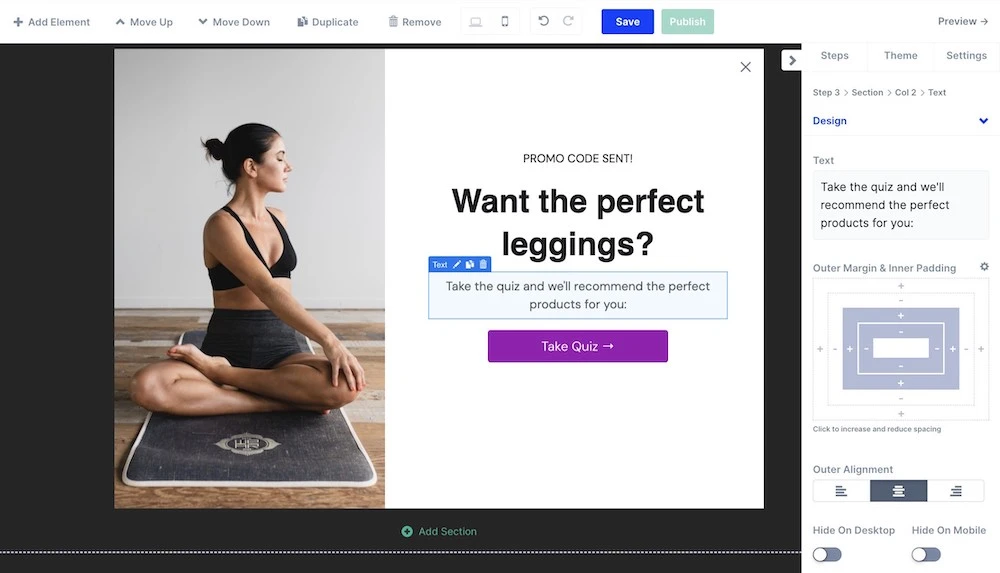
Now we'll link to the existing quiz we have in ConvertFlow.
Whatever CTA you choose, you’ll then define where shoppers go when they click the button.
So select the button from within the builder. Click "Manage Actions" and then set your button actions in the modal that appears on the screen.
For a quiz, we'll set the Default Confirmation Action Type as "Redirect to a URL" and add the quiz's link:
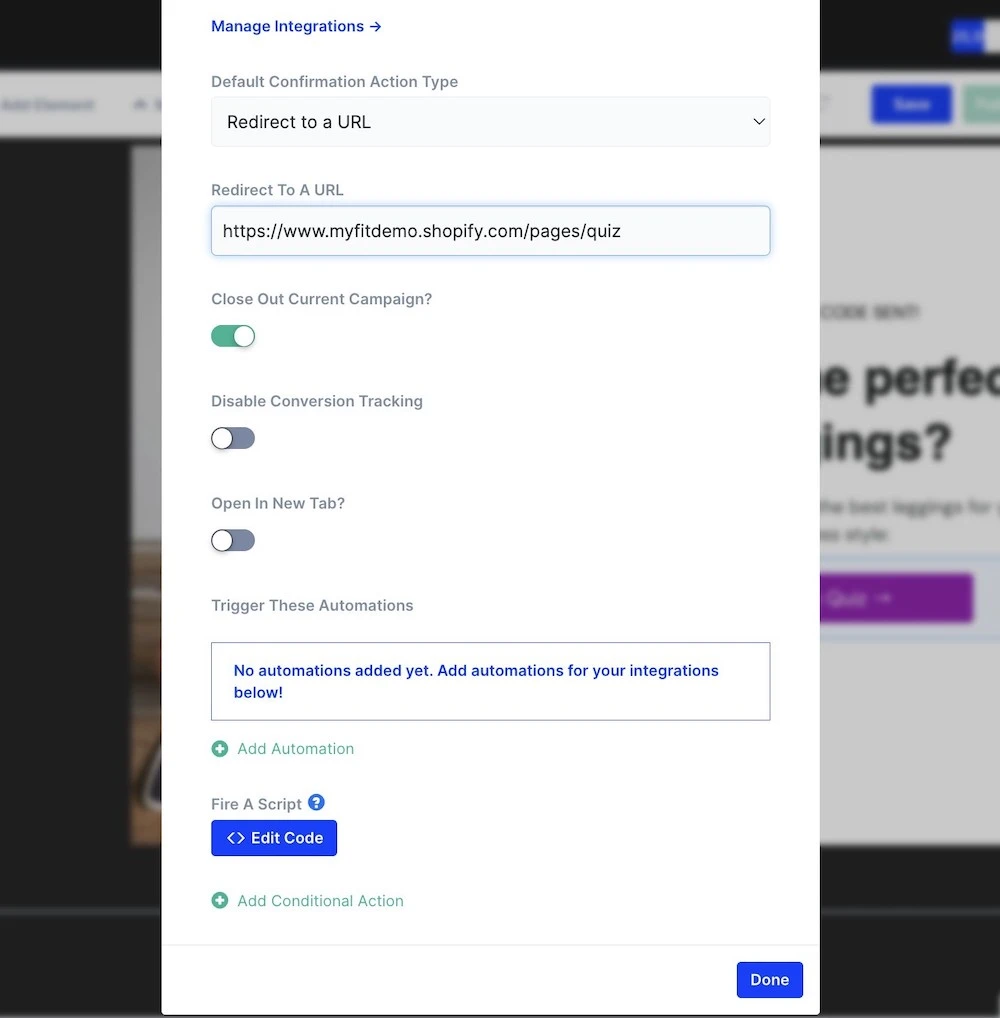
Then, click "Done" to save your settings.
Step 12: Set your popup's trigger
Your popup's trigger determines when it appears to site visitors.
Click "Settings" in the right side panel to find the trigger settings:
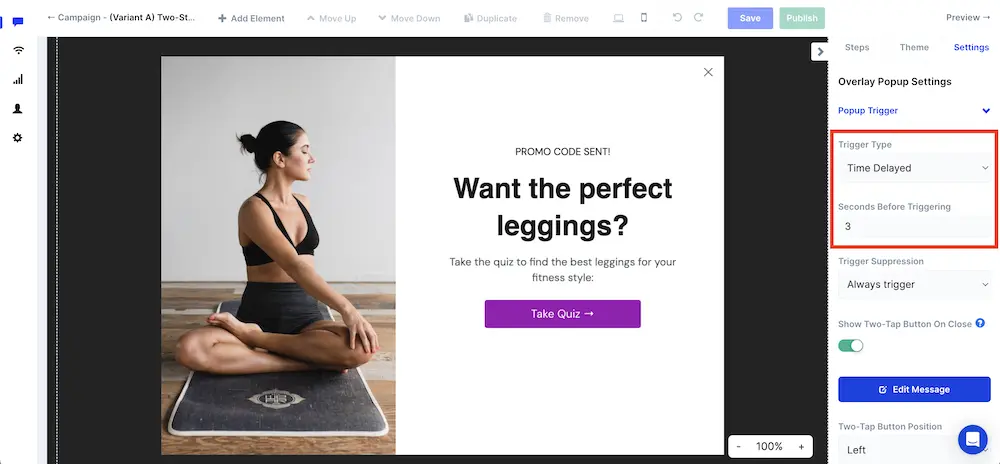
In ConvertFlow, you can set your popup to appear on:
- Exit-intent: When a customer shows intent to leave your website
- Scroll point: When they have scrolled to a certain percentage of the web page
- Time delayed: After a set number of seconds from when the visitor has arrived
- Upon click only: When the shopper clicks a button
- On-site message: When a customer clicks a small message in the corner of the screen
- Two-tap floating button: When they click a small button in the corner of the screen
- Add to cart: When a customer adds a product to their cart (Shopify only)
Set your trigger as you determined when you set your welcome offer strategy earlier.
Step 13: Define your popup's trigger suppression settings
And let's modify the trigger suppression settings to keep the popup from showing again too soon after the shopper has closed it:
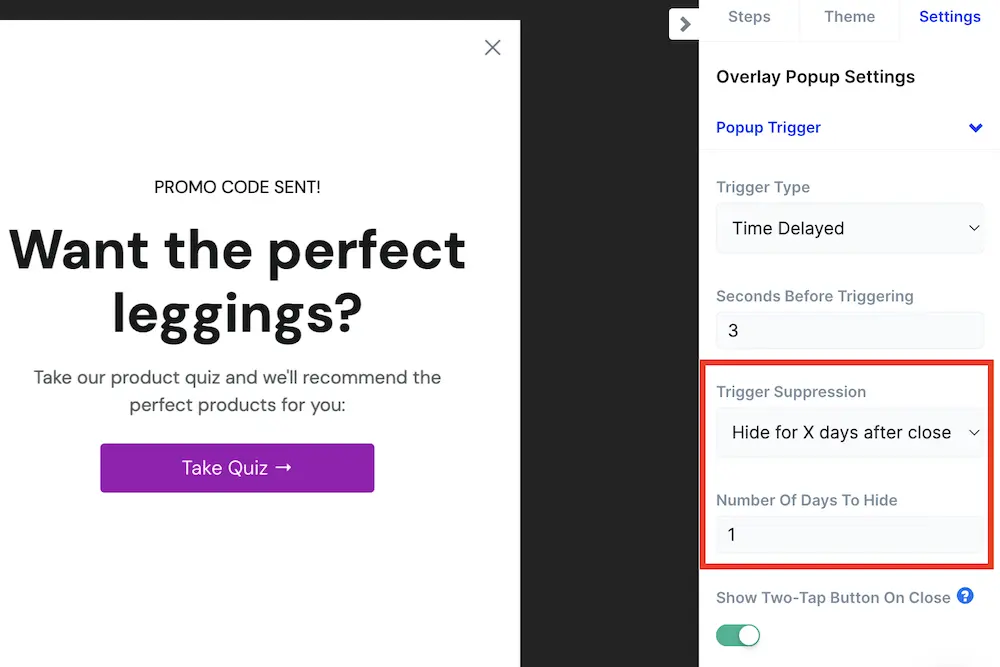
You can hide it for a number of minutes or days after it's been closed. Showing it too soon after it's been closed can annoy shoppers. So we recommend suppressing it for at least one day.
Set up your two-tap floating button here, too, so that shoppers can still access your offer if they close the popup.
Toggle the switch under suppression settings and choose your button’s position:
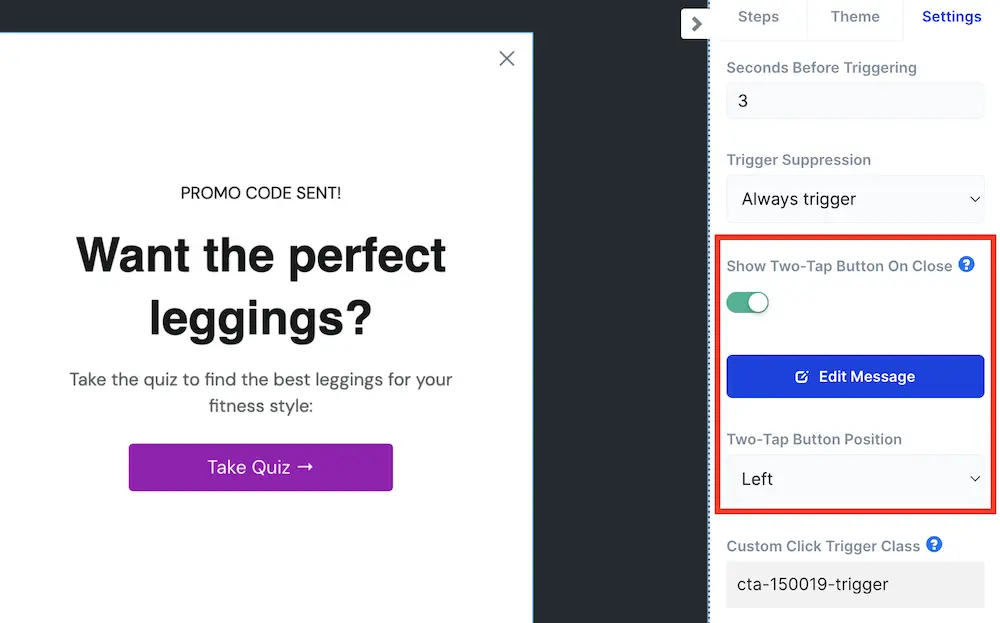
Click "Edit Message" to customize the button.
Update your button’s style and adjust the message to reflect your offer:
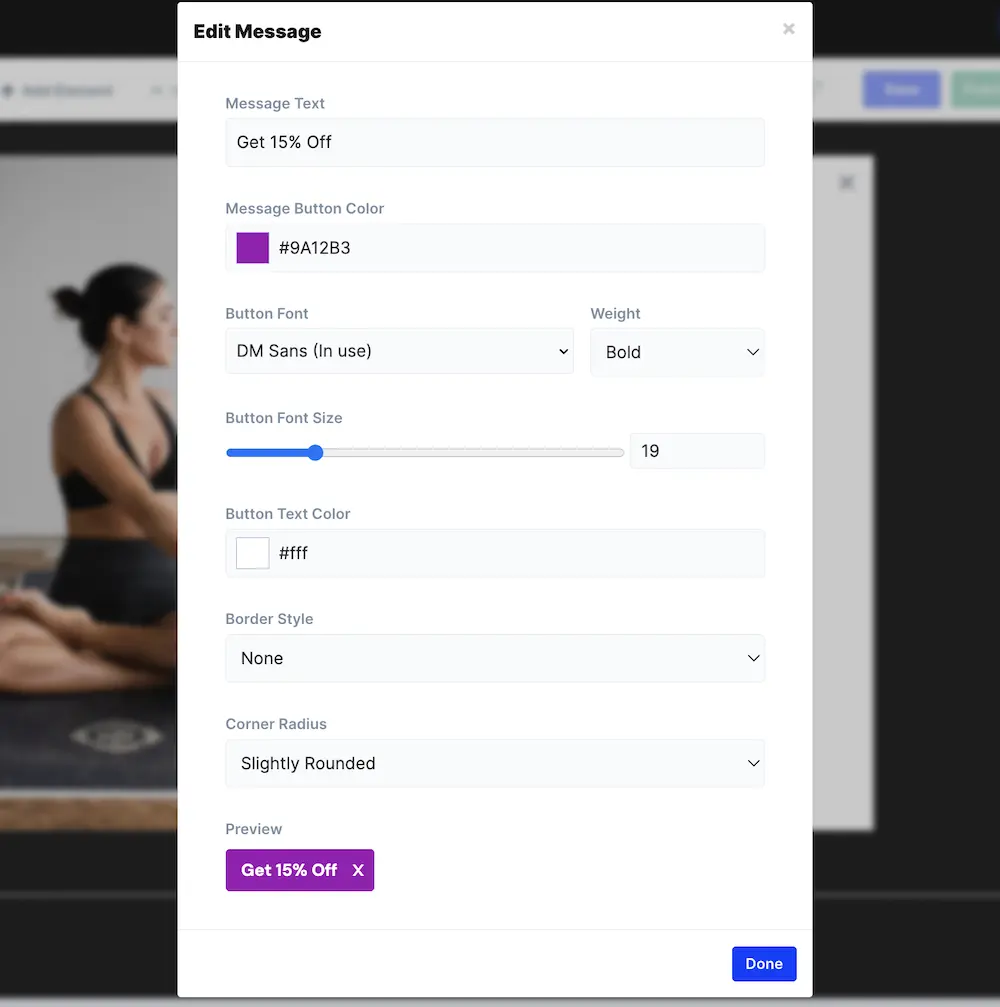
Click “Done.”
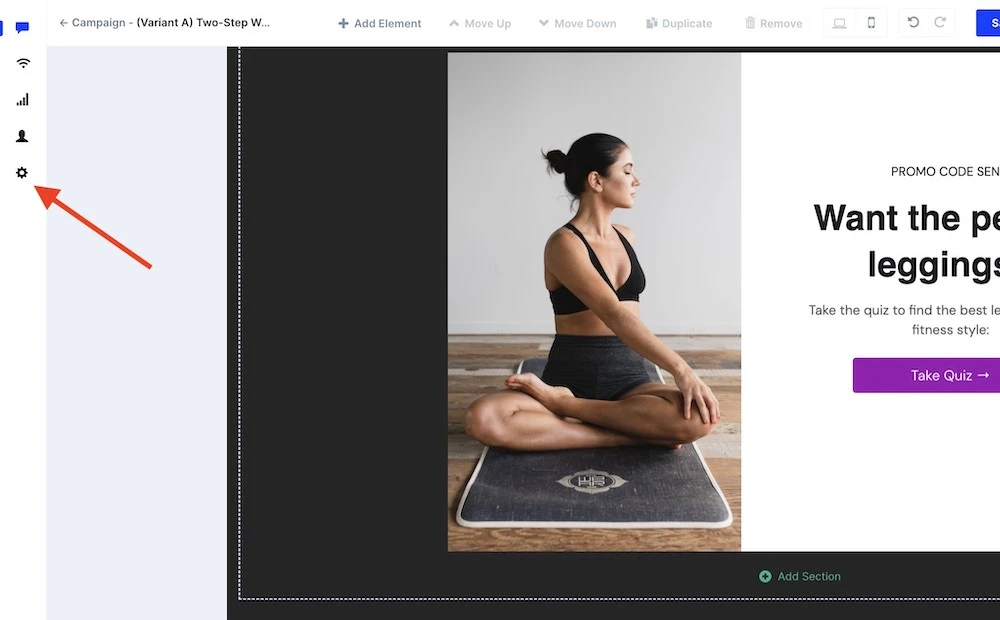
Step 14: Connect Shopify to ConvertFlow
To display your welcome popup on your website, you'll want to integrate your ecommerce store. We'll assume you're on Shopify.
Bonus: By integrating Shopify, you'll also be able to pull in product and customer information for personalization. 🤓
Start by saving your campaign.
Then, install the ConvertFlow app on your Shopify store by clicking the Settings icon represented by a gear on the left side of the screen:
Select “Integrations,” then find Shopify and click "Connect:"
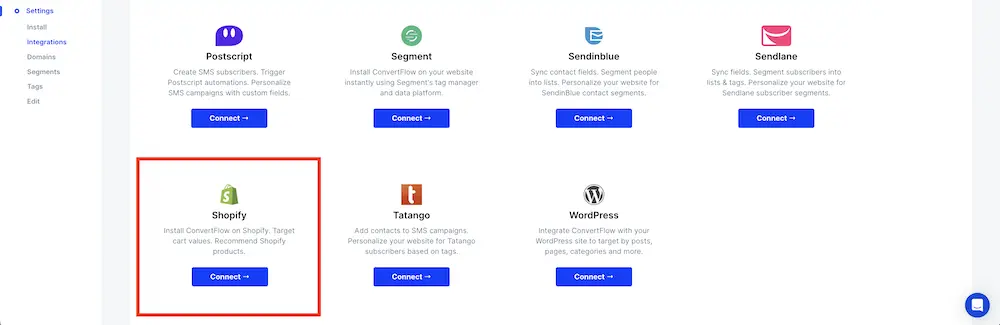
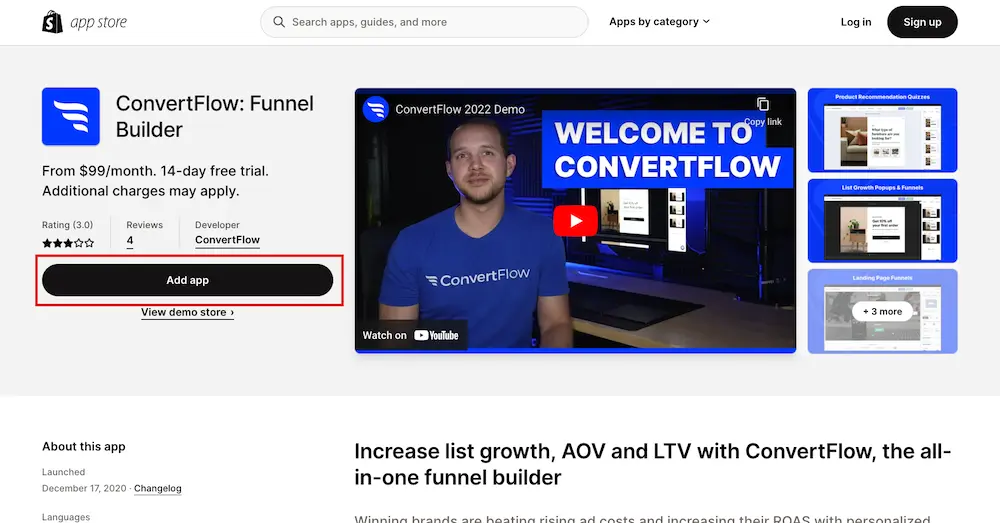
You’ll be taken to the Shopify app store where you’ll click “Add app."
You’ll be asked to confirm which ConvertFlow website sub-account you want to connect.
After you confirm, you’ll be taken back to ConvertFlow’s integration manager.
ConvertFlow's script will automatically install on your store which will enable you to launch campaigns.
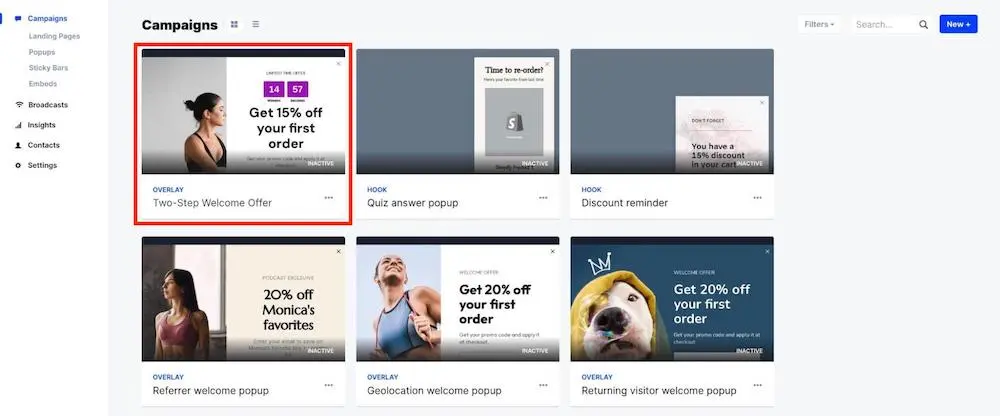
Once connected, head back to your campaign by selecting “Campaigns'' from the left-side menu, then clicking your campaign:
Click “Builder” on the top of the screen to continue editing your popup.
Step 15: Review your mobile design
74% of retail traffic takes place on mobile. So it’s essential to verify that your popup will function well on smartphones.
At the top of the screen, click the phone icon to toggle to the mobile view:
From this view, you can edit certain aspects of your popup for mobile only.
Anything with a phone icon next to it will only change the mobile version of the popup:
For example, when we select a text element, we can edit the padding, alignment, and maximum width for mobile devices.
Device-specific edits can be made at the element-level and the theme-level.
You can also hide columns and elements on mobile or desktop. The template we chose automatically hides the column with the image on the left.
This is smart because mobile real estate is limited and we need to make sure our text is easy to read and buttons are large enough to click.
Step 16: Preview your welcome offer popup
Once you’re done editing your popup, click "Save" and then "Publish." (This won't make your popup visible on your website yet.)
Now, click "Preview" to review your campaign:
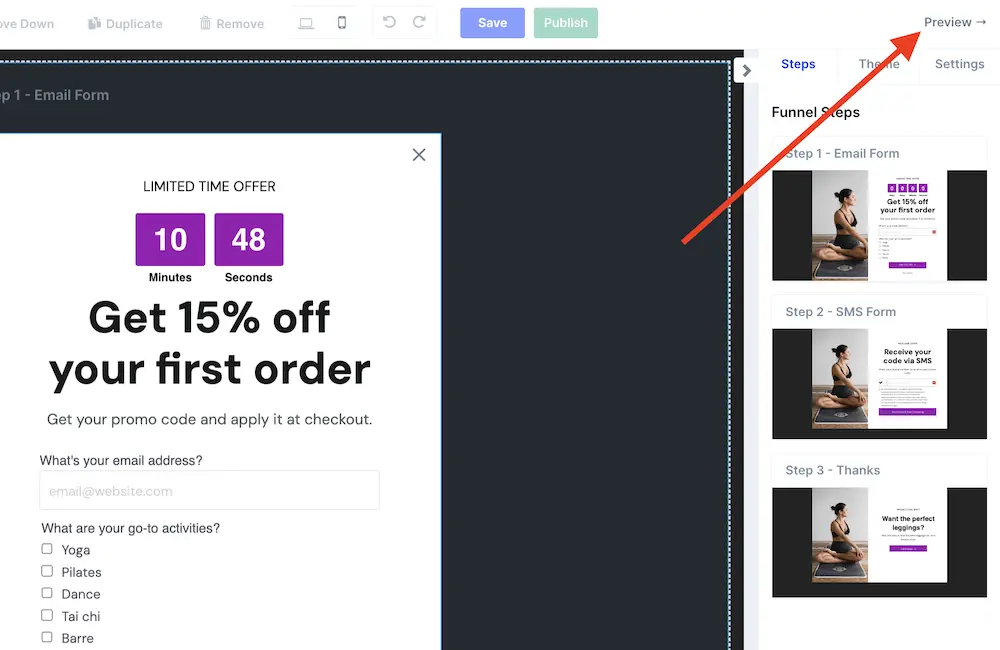
Your welcome popup will show based on the trigger you set. You can interact with it just like shoppers will on your website.
However, it won't trigger any automations (like adding an email address to your Klaviyo list). So you can test out your popup's functionality without affecting your metrics or adding subscriber data to Klaviyo.
Preview your popup’s mobile version here, too, by clicking the phone icon in the lower left corner of the screen.
Step 17: Set targeting conditions for your popup
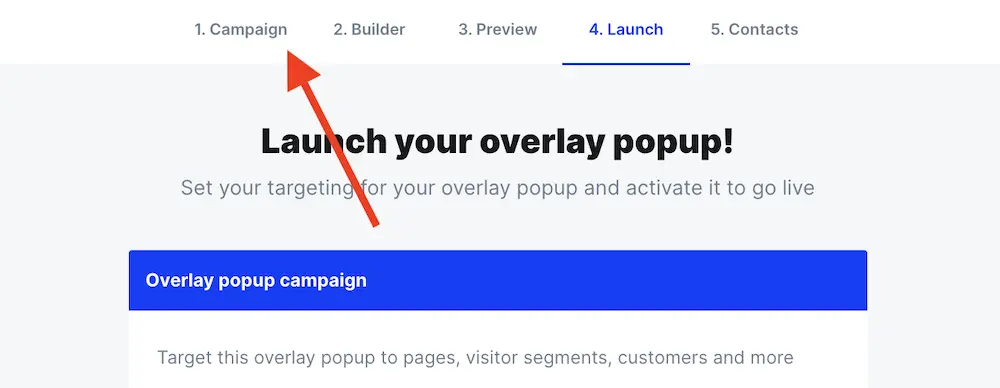
If you’re happy with your popup, it's time to get it live. ⚡️
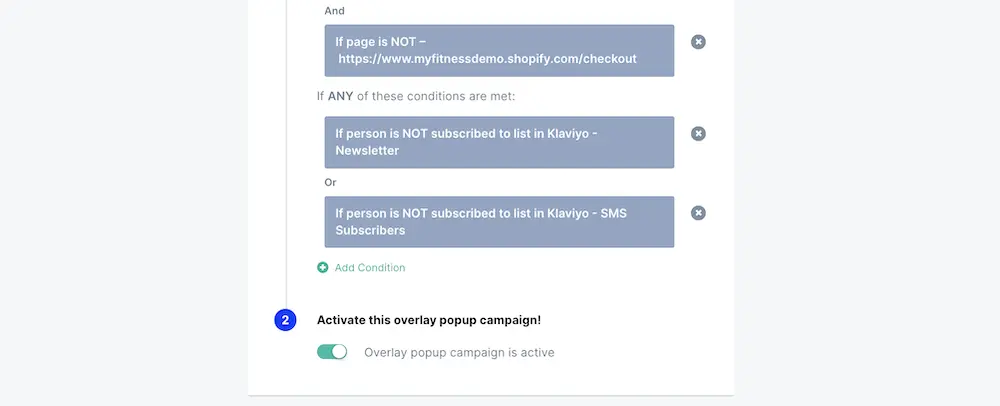
Click "Launch." Here you can control the pages your welcome offer shows on and which customer segments it appears to.
For example, we want our popup to show to people on all pages except our:
- Support page
- Quiz page
- Cart and checkout
And we want to avoid showing the popup to existing subscribers.
So our settings will look like this:

Step 18: Launch your welcome offer popup on your website
With targeting conditions set, you're ready to launch your popup. Toggle the activate switch to turn your popup on:
Congrats! Your welcome popup is live. Watch the subscribers roll in. 🤸🏾
Bonus step: Create a landing page campaign for your welcome offer
Now that you have your primary welcome popup, it’s easy to duplicate your campaign into different formats like a landing page which can be useful to link to directly from other channels.
To turn your popup into a landing page, start by duplicating your popup campaign.
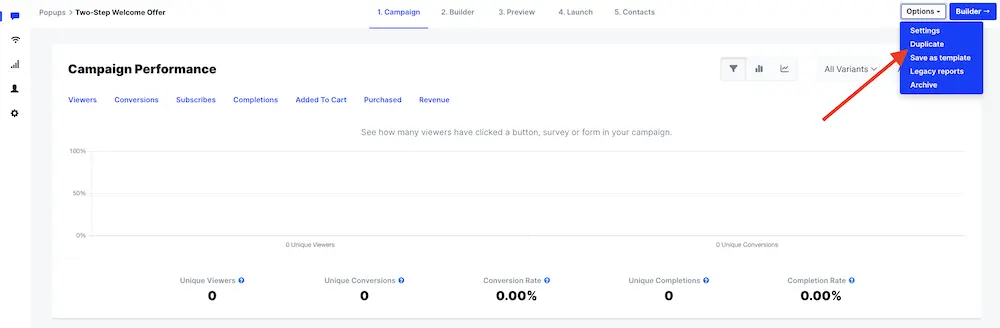
Click “1. Campaign” in the top menu to be taken to your campaign dashboard:
Click “Options” in the upper-right corner, then “Duplicate” from the dropdown menu:
You’ll be taken to the new campaign’s dashboard.
Then, change your duplicated campaign’s format by clicking “Options” again and then “Settings.”
Here you can change your campaign’s name and then select “Landing Page” as the campaign format.
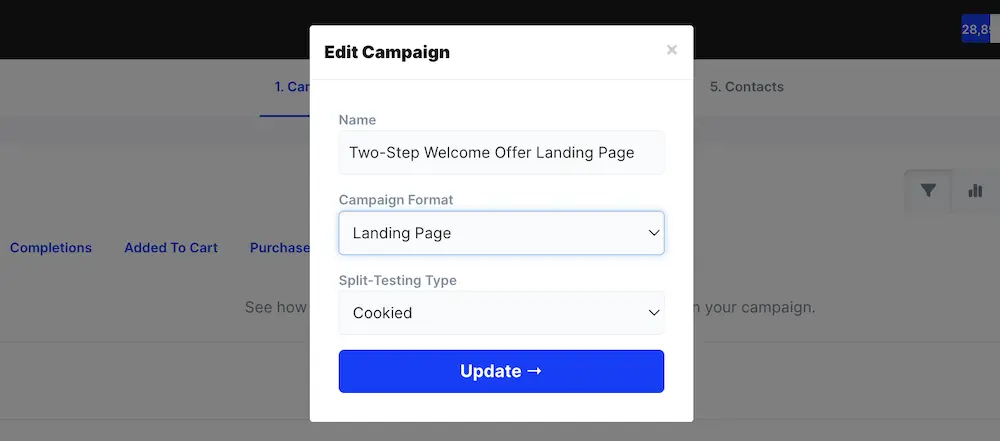
Then, click “Update.”
Make any changes you wish to suit your landing page in the builder, then save and publish your changes.
Now click “Launch.”
There’s no targeting for landing page campaigns since they’re standalone webpages, so all you need to do here is customize your landing page’s URL and update any metadata:
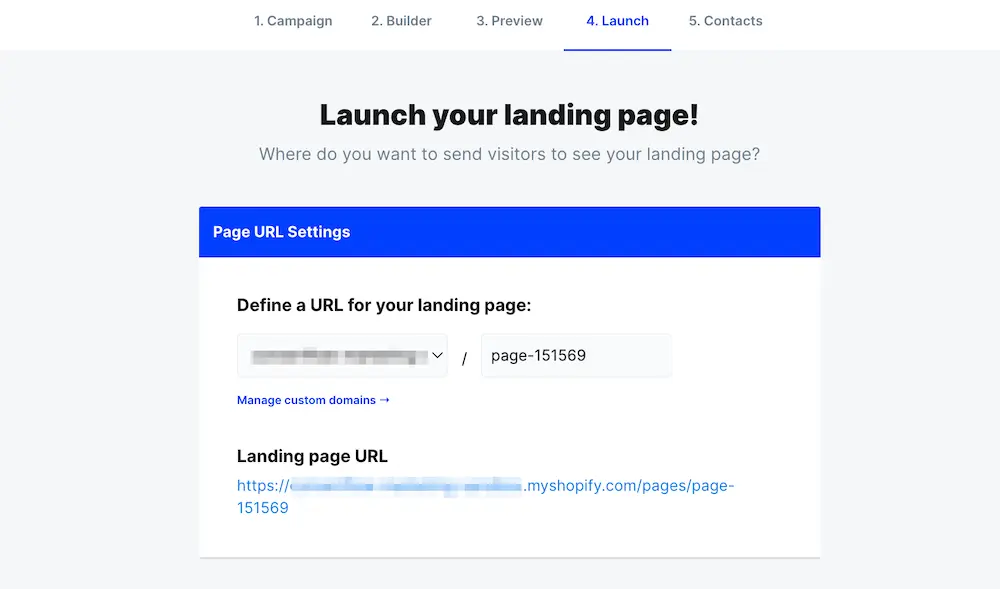
Click “Save” to finalize your URL.
Now it’s ready for promotion! 🎉
<split-test>Split-test your welcome campaign to maximize performance<split-test>
Split-testing is key to optimizing your welcome campaign’s performance.
In ConvertFlow, you can test an unlimited number of variants and run experiments on anything about your campaigns including your:
- Offer
- Fields
- CTA
- Copy
- Imagery
- Button colors
- Trigger timing
- Suppression settings
For the most accurate experiment, test one aspect of your popup at a time.
Step 1: Customize your test variant
To create a test variant, go to the Experiments section of your campaign's dashboard.
Your existing campaign will be Variant A. Copy this variant by clicking "Options," then "Duplicate:"
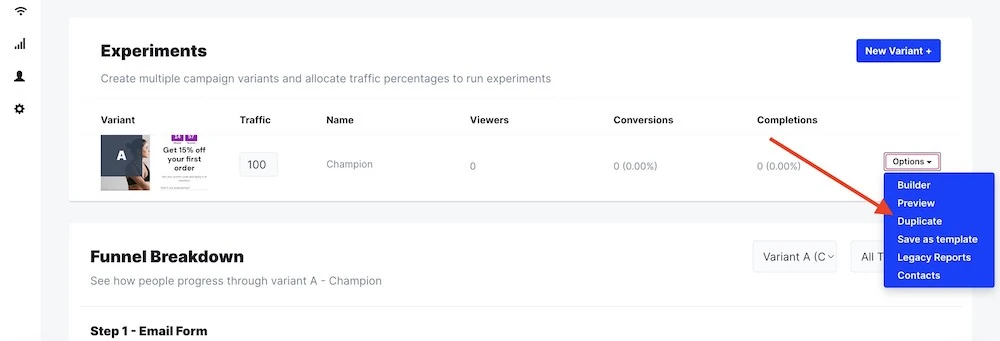
When you duplicate a variant, you'll be taken to the builder where you can edit the new variant.
When you’re done, preview Variant B to ensure it looks how you want it to.
Step 2: Set the parameters of your A/B test
From the Experiments section on the campaign’s page, adjust the traffic distribution for each variant and click save:
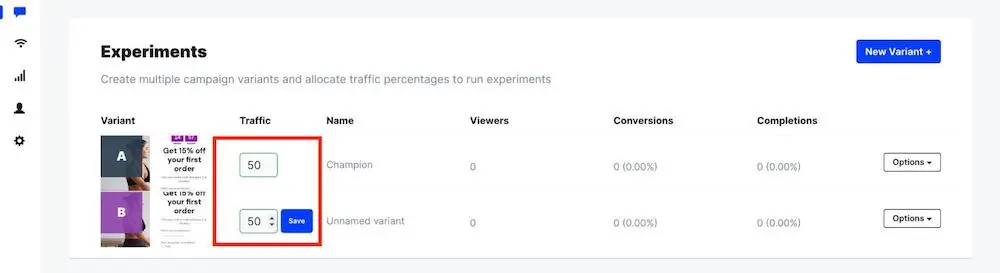
For a fair comparison, an even split among the variants you’re testing is recommended.
Step 3: Monitor the results
You can track your experiment’s performance by monitoring the results from the campaign dashboard:

Comparing performance will help you identify what leads to the most subscribers.
But be sure to look at other data too, like unsubscribe rates and revenue per subscriber, to ensure you're drawing in high-quality leads.
<after>After the welcome offer: Get the most out of your new contacts<after>
Your welcome campaign is the beginning of your relationship with your website visitors. It's not just a contact to blast with product launch and sales announcements.
Once you've earned shoppers' contact information, you'll want to:
- Grow those relationships with automated flows
- Personalize campaigns across your owned channels with subscriber data
That will help you maximize the revenue you earn from your audience and spend less on ads.
Craft an engaging welcome series
According to Klaviyo, a welcome email flow gets 4.3x as many clicks and 21.2x the revenue per recipient compared to batch-and-blast email campaigns.
Yet many brands overlook this opportunity to engage and don't bother sending any campaigns until it's time for a sale or launch.
But that could come off as pushy if you haven't properly introduced a subscriber to your brand and they might just unsubscribe.
Your welcome series introduces new contacts to your brand, encourages a first purchase, and turns them into loyal fans so they care when you've got an announcement to make.
So start your relationship on the right foot with a welcome flow.
Here's a basic email & SMS welcome flow to start with:
1. Confirmation text (SMS only)
TCPA regulations require businesses to give subscribers an option to opt out of messages. So send SMS subscribers an initial text that confirms they've opted in and gives instructions on opting out.
Even better? Use a double opt-in mechanism to confirm you’re texting a working number and that they want to receive texts—like makeup brand Ami Colé does:
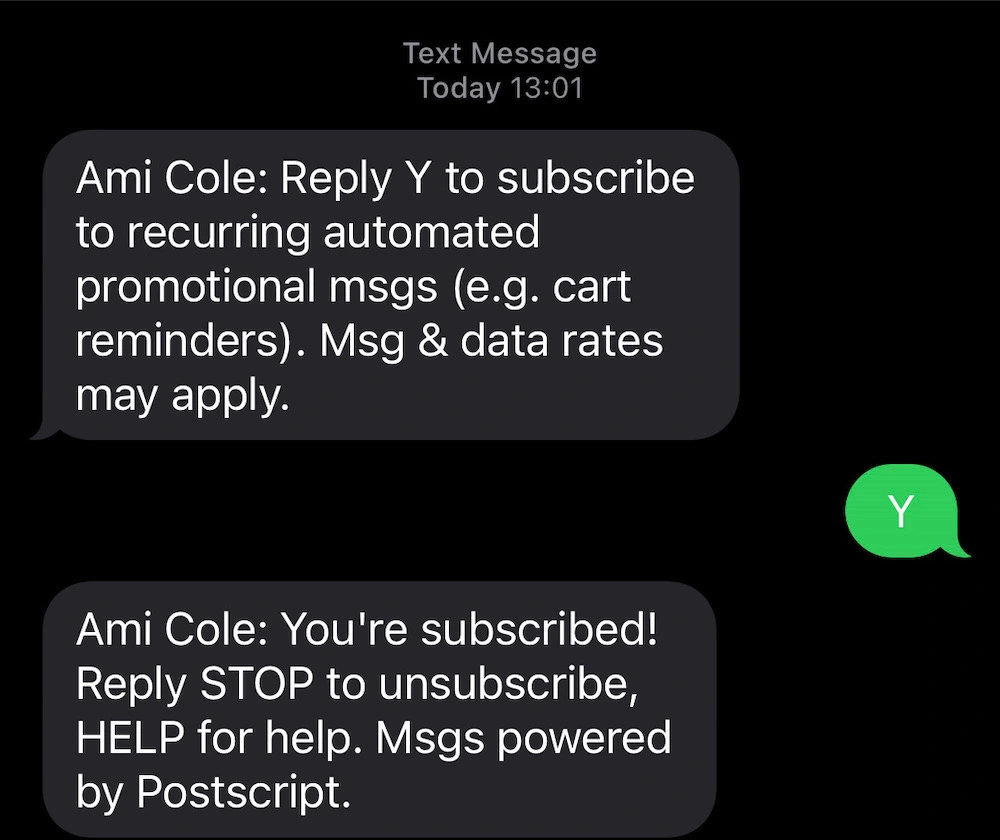
The initial messages are short and clear to confirm the signup before sending any other content.
Send this immediately after signup.
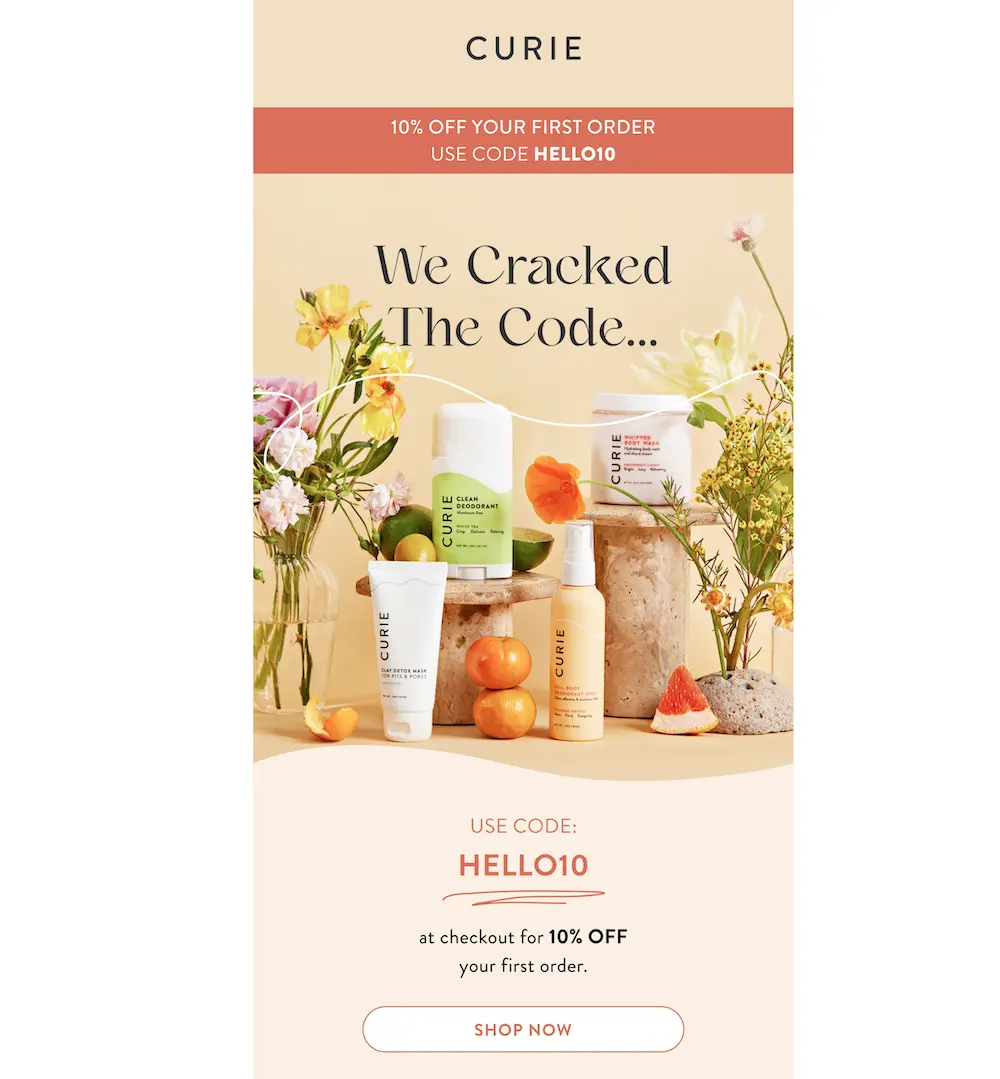
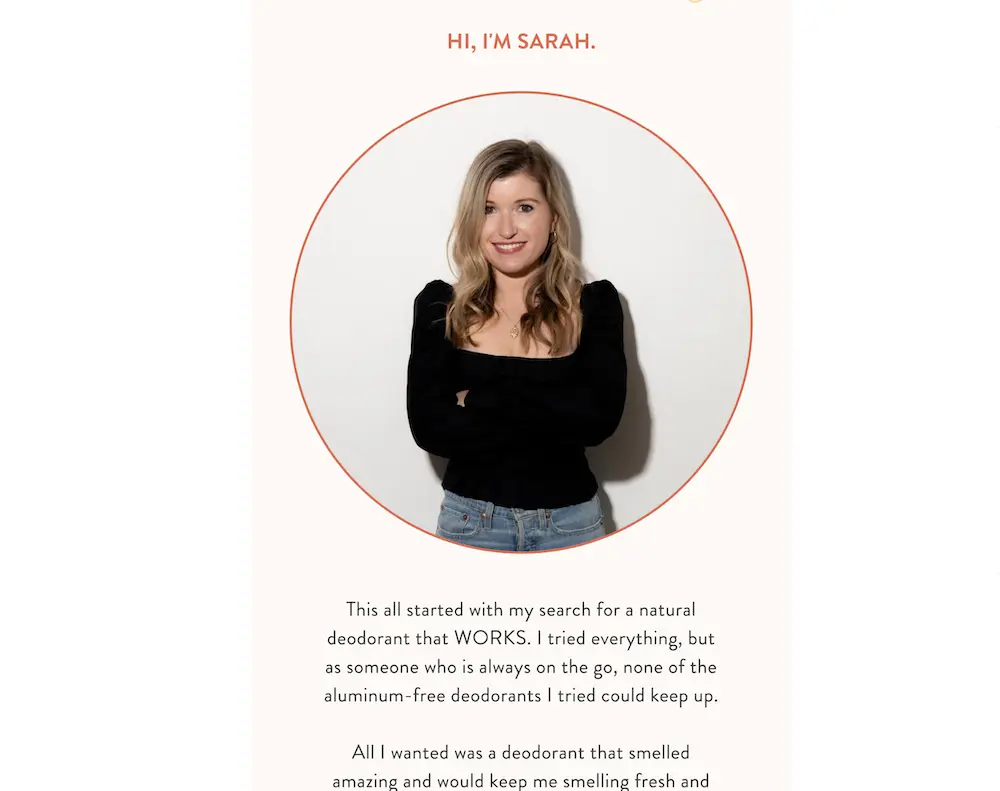
2. Thank you message (Email and SMS)
It's a privilege to have direct access to your customers. So show your new subscribers gratitude with a thank you message. It could be a simple thank you message or a more personal letter from the founder.
If you promised an incentive for signing up, deliver it in this message.
In its welcome email, Curie first includes the discount:
Then a letter from the founder, which helps the brand feel more relatable:
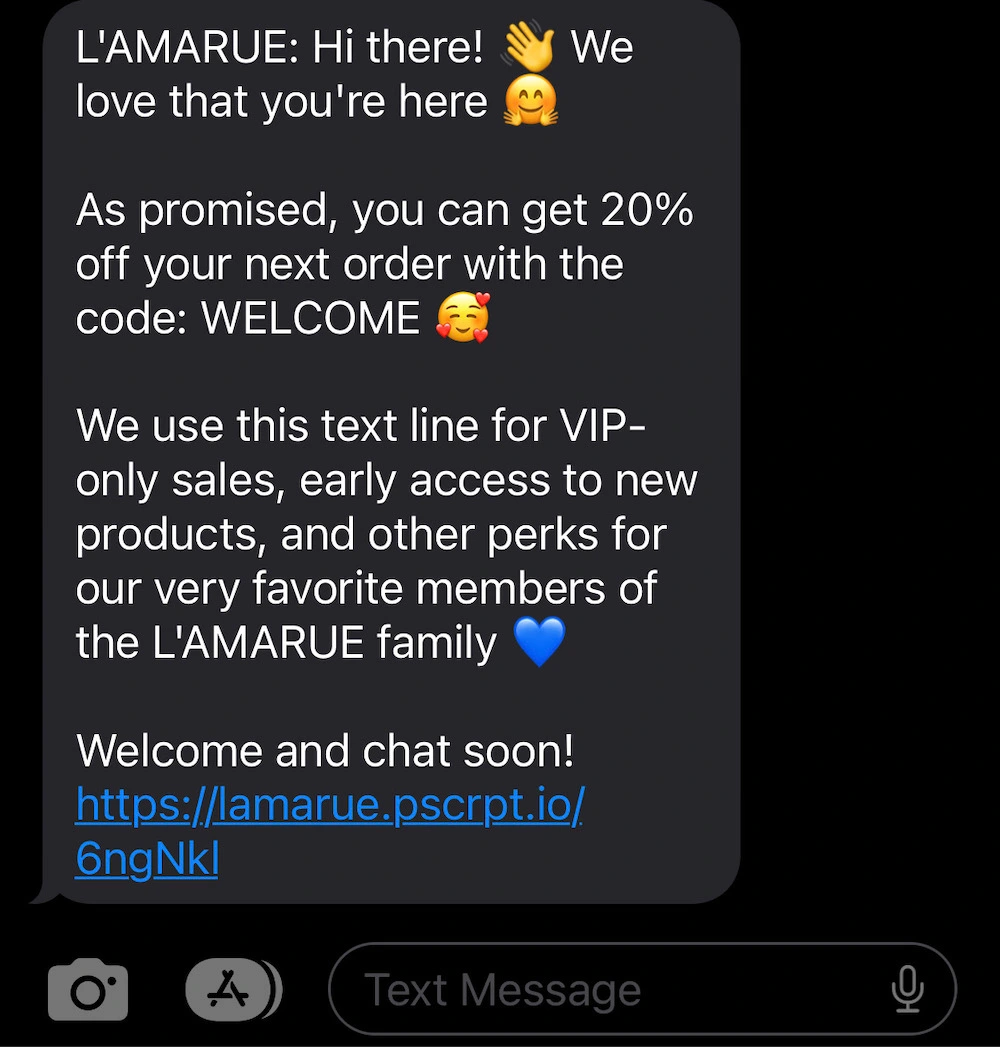
You can also let subscribers know what to expect to receive from your brand on each channel like L’AMARUE does for SMS:
Send your thank you messages immediately after sign up—or for SMS, immediately after the confirmation text.
3. Brand story message (Email or SMS)
Your next message can introduce subscribers to your brand.
Let them know your brand's values: Do you value body positivity? Emotional development for children? Free expression?
Use this message to build a connection beyond products with your audience.
Outerknown is an apparel brand committed to sustainability, so its welcome series highlights that value in an email about the brand’s origins:

Send it one day after signup.
Note: If you covered brand story content in your first message, you can jump straight to product education in the next step of the welcome sequence.
4. Product education message (Email or SMS)
Now that you've built a connection, use your next message to help shoppers understand your products better.
Perhaps you introduce them to a special technology you've developed or the materials you use. Or show them how your products are made or how they're perfectly crafted for a particular use case.
Menstrual wellness brand Marea combats common objections to purchase in its product education email:

👉 Read more about how Marea personalizes the path to purchase with its quiz + welcome series.
You can also offer help to customers proactively like Ready. Set. Food! does in its SMS flow:
Send this two to three days after sign up.
5. Helpful content related to your niche (Email or SMS)
At this point in your welcome series, ease off of strictly promotional content and send helpful content to your subscribers that's related to your products or niche. This can help build trust and show off your expertise.
For example, if you sell cookware, you can send tips to cooking a perfectly browned steak.
In Tortuga’s welcome series, the brand covers travel packing tips:
These tend to be longer messages and work best by email. But you can also send quick helpful tips by text like Buoy does in its welcome series:

Send this one to two days after your last message.
6. Social proof (Email or SMS)
If subscribers haven't purchased at this point, social proof can help assure shoppers that your product will benefit them.
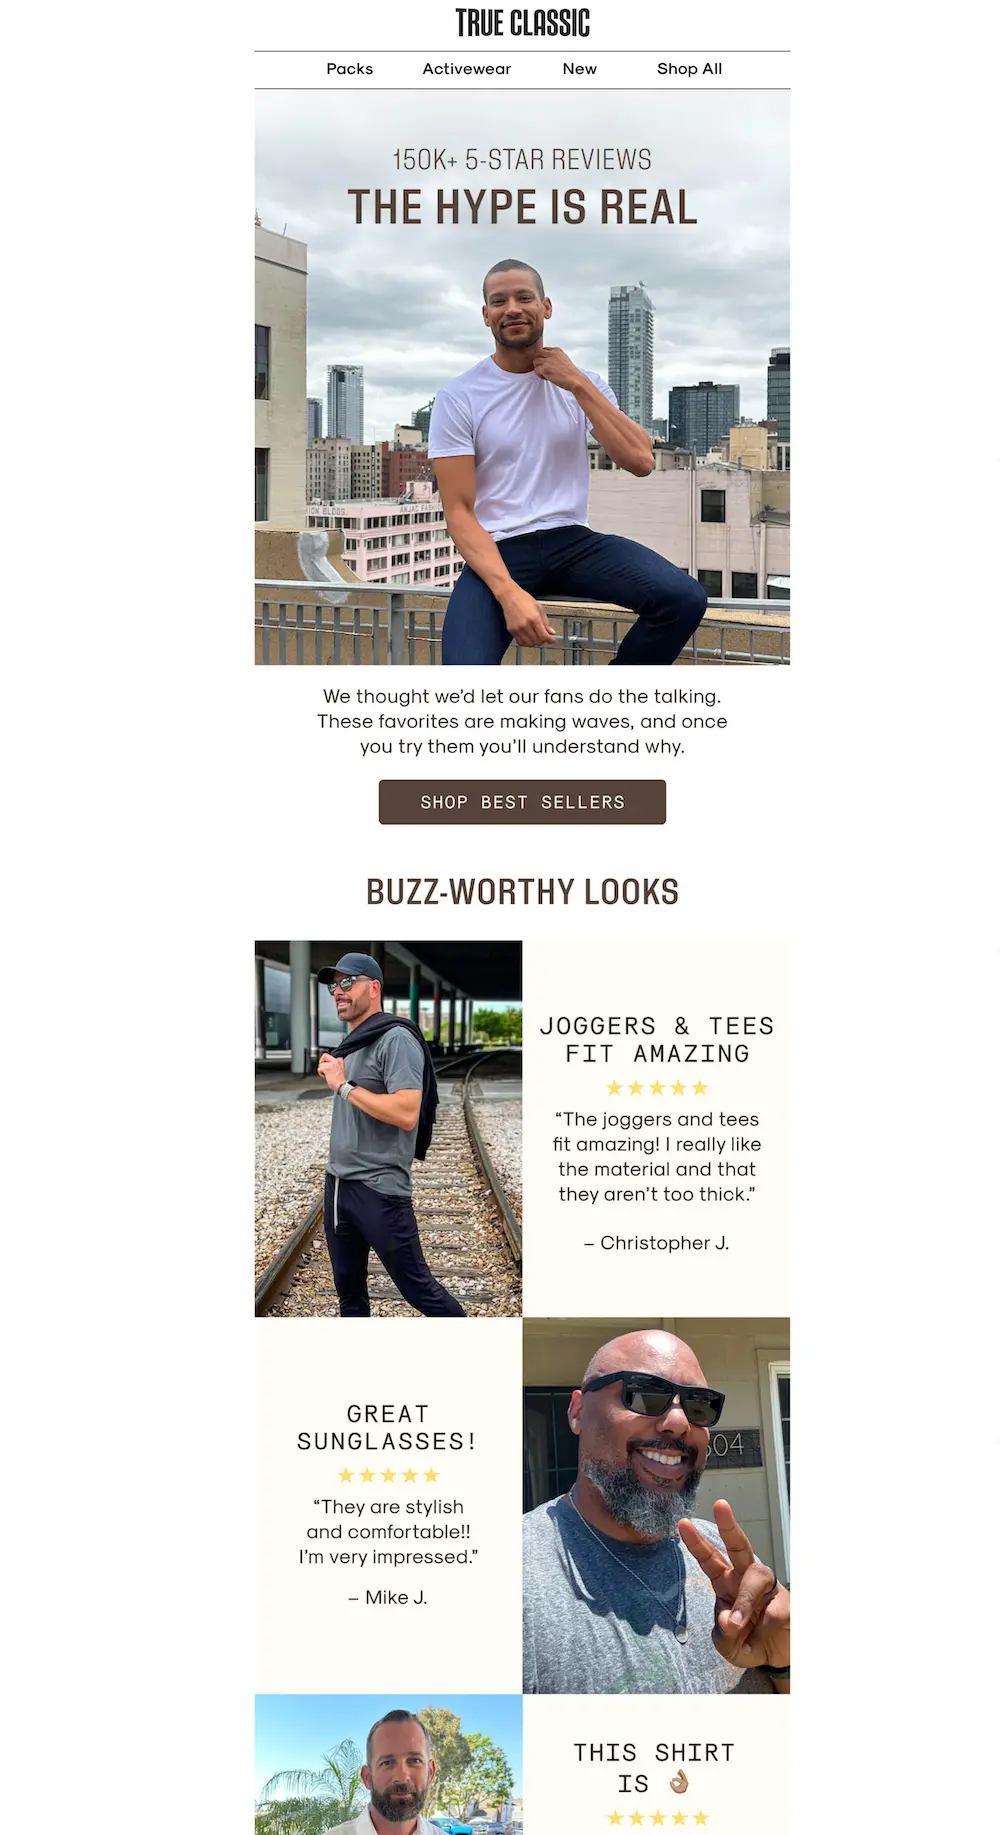
You can showcase awards from major publications, grab UGC from social media, or highlight glowing reviews like men’s apparel brand True Classic does:
Send this one to two days after your last message.
7. Incentive reminders (Email and SMS)
Remind shoppers about their incentive with dedicated reminders that their offer is about to expire like cookware brand Great Jones does:
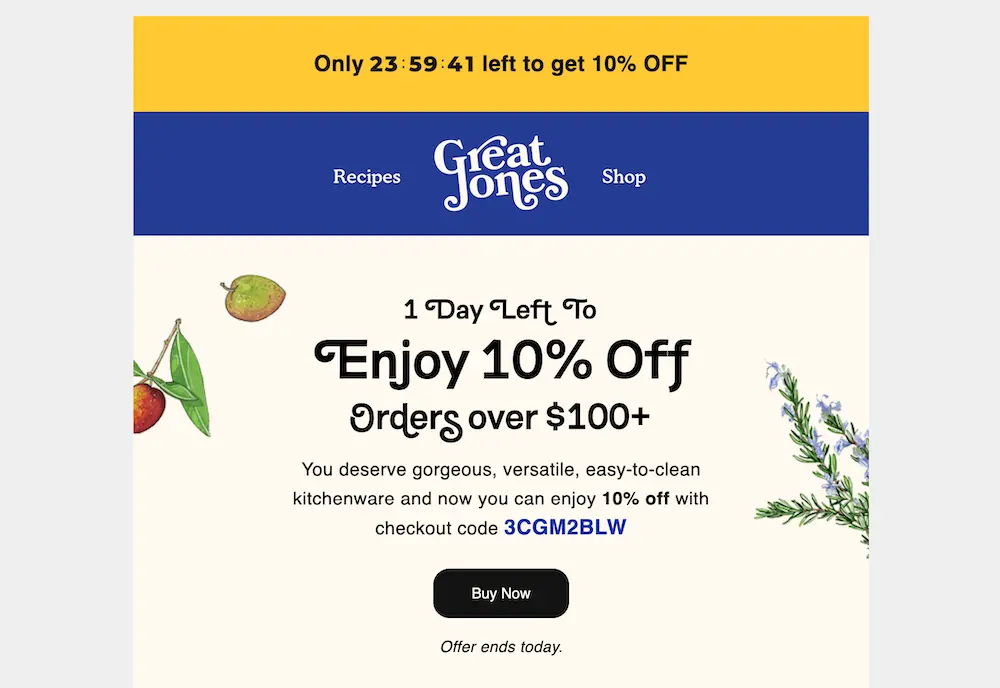
Texts are ideal for time-sensitive messages, so send an email one day before the offer expires and a text on the day it expires.
You can also include reminders throughout the welcome series in your other messages.
A good welcome offer and welcome series should encourage shoppers to buy more quickly. So when figuring out when your offer should expire, start by determining your average time to purchase.
Then test shorter time frames until you find the sweet spot that encourages customers to take action without your overall conversion rate dropping.
Personalize your marketing campaigns with subscriber data
Beyond the welcome flow, you can use your subscriber data to personalize your marketing campaigns on an ongoing basis.
According to Segment, 62% of business leaders say personalization improves customer retention.
Activating your data across marketing channels enables you to create tailored campaigns that effectively target potential customers with products and messages that are relevant to them.
Here are three places to leverage your subscriber data:
💡 On your website
Remind new subscribers about their incentive when they visit your website if they haven't purchased yet with a nonintrusive hook popup:
And show relevant product recommendations based on form fields and quiz answers.
For example, you can embed featured products on any page highlighting products you think they'd like.
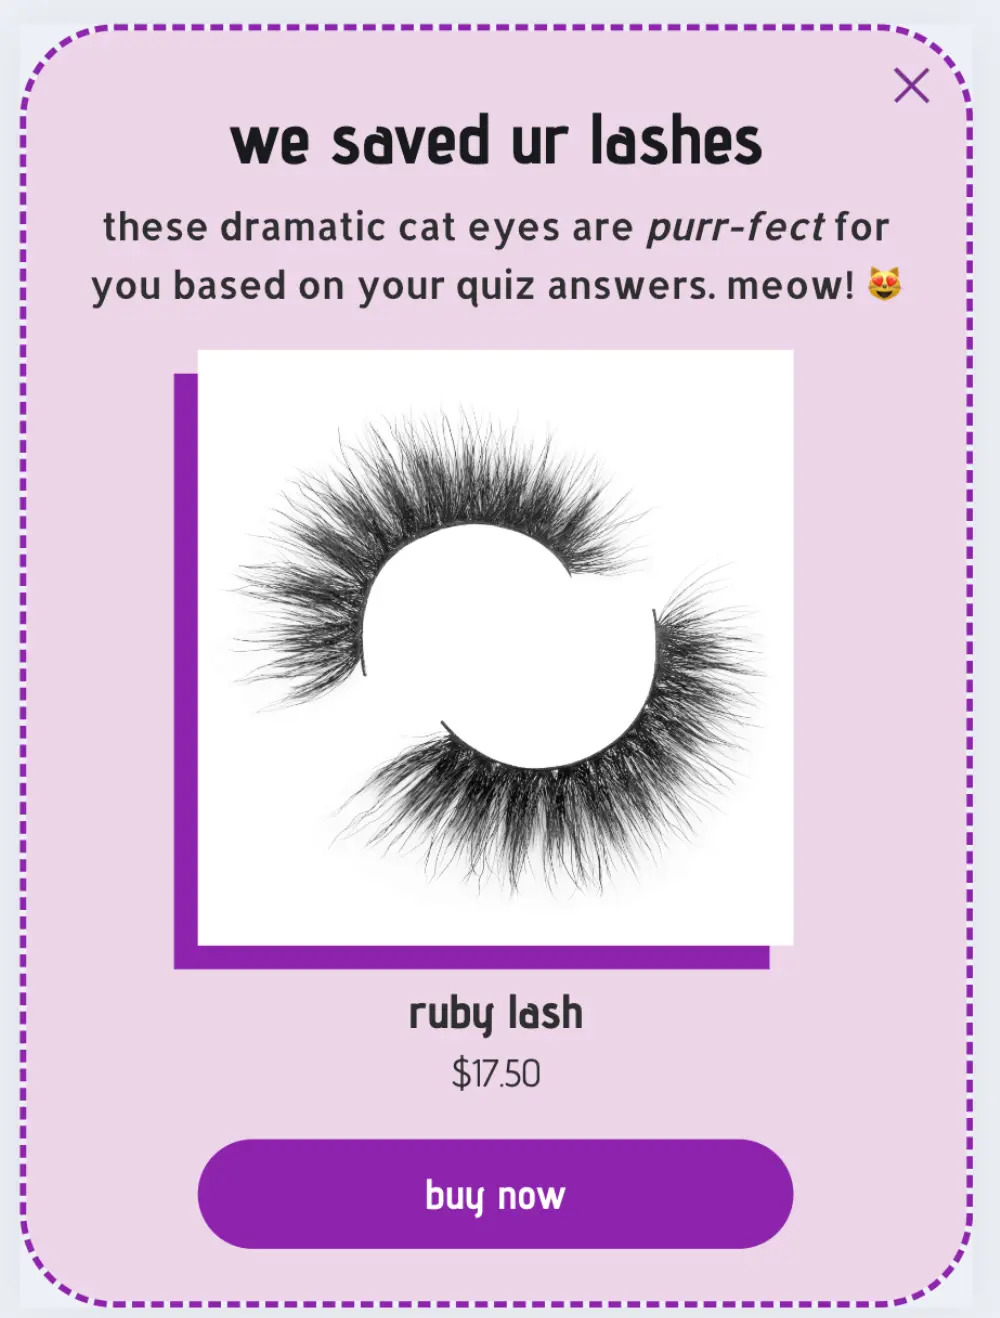
Or you can show a popup reminding shoppers about the products recommended for them based on their quiz answers:
💡 Future emails and texts
You've already personalized your welcome flow. Now use your subscriber data to inform future campaigns:
- Send launch announcements to subscribers based on product categories they’re interested in (e.g. yoga apparel vs. running apparel)
- Personalize sale campaigns with imagery and copy that resonates with different subscriber segments
- Create helpful content based on a subscriber’s goals & needs
💡 Retargeting ads
Retargeting is a great way to keep your brand top-of-mind with subscribers who haven't purchased yet.
Sync your segmentation data to a Facebook Audience to personalize your ads.
Then you can remind subscribers about your offer and display more personalized product recommendations.
<list-growth-tactics>Grow your list: Tactics to promote your welcome offer<list-growth-tactics>
With your opt-in campaigns, welcome series, and dedicated re-engagement campaigns in place, you have a complete welcome funnel that earns subscribers and turns them into paying customers.
Want to grow your email & SMS lists even more? This is the perfect use case for your welcome offer landing pages.
While a popup is great for grabbing the attention of website visitors as they arrive on your website, a landing page lets you promote your welcome offer on other channels.
Try these tactics for promoting your welcome offer and growing your email & SMS lists:
💡 Social media
There are several ways to turn your social audience into owned contacts.
Try including a link to your welcome offer landing page on your “link in bio” page.
And develop dedicated landing pages that entice subscribers to sign up for things like early access to a launch, sale, or limited-time offer. Then promote those through social posts.
💡 Partnerships
Drive signups through influencer, affiliate, and sponsored marketing campaigns with dedicated partner landing pages.
Run comarketing campaigns with brand partners to amplify your reach to each other’s audiences.
💡 Retargeting ads
Retarget shoppers who have visited your website but didn’t opt in to your subscriber lists by excluding existing subscribers with your ESP’s audience sync feature.
💡 Offline marketing campaigns
Inform shoppers about your welcome offer with a QR code or short link that’s connected to your welcome offer landing page.
For example, you can include your QR code in direct mail campaigns or at retail locations if you have them.
Complete your ecommerce conversion funnel
Congrats on building out your welcome offer funnel! 🎉
By going beyond a basic opt-in form, you set yourself up to amp up conversions and foster long-term engagement.
The welcome offer is the beginning of your ecommerce funnel.
Keep shoppers in the purchase funnel by continuing to build out targeted campaigns that guide them toward purchase. Then you can:
- Spend less on ads
- Convert more customers, and
- Earn more from each customer
Ready to build your next campaign? Build a quiz to follow your welcome offer and help new store visitors find the right product.
Or check out all the ecommerce funnel playbooks 💥


.svg)
