
Playbook summary
Use this guide to create a quiz that asks shoppers a series of questions, then provides personalized product recommendations based on their answers. You'll help people overcome "product overwhelm" and find the best item in your catalog for their needs.
- Industry:Ecommerce
- Metrics affected:Checkouts; AOV
- Campaign type:Quizzes
Tools you'll need
- Funnel builder: ConvertFlow
- Ecommerce CMS: Shopify
- Email/SMS software: Klaviyo (or your provider of choice)
Quick setup
- Content: Questions related to your product(s)
- Call-to-action: Add recommended products to cart
- Targeting: Show to undecided shoppers visiting general pages
Product recommendation quizzes help potential customers overcome “product overwhelm” and find the best items in your catalog for their needs.
Learn how to create your own product quiz to help shoppers find products, understand your customers better, and grow conversions and average order value (AOV). Then, make your quiz a success with the right promotion tactics and follow-up campaigns.
Keep reading for the text version. Or if you prefer video, build a quiz side-by-side with us:
Let’s dive in 👇🏽
<why>Why use a product recommendation quiz<why>
There are several benefits to offering shoppers a product recommendation quiz. Ultimately, these benefits lead to better conversion rates, AOV, and customer retention.
Help shoppers discover the right products
Studies show that if a shopper has too many options, they might abandon their purchase altogether. And if they do follow through with their purchase, they’re more likely to be unsatisfied with their choice—left wondering if they made the right decision.
Help people overcome this via a quiz that:
- Asks a series of questions to uncover shopper preferences and goals
- Recommends products based on the shopper’s answers
This significantly reduces the time and effort needed for visitors to navigate your catalog and find product(s) to solve their specific problems. It’s like the sales assistant that directs shoppers to the right part of your retail store—only online, at scale, and completely on autopilot 😎
Get to know your customers on a deeper level
Quiz answers are a gold mine for eye-opening insights into how your customers think and feel. Learn about their problems, preferences, goals, and desires.
Use that to refine your customer personas, inform your marketing campaigns, and clarify product direction.
Personalize the shopping experience with first-party data
When done well, personalization can yield 40% more revenue than the average brand. To reach that top tier of performers, you need first-party data.
Quizzes are a prime source of customer data that can fuel future personalized marketing efforts. You can use the information you collect in your quiz to follow up with relevant:
- Emails
- SMS messages
- Retargeting ads
- On-site offers
And you can use this data to recommend items from future product launches, too.
For example, say you sell false eyelashes. Through your quiz, you learn that a customer only buys natural-looking lashes, black in color, and magnetic instead of glue-on.
Instead of sending this customer an email announcing every new product launch and risking a drop in open rates, you can get in touch just when you launch the styles of lashes they like wearing.
<inspiration>Get product quiz inspiration from successful brands<inspiration>
Before you make your product recommendation quiz, get clear on your vision.
It should answer a burning question your audience has and streamline the shopping experience like these ecommerce brands’ quizzes do.
Casper’s mattress quiz
Mattress brand Casper recommends the right mattress for customers by asking questions about their sleep issues and preferences:
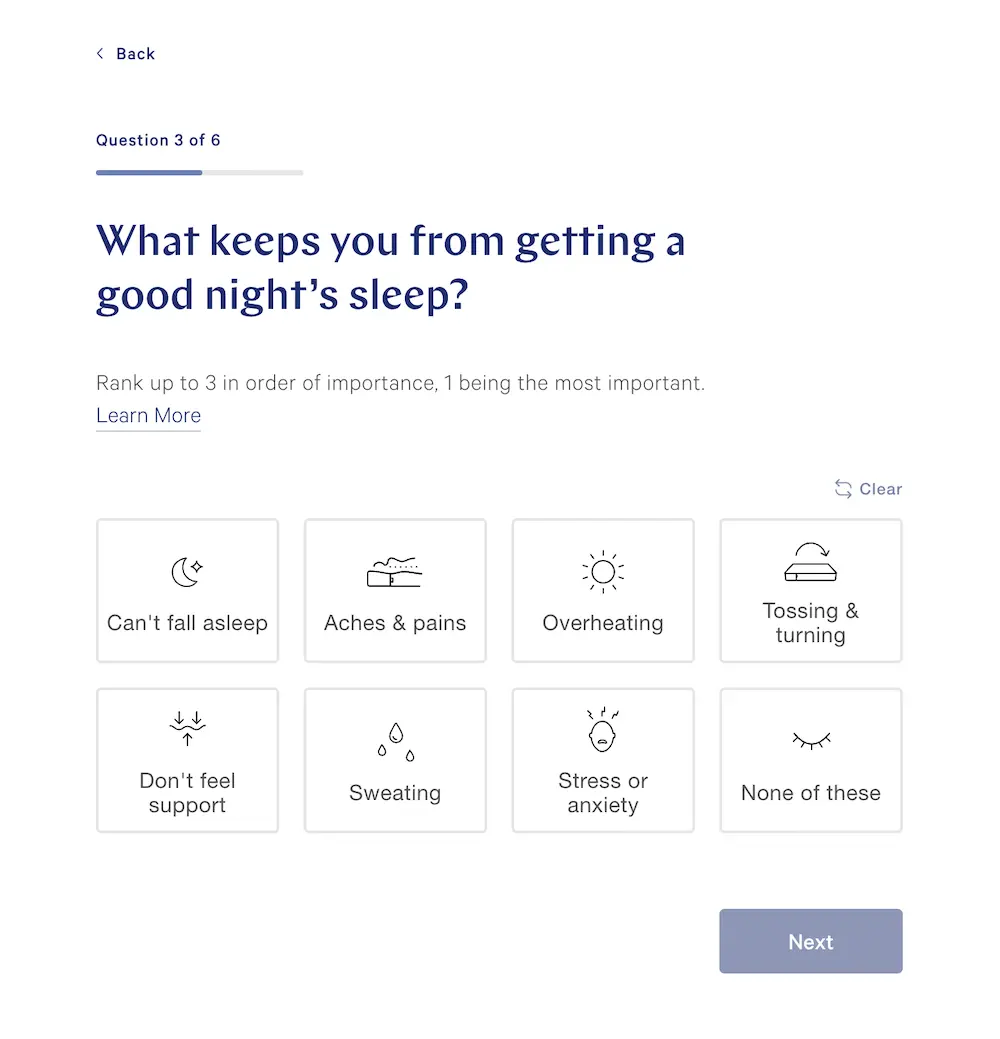
Note that Casper focuses on the customer’s sleep experience as opposed to asking about specific mattress features. It's a common mistake for brands to ask what features a customer wants in a product.
But in many cases, customers don't actually know how a specific feature relates to their needs. So, most of the time, it's better to frame questions around the shopper's experience so you can determine what features match best.
Dear Brightly’s prescription skincare quiz
Dear Brightly is a prescription skincare brand that uses its quiz to learn about a customer’s skin health and routine.
Then, the brand tailors the strength of the active ingredient in the customer’s skin serum:
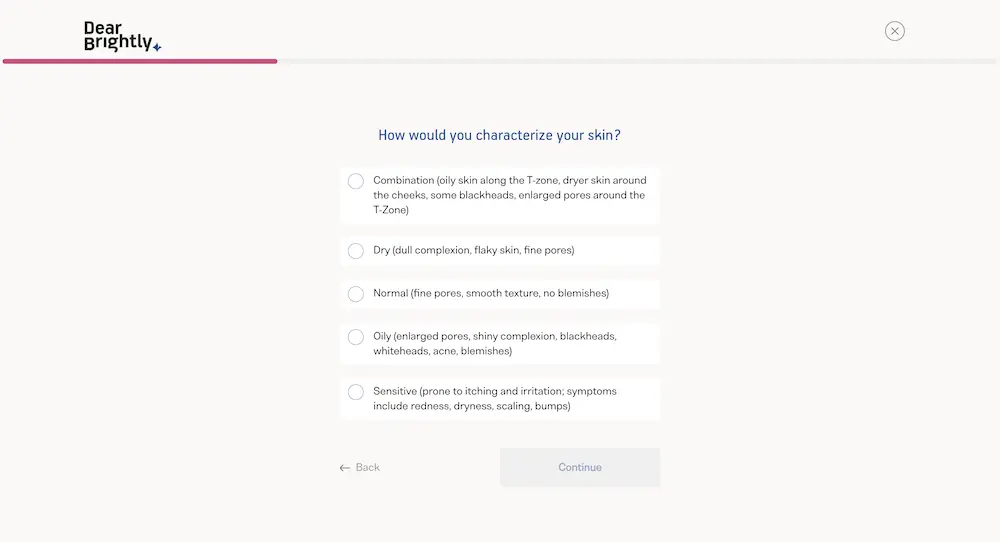
A consultation quiz like this is common for brands that sell custom-formula products like haircare and skincare.
Marea Wellness’ one-product quiz
If you have a limited product catalog, you can focus your product recommendation quiz on just one product, like menstrual health brand Marea Wellness does:
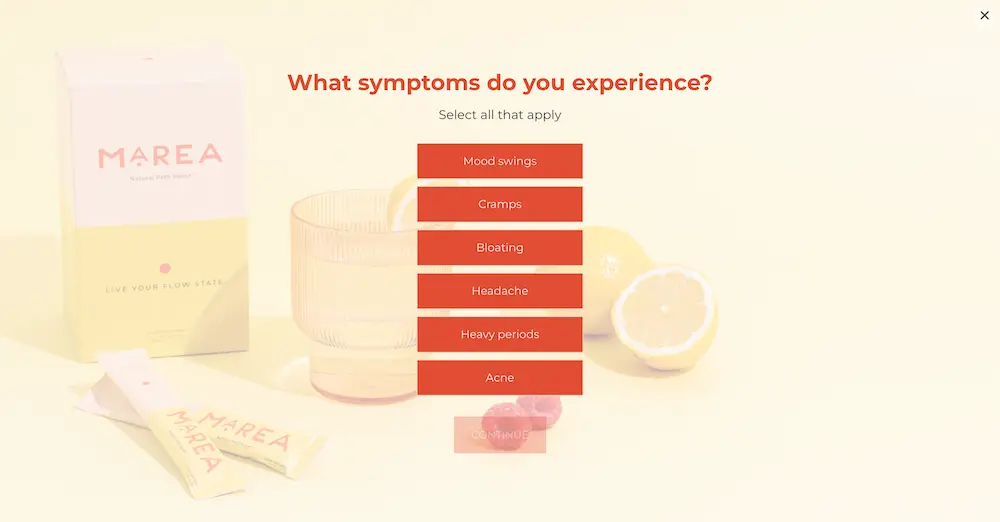
At the end of its one-product quiz quiz, the supplement brand is only recommending one product: the PMS Elixir. But Marea is able to use the shopper’s answers to educate shoppers on how the product will heal their specific symptoms.
This is a unique, but powerful, version of the product recommendation quiz for small brands.
Prose’s collection-building quiz
Haircare brand Prose creates custom formulas for shoppers, but also helps them build a full routine of products depending on their needs:
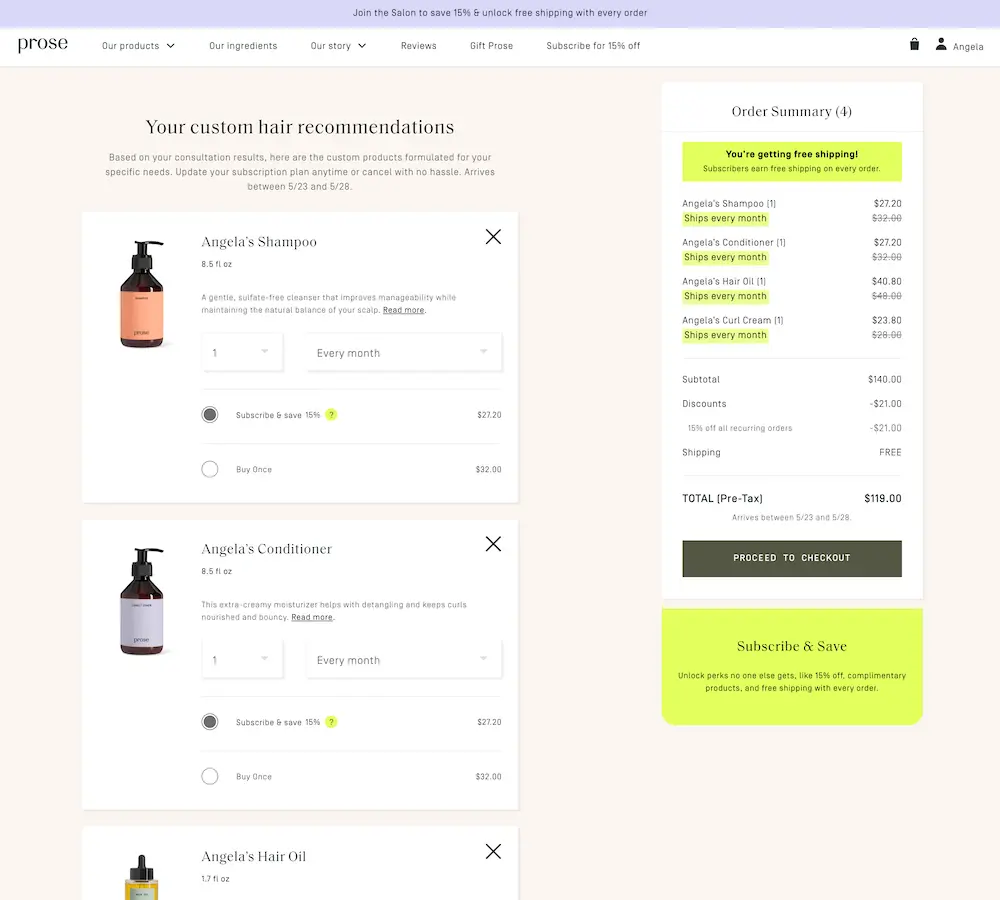
This quiz style is a great choice for brands that sell products that are often used together like supplements, workout gear, apparel, and personal care.
Tarte’s shade-finder quiz
Another great way to use product recommendation quizzes is to recommend a specific variant of your product. This is common in the beauty space for things like foundation or hair dye.
In the case of Tarte Cosmetics, the brand links to its shade finder quiz on its blush product page:
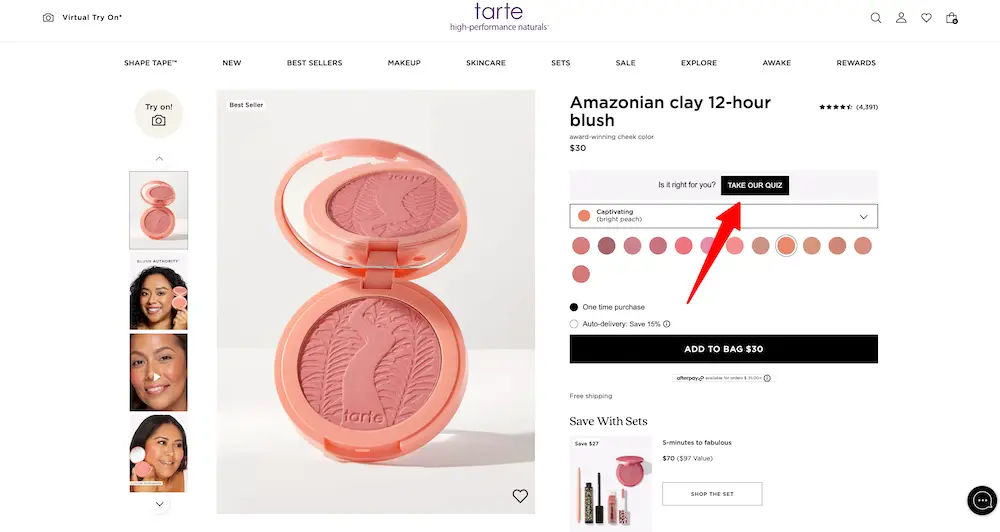
The brand has a variety of quizzes for different products. Surfacing each quiz on the appropriate product page means Tarte can guide shoppers to the right variant for their skin tone.
<map>Map out your quiz questions and results<map>
Before building your quiz in ConvertFlow, figure out what questions to ask and what results come from each combination of answers.
Quizzes can look very different from one business to another. But there are some general best practices that will apply to most ecommerce quizzes:
- Keep your quiz concise: The more questions you ask, the more likely a shopper is to drop out before completing it. And a lengthy quiz could mean more results combinations for you to create. Ask just enough questions to give accurate results to shoppers and personalize their shopping experience. 3-5 questions will be plenty for many use cases. You can always expand your quiz if you learn you’re missing crucial information.
- Limit product options for each result: Remember, one of the main points in creating a quiz is to reduce shopper overwhelm and choice overload. It’s your job to figure out the best-fit product for the customer. Occasionally, it makes sense to recommend multiple products—like if you’re recommending items to buy as a set. Or if there are a few products that would make sense for the customer. But you should still limit their choice to three or four max and differentiate the options you recommend to make their decision easy.
- Keep flow in mind: The questions you ask should make sense together and lead naturally from one to the next. And ask simple questions first. For example, if you’re making a skincare quiz, you’ll probably ask about skin type before you ask about goals or concerns.
To make building your quiz easier, draft out your quiz flow on paper or by using a mind map tool keeping these best practices in mind.
Draft your questions and answers
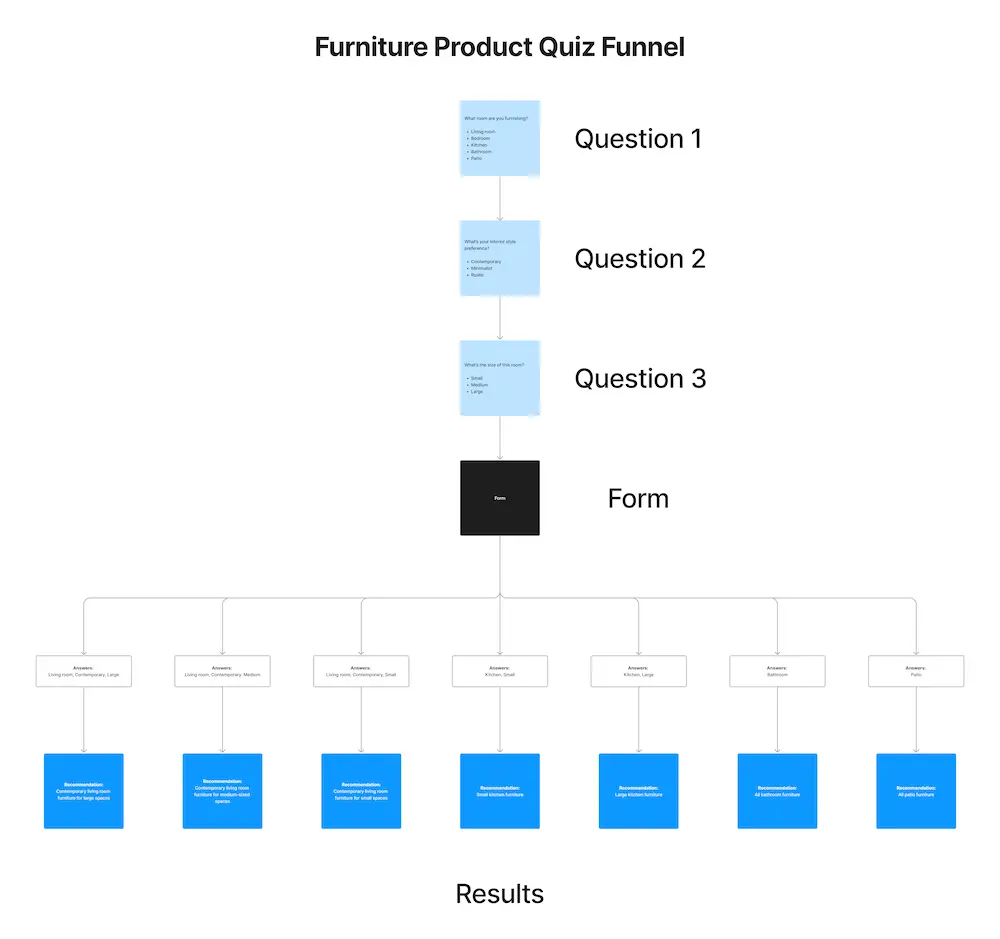
Let’s take the example of a fictional furniture store. We want to recommend specific Shopify product collections based on the customer’s style and use case.
Our questions with their answers might look something like this:
Question 1: What room are you furnishing?
- Living room
- Bedroom
- Kitchen
- Bathroom
- Patio
Question 2: What’s your interior style preference?
- Contemporary
- Modern
- Rustic
Question 3: What’s the size of this room?
- Small
- Medium
- Large
Match answer combinations to product recommendations
Now, we can define each answer combination into unique results. There are a lot of potential combinations here—which is a great reason to keep your quiz short—but you don’t necessarily need to come up with unique results for each combination of answers.
Instead, keep your quiz simple to start, focusing on personalization for your top shopper segments. You can always add additional quiz logic later.
With this in mind, here are a few that we came up with for our quiz:
Recommendation #1
- Answer combination: Living room, Contemporary, Large
- Collection recommendation: Contemporary living room furniture for large spaces
Recommendation #2
- Answer combination: Living room, Contemporary, Medium
- Collection recommendation: Contemporary living room furniture for medium-sized spaces
Recommendation #3
- Answer combination: Living room, Contemporary, Small
- Collection recommendation: Contemporary living room furniture for small spaces
Recommendation #4
- Answer combination: Kitchen, Large
- Collection recommendation: Large kitchen furniture
Recommendation #5
- Answer combination: Kitchen, Small
- Collection recommendation: Small kitchen furniture
Recommendation #6
- Answer combination: Bathroom
- Collection recommendation: All bathroom furniture
Recommendation #7
- Answer combination: Patio
- Collection recommendation: All patio furniture
As a mindmap, the combination of questions and recommendation options would look something like this:
Copy this FigJam whiteboard to create something similar for your product quiz. Or if you prefer a spreadsheet, copy this Google Sheet quiz template.
When it came to determining what results to provide, we created more personalized recommendations to the more popular, high-ticket room categories. Each combination of style and size responses for people shopping for their living room will get a unique result.
But our store doesn’t have a lot of variety in terms of style when it comes to kitchen furniture, so we can just create kitchen recommendations based on size.
Meanwhile, we have fewer items in our bathroom and patio collections. Plus, these items are less popular. So, it makes sense to recommend the whole room collection to shoppers here.
<build>Build your quiz in ConvertFlow<build>
With your quiz mapped out, you’re ready to build it in ConvertFlow ⚡
Let’s do it together step-by-step.
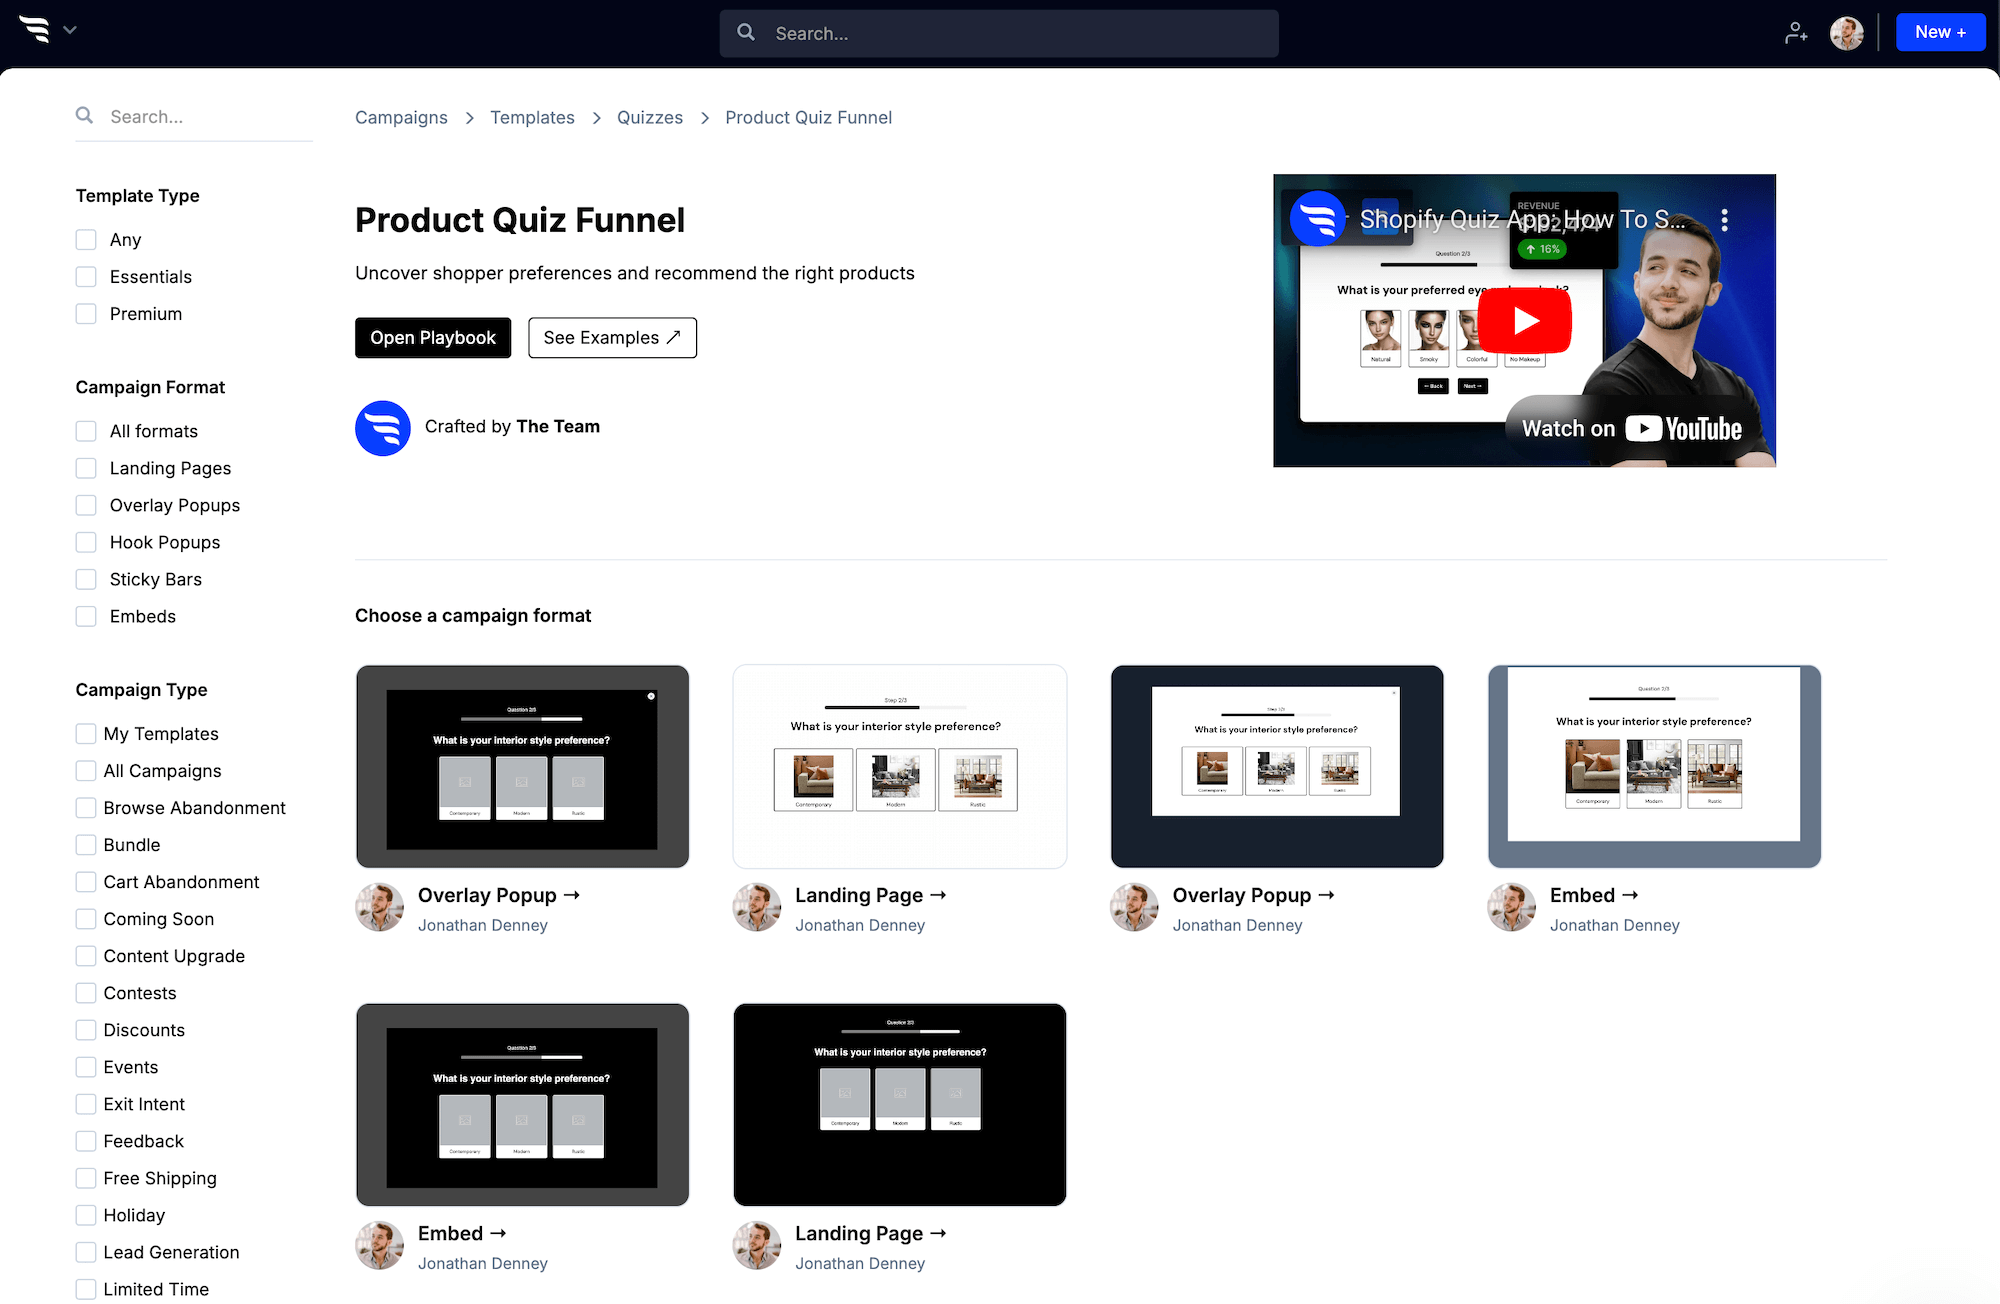
Choose a quiz template
Make the quiz creation process easier by starting with a template that aligns with your product’s end goal.
ConvertFlow has a wide range of customizable quiz templates for all kinds of verticals, niches, and outcomes. Browse our template library to see them all.
For this playbook, we’ll use a simple product recommendation quiz template:
Select quiz campaign format
Now decide how you want your quiz to display on your website.
You can display a quiz:
- On a dedicated landing page
- As an overlay popup
- Embedded onto an existing page on your website
We’ll choose a landing page for this playbook.
We typically recommend using landing pages for quizzes so you can have a single quiz URL to promote in a variety of ways.
NOTE:
If you chose to have your quiz within a popup or site message, remember to set how it’s triggered when someone is browsing your website. E.g. exit-intent, scroll-point, time delay, or on-click.
To do this in ConvertFlow, head to the settings tab in the right-side panel and scroll to the trigger section:

👉 Learn more: 6 Must-Know Popup Design Principles to Boost Conversions
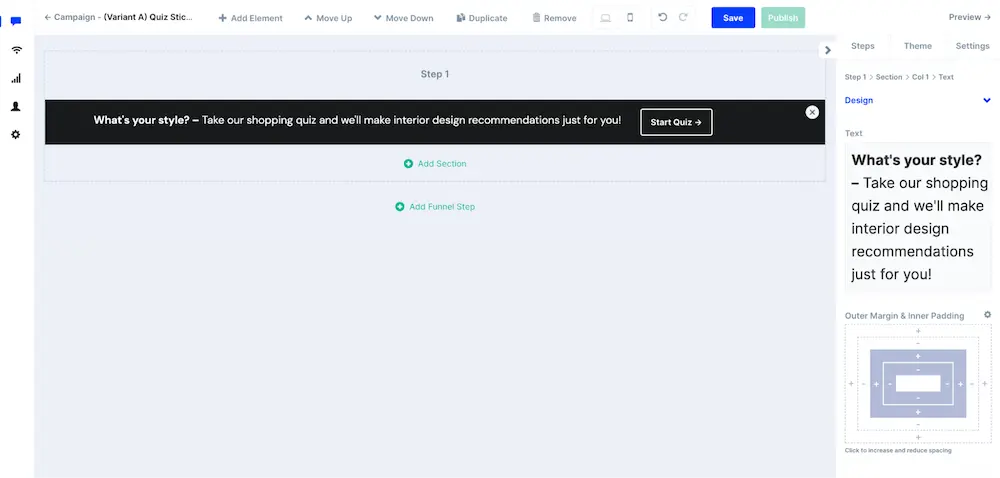
Adding a quiz element
If you started from scratch, or your template doesn't have a quiz element, to add a quiz element, first, click to add a new element from the toolbar.
.avif)
Then, choose the "Quiz" element from the element types to the right.
You'll now have a quiz added to your campaign, with controls to customize the quiz displayed to the right.
In the panel, you can toggle the quiz progress bar, manage quiz questions, toggle next & back buttons for the quiz, and manage quiz completion actions.
.avif)
Adding questions to your product quiz
To add a new question, click "Add Question".
.avif)
You'll be able to either create your quiz's question from scratch, or choose from a library of quiz question templates.
We'll click to create from scratch. A new question will be added to your quiz for you to customize in a panel.
Note at the top of the panel, that you can switch between editing the content, the design, and the logic of the question, by clicking the tabs up top.
Mapping to a custom field
First, you'll want to select a contact custom field to map your quiz question to.
This way when someone answers the quiz question, their answer will be stored within that custom field in their contact profile in ConvertFlow and in your integrated email provider.
This means you’ll be able to run highly segmented email & SMS sequences based on the answers people give to your quiz 😎
Either write in a new custom field data name to use, or select an existing custom field from the dropdown.
.avif)
Choosing a quiz question type
You can choose between multiple question types for your quiz questions, such as simple surveys, image surveys, surveys to choose an icon, color, letter, or emoji.
You can also have your quiz question be a form field, like a text input, dropdown select, numerical inputs, range sliders, etc.
Pro tip: Want to just show a message in between questions, or a loading screen before completing your quiz? Use the "show a message" type!
Customizing the quiz question content
Next, you'll want to edit each of your quiz questions' titles, descriptions, and images that are displayed.
By uploading images and gifs for each question, you can make longer quizzes more fun and engaging, to increase your completion rate.
.avif)
Defining answers for your quiz
Then, customize the answers for your quiz by adding answers, as well as editing/removing any pre-populated answers.
.avif)
Each answer can have a label and value, which you can edit by double-clicking on the answer to open its settings.
The label is what shows to quiz takers, while the value is what gets stored in as a custom field value for contacts.
.avif)
Pro tip: If you plan to have your quiz outcome depend on a score, you can use the score setting to increment/decrement the product quiz taker's score by a certain amount for each answer.
For other types of surveys, such as image surveys, icon surveys, color surveys, etc, each answer can have the visual representation for the answer customized.
Adding sub-questions
Sub-questions let you organize quiz questions under their parent question.
When sub-questions are displayed, the progress bar doesn't progress. The progress bar only visualizes the progress of parent questions.
By default, quiz takers will be automatically routed to sub-questions after answering the parent question.
This can be overridden by skipping questions based on answers.
.avif)
Styling your quiz
The funnel builder has tools for efficiently styling long quizzes:
- Quiz theme-level styling
- Quiz element-level styling
- Per-question styling
Quiz theme-level styling
In the builder panel to the right, click the "Theme" tab.
You'll then find theme styling controls for all types of content. Adjust headings, and paragraph styles, as well as theme styles for buttons and progress bars.
You'll also see theme styles for quizzes, so you can style the majority of your product from one place.
.avif)
Quiz element-level styling
For each quiz element you add to your quiz funnel, you can select the quiz element, scroll to the "Design" settings for that element, and adjust styles for that quiz element.
This includes design controls for the quiz's progress bar, questions, next/back buttons, etc. These element-level styles will override any theme styles you have set.
.avif)
Per-question styling
Each question you add to your quiz will often have slightly different styling and formatting.
For example, one question may have horizontally positioned text options to choose from, and then the next question may call for vertically stacked image options to choose from.
To adjust design settings for each question, click to edit the question. When the panel appears, click the "Design" tab.
Here you can adjust design settings like options layout, spacing, colors etc, for that specific quiz question.
.avif)
.avif)
Integrate your quiz with your email software or CRM
With your questions created and your fields mapped, let’s connect your email tool or CRM of choice (Klaviyo, Attentive, HubSpot, Drip, etc.). Then you’ll be able to pass on the subscriber and contact data you collect from your quiz.
To do this, we’ll jump to the form step of the quiz.
Then, select the form in the funnel builder and click to the “Actions” tab in the side panel.
Click to add or manage integrations, find your CRM from the list of options, click the “Connect” button, and follow the on-screen instructions to verify the integration with ConvertFlow.
.avif)
Segment contacts in your email software or CRM
Now, we can set up an automation to sync the field values from any form submissions into your email provider/CRM. Then you’ll be able to segment customers based on their quiz answers and add them to your subscriber lists for further outreach.
After authenticating the integration, you’ll be brought back to the “Manage Actions” window. From here, scroll down to the automations section and click the “Add Automation” button.
Then, select the automation type that will add a contact to the relevant list or database in your ESP/CRM.
Let’s say we want to add subscribers to our newsletter list in Klaviyo. Select the “Klaviyo - Add to list” automation from the dropdown menu and choose the appropriate list:
.avif)
All new subscribers will now get added to this list when they fill out the quiz form.
You can add further automations here, too—such as adding the subscriber to a list with SMS consent (if you collected a phone number in the capture form), updating contact properties, adding/removing tags, etc.
You’ll also want to add an automation to track completing the quiz as an event in your integrated software. That will enable you to fire off an email/SMS flow for post-quiz follow-up.
Configuring quiz completion actions
You'll want to set the confirmation type. This is what the product quiz taker visually sees upon completing of the quiz.
Examples of confirmation types:
- Showing a simple thank you message
- Redirecting a URL you paste
- Jumping to another step in your funnel
- Triggering another ConvertFlow campaign (e.g. quiz → popup)
.avif)
Firing quiz completion conversion scripts & pixels
If you need to add conversion pixels and custom scripts to fire upon the completion of your quiz, you can do so by opening the script manager.
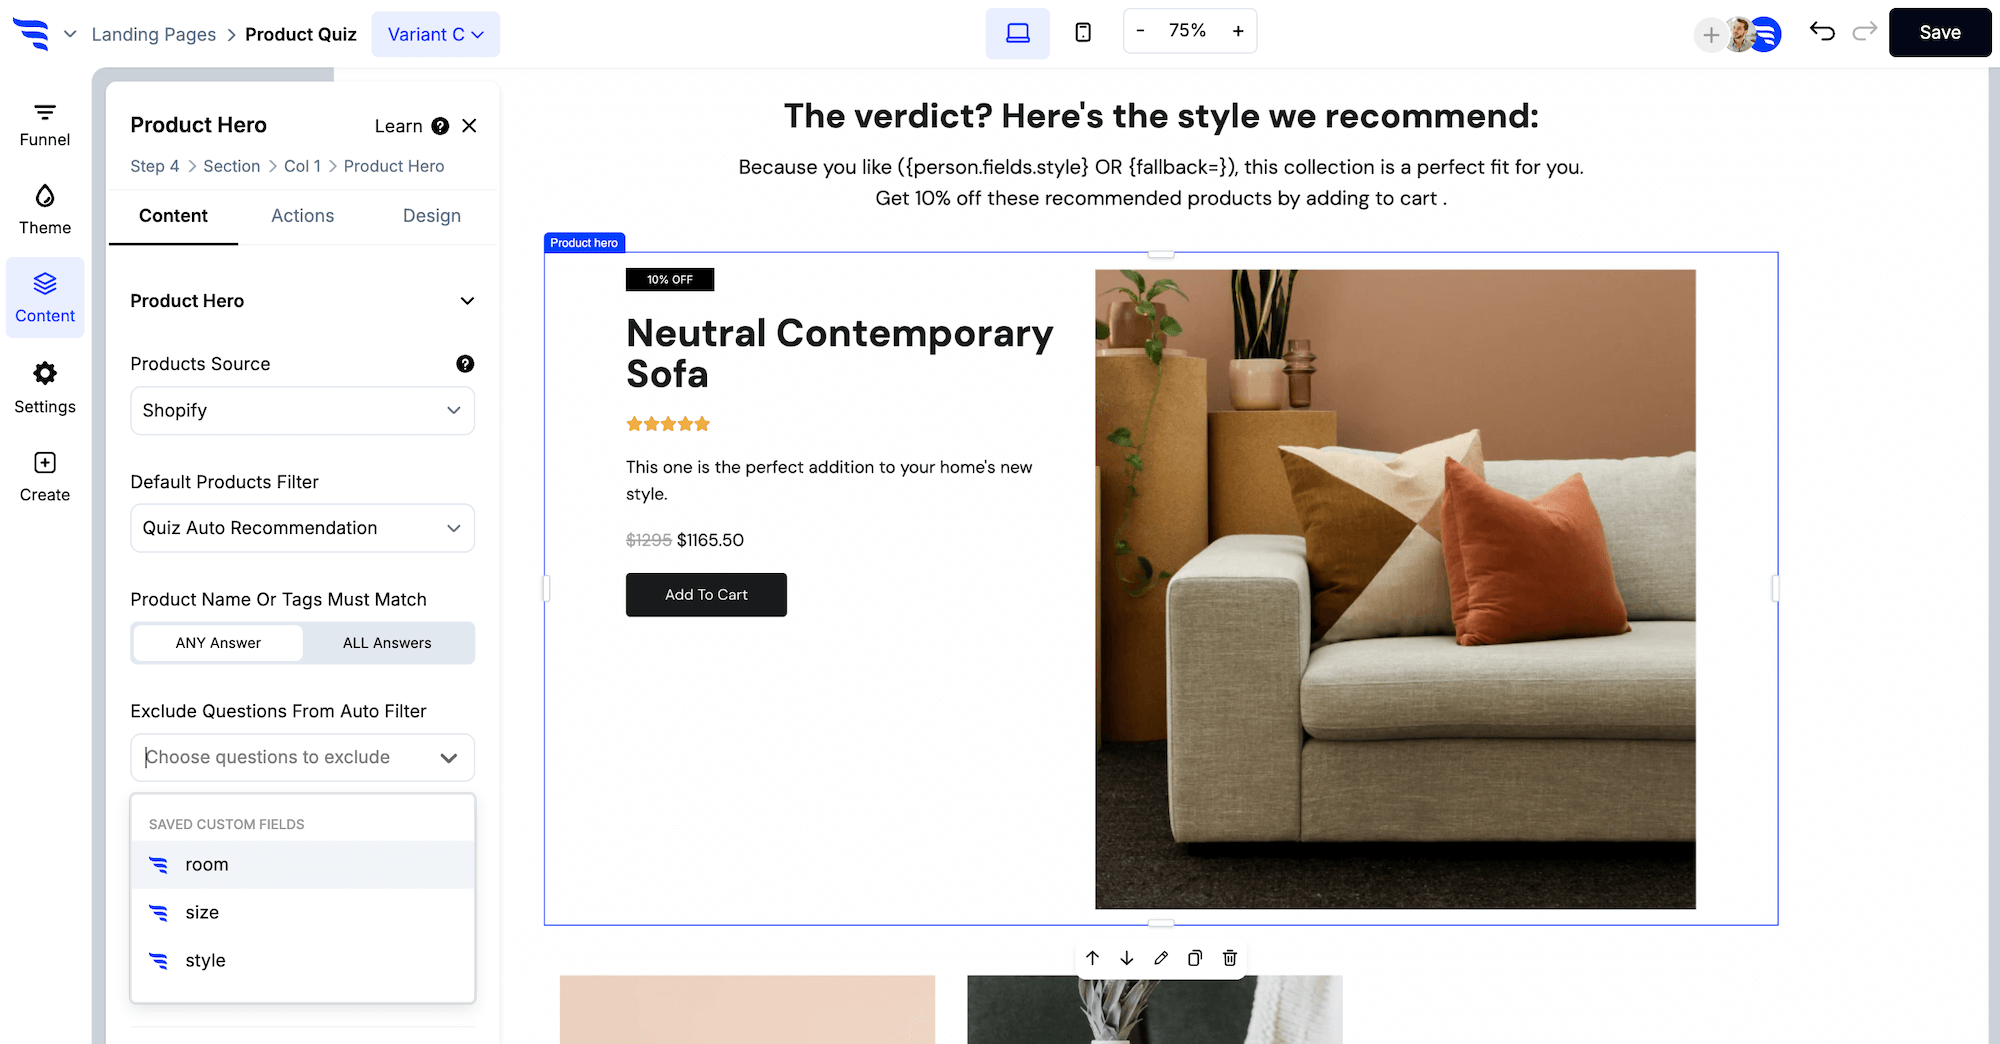
Set up personalized product recommendations for your quiz
Now, add product recommendations to your quiz.
Using the products feed and product hero elements, you can quickly showcase personalized product recommendations.
.avif)
Filtering which products show
First, select the product source you'd like to use. Product elements can use products either added to ConvertFlow or your connected ecommerce platform, such as Shopify.
.avif)
Conditional quiz product recommendations
Using the product element's conditional recommendations feature, you can conditionally show products based on quiz answers.
This is useful for quiz outcomes and product recommendation feeds, where you want to dynamically recommend products based on conditions, without having to create separate campaigns or funnel steps.
Start by clicking to add a "conditional product recommendation":
.avif)
Once you've added a conditional product recommendation, you'll want to click to add conditions for the quiz funnel's product recommendation scenario.
For example, you may want to have conditional product recommendations based on answers from your quiz.
You can add as many conditions as you'd like using ConvertFlow's entire selection of targeting conditions, as well as control whether ALL conditions or ANY condition must be met for the product recommendation to show.
Once you've set the conditions up for your conditional product recommendation, you'll then want to configure which products should conditionally by controlling the Shopify products filter (e.g. Shopify product collection A), or by adding custom products if using the ConvertFlow custom products source.
.avif)
Simplifying mapping quiz answers to lots of product SKUs
Using the quiz auto recommendation filter
By using the "Quiz Auto Recommendation" product filter, ConvertFlow will automatically use answers submitted to your quiz questions and custom fields, to filter products in your catalog.
You can toggle between products matching ANY or ALL answers, to set how strict you want the product recommendations to be.
If there are any quiz questions or custom fields that you don't want to be considered in your product recommendation, select them using the exclusion dropdown setting.
Using A/B/C mapping
To quickly map quiz answers to product recommendations when building long and complex product quizzes, you can use "If answers are mostly A/B/C" conditions to map lots of answers to multiple product recommendations, based on each answer's alphabetical order.
This way, you can map answers to product collections A/B/C/... efficiently by positioning the quiz answers alphabetically.
Example: selecting mostly A answers will recommend Shopify collection A, and so on...
Use quiz answer merge tags
ConvertFlow's Shopify products filter supports adding merge tags to the setting, so quiz answers can be used to dynamically filter products.
When using this method, you'll want the values of your quiz answers to map to how your products are named.
Example: {apparel_type} to only show hoodies, if the shopper selects hoodie.
You can also use merge tags to filter product variants. Example: {shirt_size} to only show small sizes if the shopper selects small.
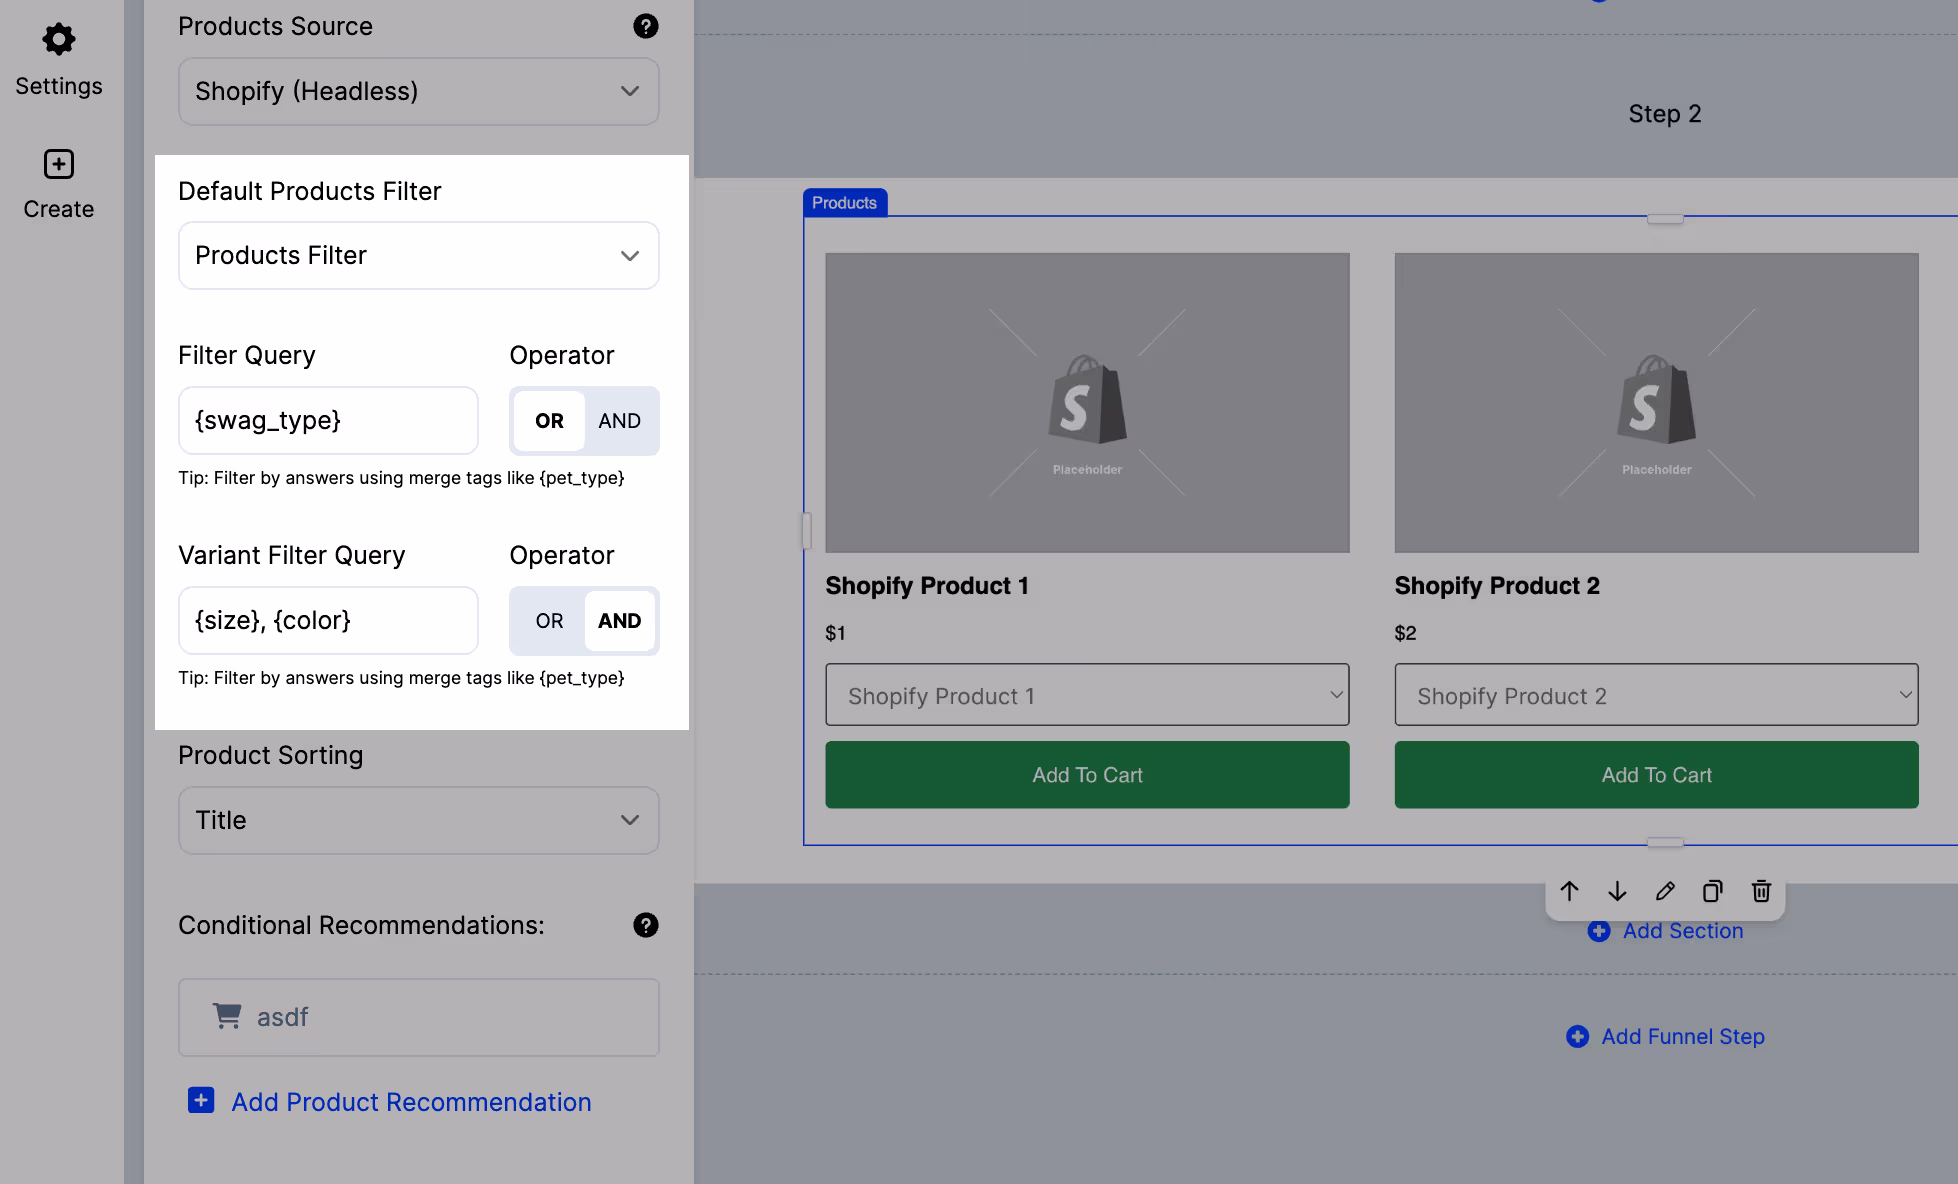
Pro tip: When using comma separate values or merge tags in product filters, you can configure the filter if the product name contains all keywords, or any keyword, by toggling the AND/OR operator.
Customize the design of your quiz product recommendations
With your products added, you can customize a whole heap of design options for your products from the side panel, like:
- Grid or list layout
- Maximum number of products to show
- Margins, padding, container widths
- Button colors, font types, text styling
And lots more ✨
.avif)
Preview your quiz funnel
Click “Preview” in the top right of the builder to view your quiz as it will appear on your website. You’ll be able to check the look of your quiz and test out its functionality.
Any automations you have set up won’t actually run here. So you won’t be creating contacts and adding to lists while testing.
If it all looks good, select “Launch” to go through to the final step.
Launch your quiz funnel
On the Launch page, you’ll see slightly different options here, depending on the kind of format chosen earlier—landing page, popup, embedded, etc.
For a landing page: just select your domain and customize your URL path.
For popups and sticky bars: set the pages you’d like your quiz to be shown on and/or visitor segments to be shown to.
For embeds: you’ll see a simple embed code you can copy-paste to any page on your website. Like with a popup, you can also choose specific visitor segments to show the embed to.
Now all you need to do is activate your quiz to set it live!
.avif)
<split-test>Split-test to improve quiz performance over time<split-test>
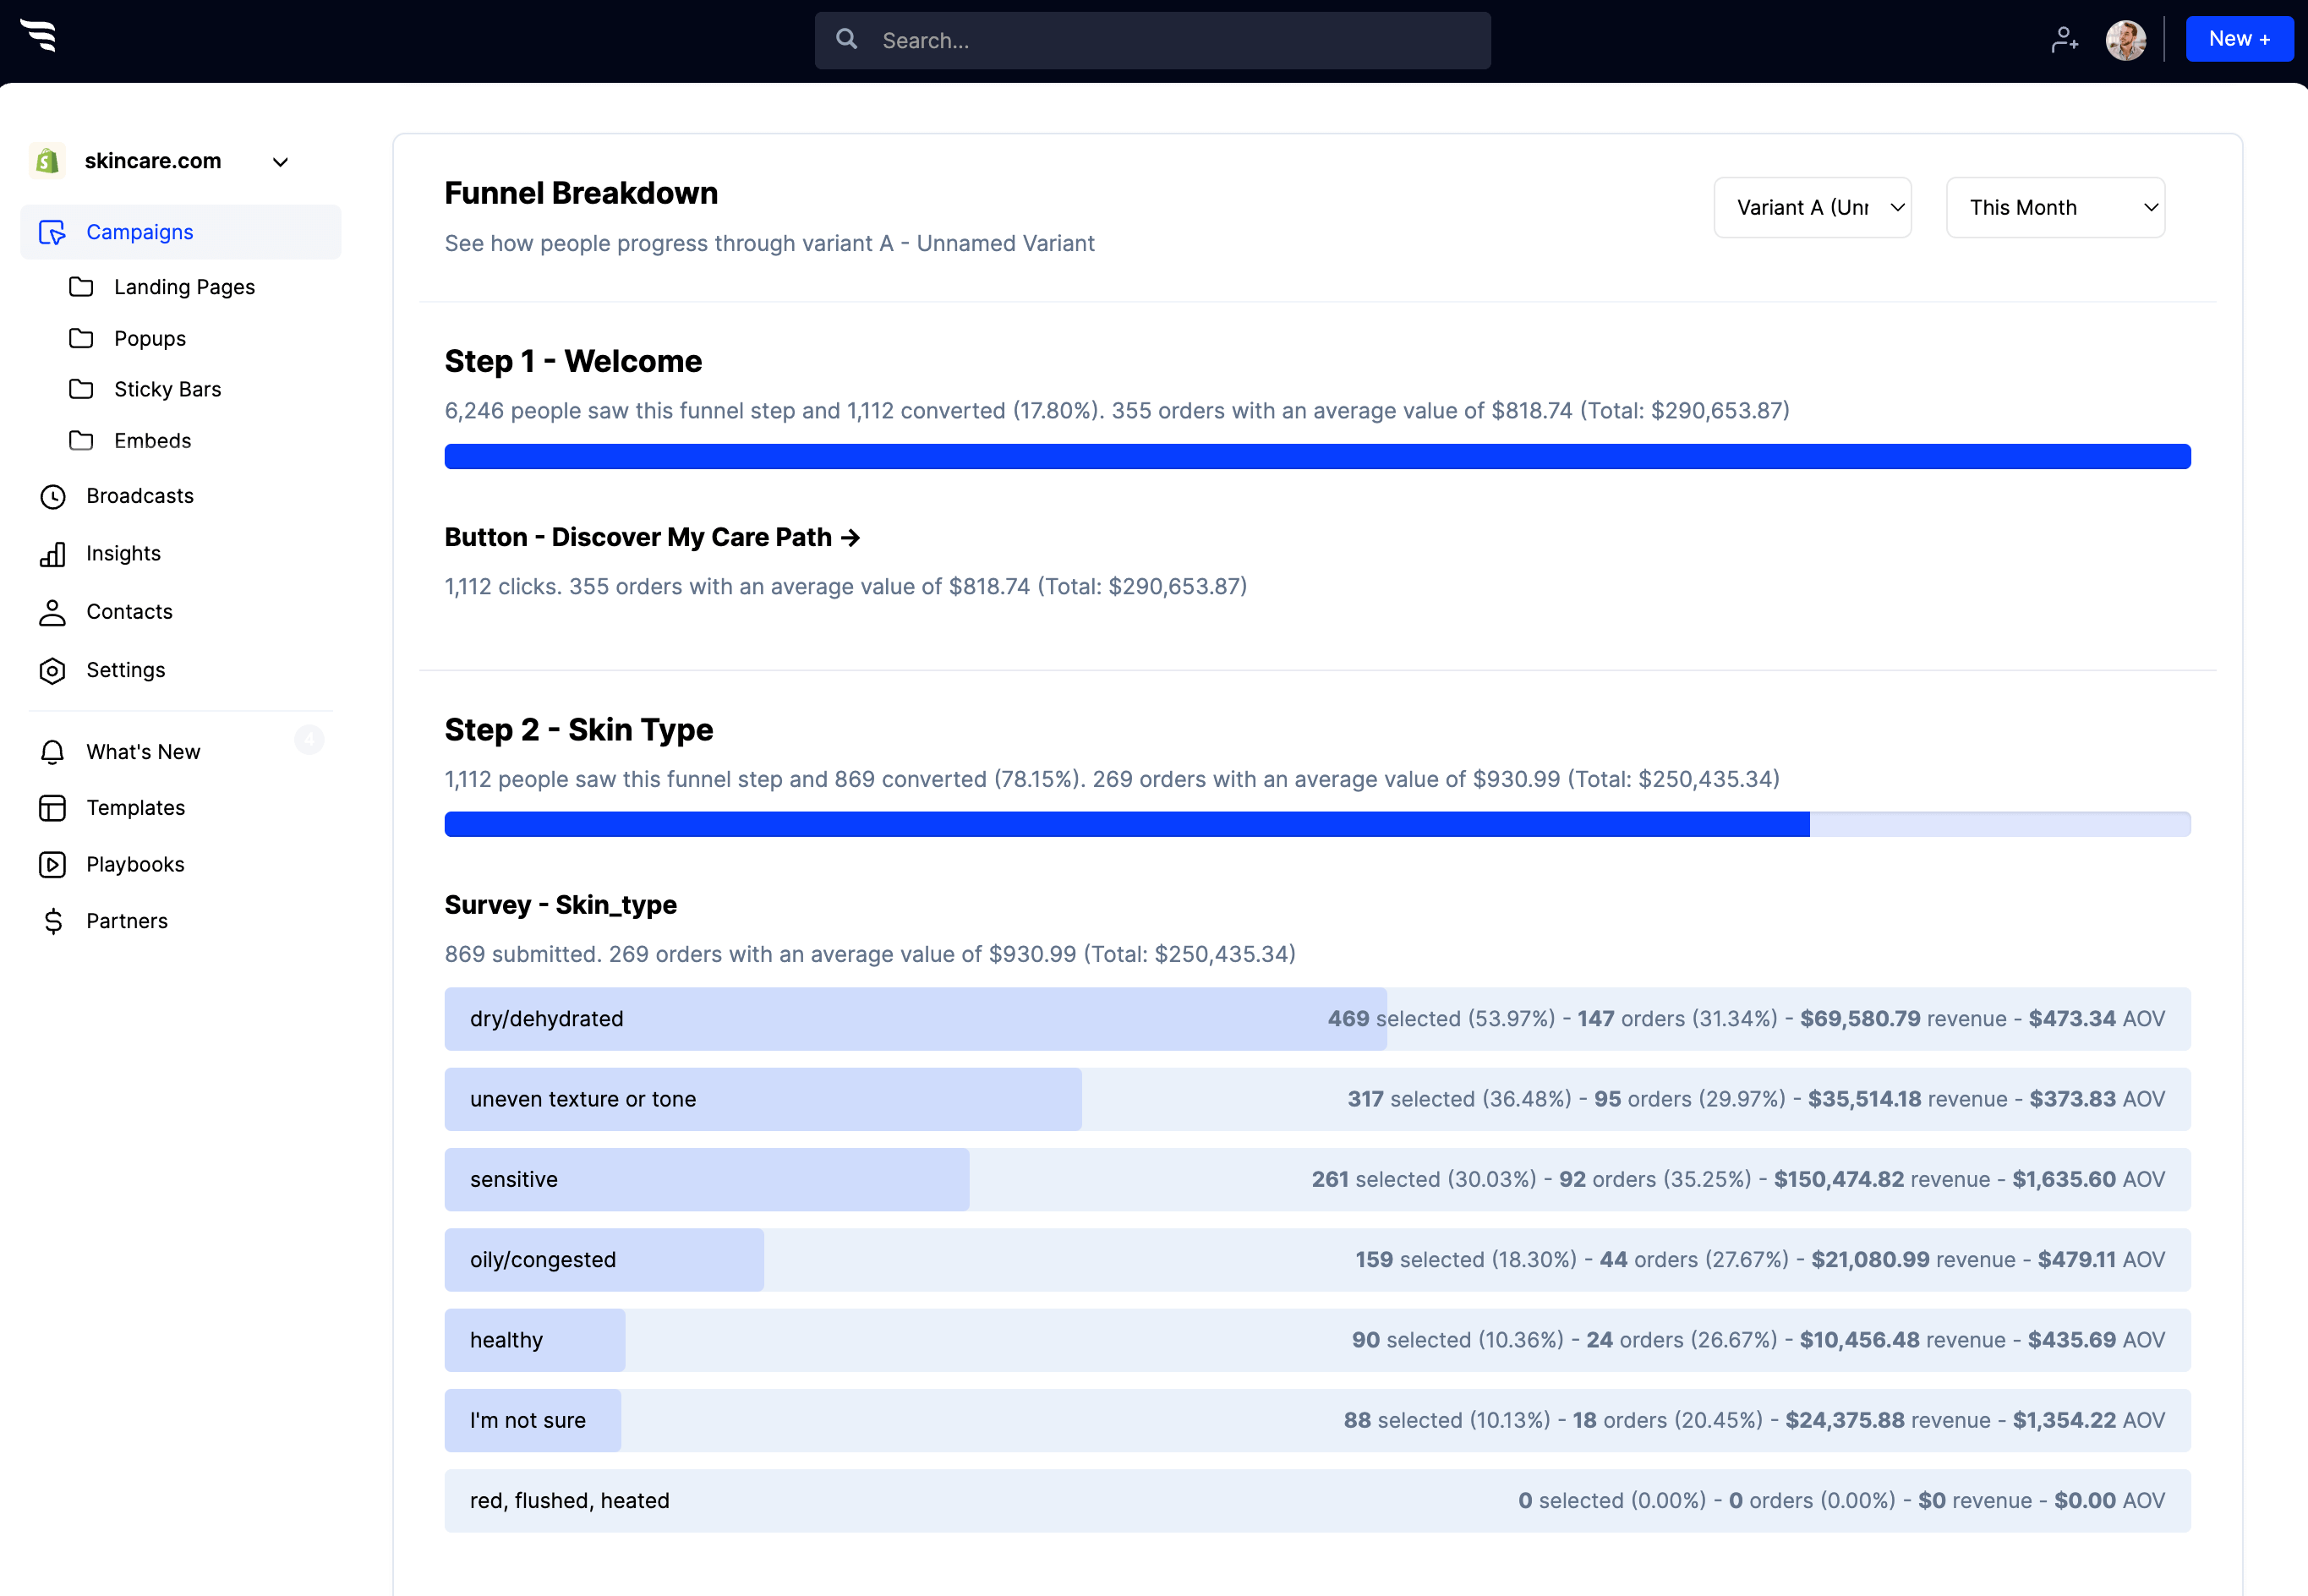
ConvertFlow’s analytics dashboard makes it easy to examine your quiz funnel’s success.
For example, you can see how many people are progressing through the funnel, answering questions, selecting certain answers, dropping off, etc.
And when shoppers take your quiz and then checkout, you can see how many orders and how much revenue & AOV is attributed to each answer!
Then, split-test different variants to improve these metrics:
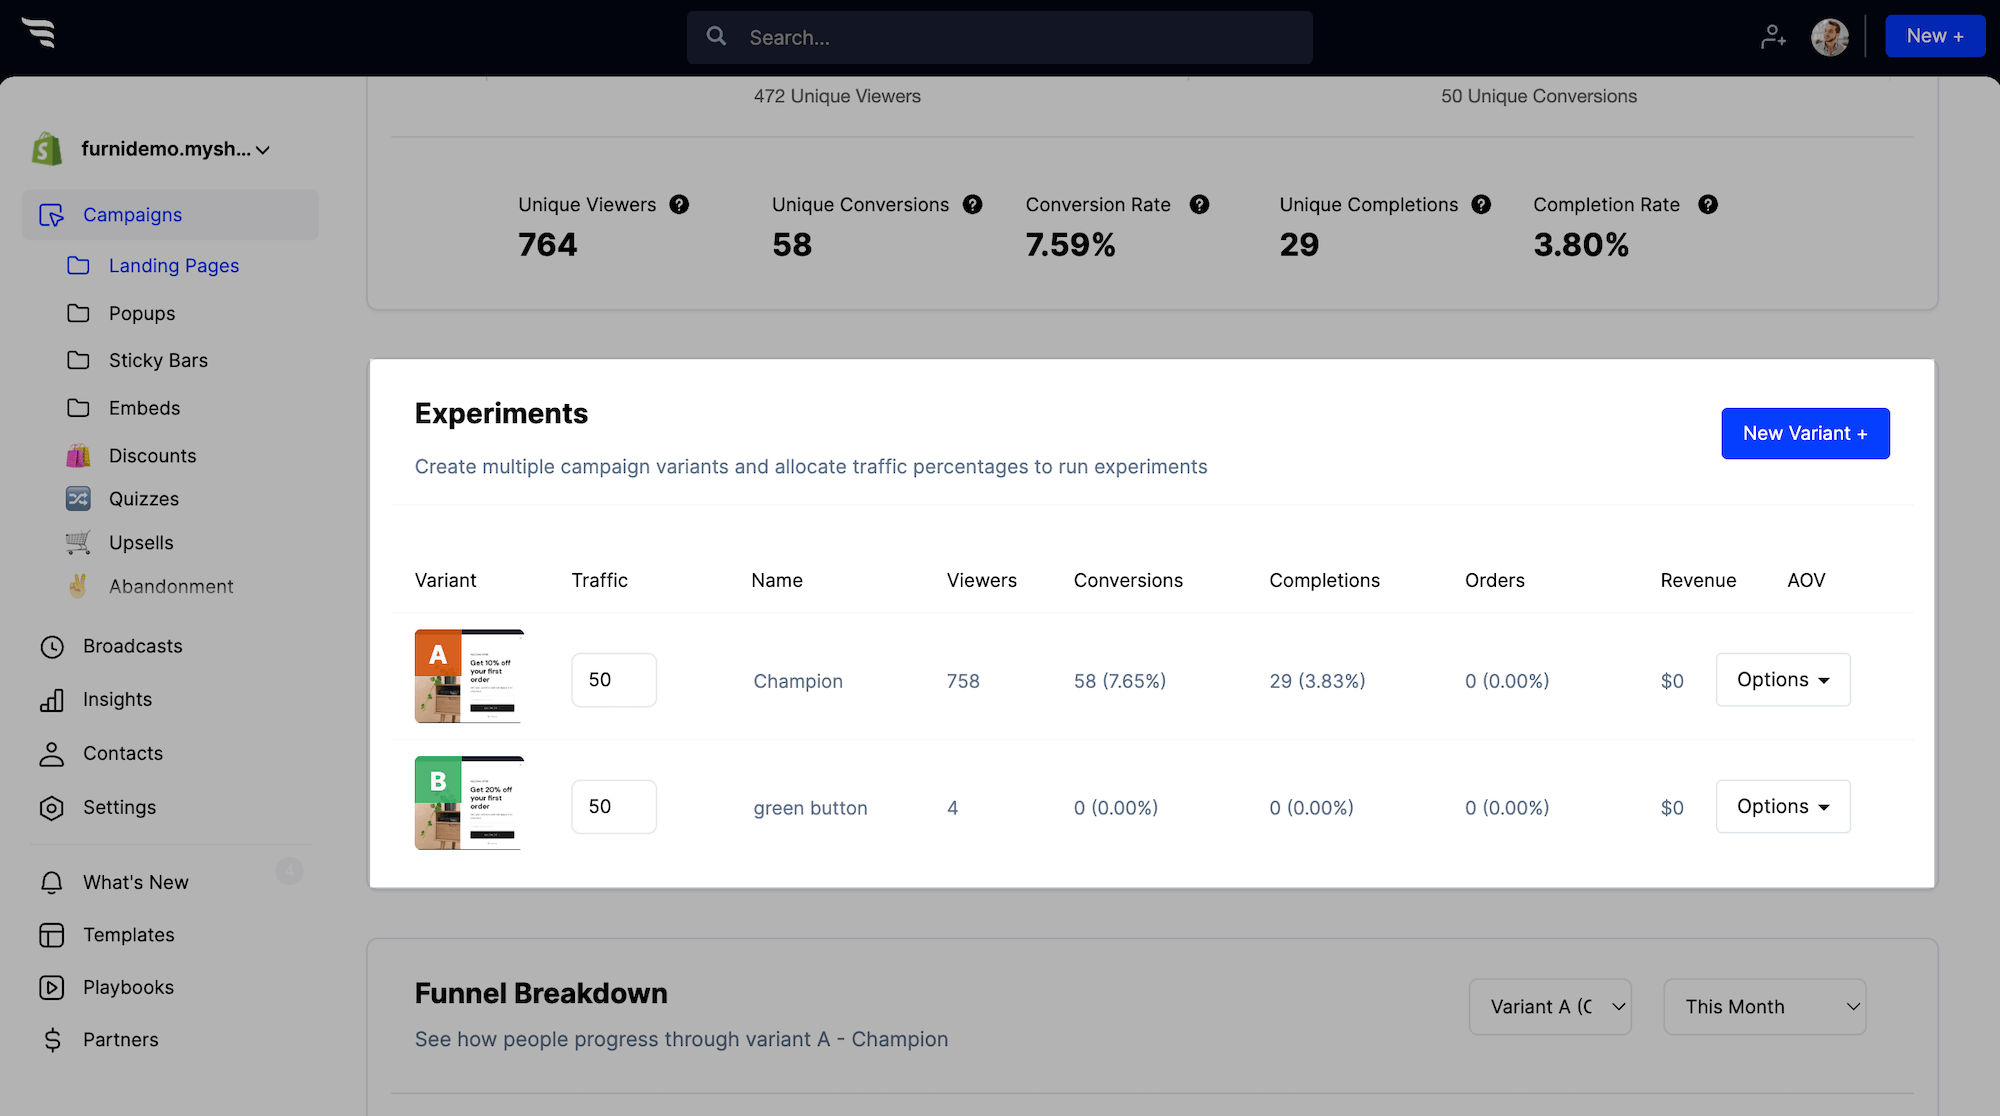
You can experiment with your quiz’s:
- Copy
- Number of questions
- Product recommendations
- Aesthetic design
- And more
Soon, you’ll find the best-performing version of your quiz that engages shoppers and encourages them to buy.
<promotion>How to make your quiz a success<promotion>
Congrats on launching your quiz 🚀
Now that you’re set up to recommend the best products to shoppers, you’ll want to:
- Surface your quiz to shoppers
- Set up an email/SMS sequence to engage quiz takers
- Use your quiz data to personalize campaigns
Doing these things will amplify your quiz’s success and impact on your business.
Set up a post-quiz email/SMS flow
A common mistake brands make is to leave quiz takers without any follow-up. Sure, you have shoppers’ emails and phone numbers now. But you don’t want their first contact from you to be a generic welcome flow—or worse, a sale or new product announcement three months down the road.
By sending a dedicated email or SMS flow to quiz takers, you can continue the conversation and encourage a purchase if they didn’t convert right away.
This is the email menstrual wellness brand Marea sends its customers right after they take the quiz:
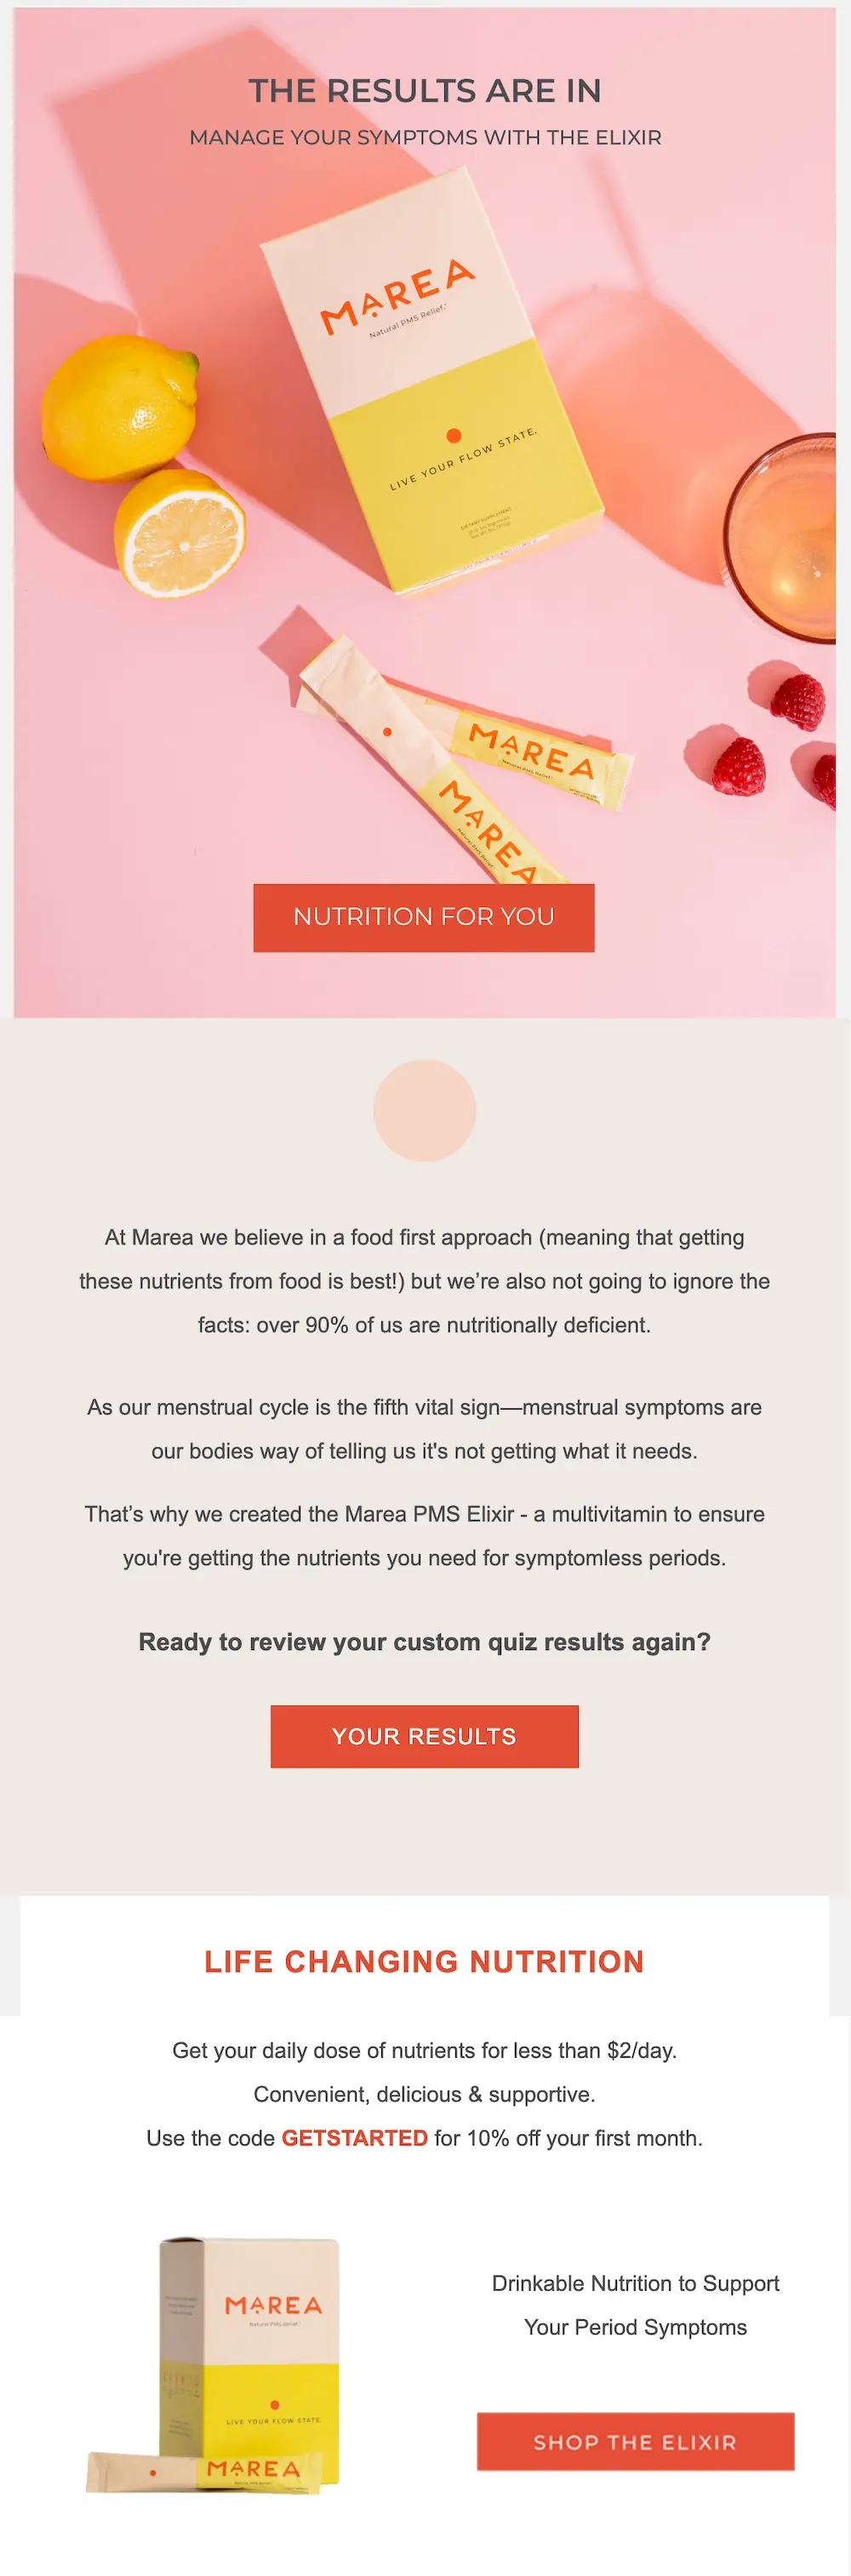
The email has a link to review quiz results and to shop. Plus, a reminder of the first-order discount.
👉🏾 See a full breakdown of Marea’s one-product quiz and post-quiz email flow.
If you completed steps 6 & 7 when building your quiz, you’re all set up to launch post-quiz email and text sequences.
Use the custom fields you defined earlier to set up conditional flows in your product of choice. It’ll look something like this if you’re using Klaviyo:
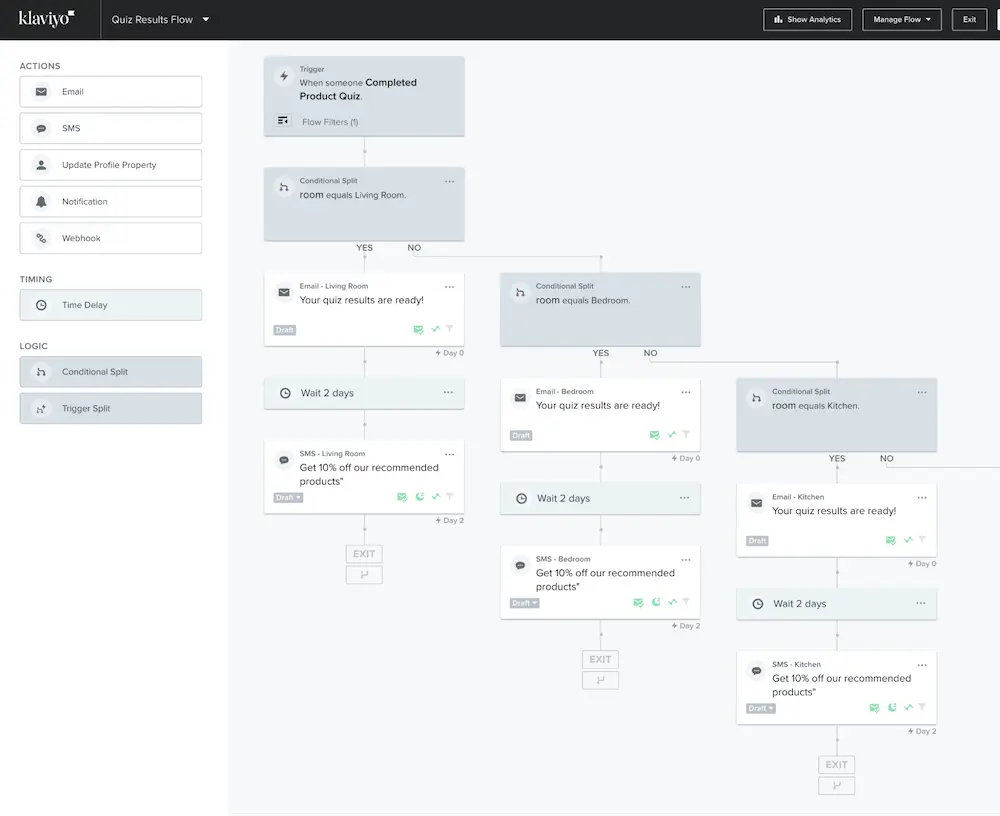
Send a first email with the shopper’s quiz results right after a customer completes the quiz like Marea does.
From there, experiment with your flow. Try different numbers of messages in the sequence and test different timing.
At minimum, send a text after a couple of days to shoppers who didn’t order with a reminder of their discount or other incentive and a link back to their recommendations.
Also, consider how your typical welcome sequence can inform your post-quiz flow for new subscribers. Perhaps your sequence will include:
- A letter from the founder
- Product education, or
- Social proof
Your post-quiz email and SMS flow is crucial to getting shoppers back to your site if they didn’t purchase right away. So don’t leave this out of your strategy.
👉🏼 Learn more about setting up flows in Klaviyo.
Promote your quiz
By promoting your quiz, you’ll get a lot more shoppers to take it. And since a quiz streamlines the path to purchase, it can help you get more shoppers to checkout faster than if you let them browse the site of their own accord and hope that they find the quiz.
You’ll still start by giving your quiz a home where site browsers will find it. That could be in your navbar or on a specific product page.
Now, promote it in marketing campaigns on your website and other channels.
Try these tactics to leverage your quiz.
💡 As a follow-up campaign to your welcome offer
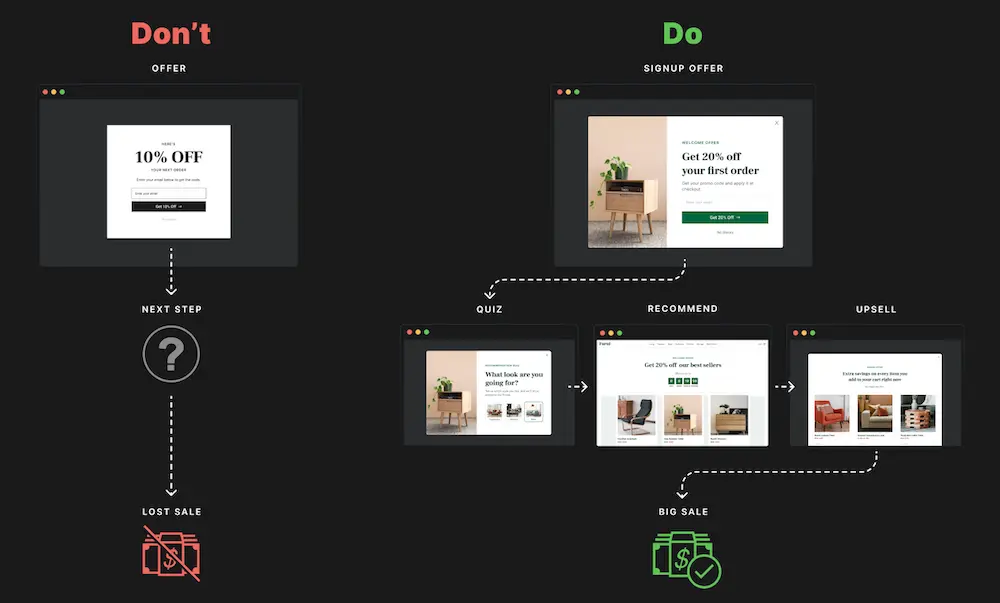
After a welcome popup, many brands leave shoppers hanging with no guidance to navigate the store. That’s a missed opportunity and you risk losing customers.
Instead, include a CTA to take your quiz as the last step of your welcome popup.
👉🏾 Learn how to set up your welcome offer with a CTA to your quiz using the welcome offer playbook.
💡 Across your website
With ConvertFlow’s popups, sticky bars, and embed campaigns, you can surface your quiz wherever it makes sense for your brand.
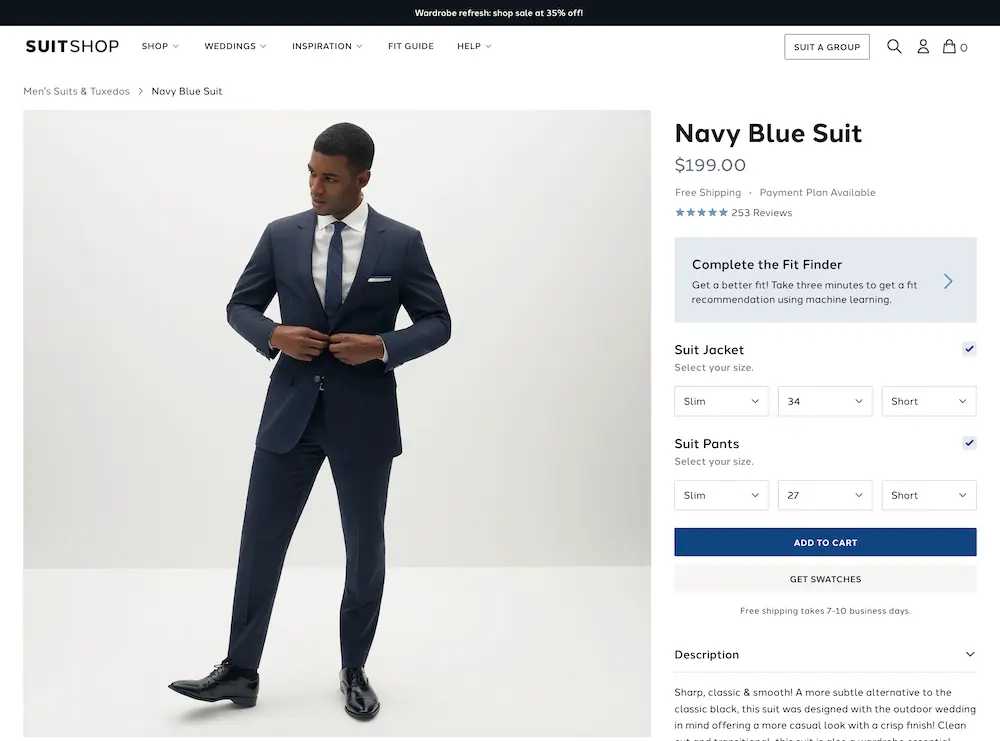
For example, you could embed a CTA to take your quiz on a product page like SuitShop does with its fit finder quiz:
You can also target specific customer segments like new or returning shoppers, based on their site activity, previous purchases, etc.
For example, you could create a sticky bar that targets existing Klaviyo subscribers on your store and drives them to take the quiz:
💡 To existing email & SMS subscribers
If you already have a subscriber list by the time you launch your quiz, consider sharing the quiz with a segment of shoppers who would benefit from it.
For example, you could send it to subscribers who haven’t purchased yet.
Increase the chances that subscribers will take your quiz with an incentive—ideally, a different one from your welcome offer. That could be a better discount, loyalty points, a free gift, etc.
💡 In paid ads
A quiz is a huge value proposition for many brands. Try promoting your quiz in paid ads to draw customers in.
Depending on your products and brand, the quiz itself might be a great CTA for new shoppers who’ve never heard of your brand—like makeup brand Il Makiage does on Facebook:
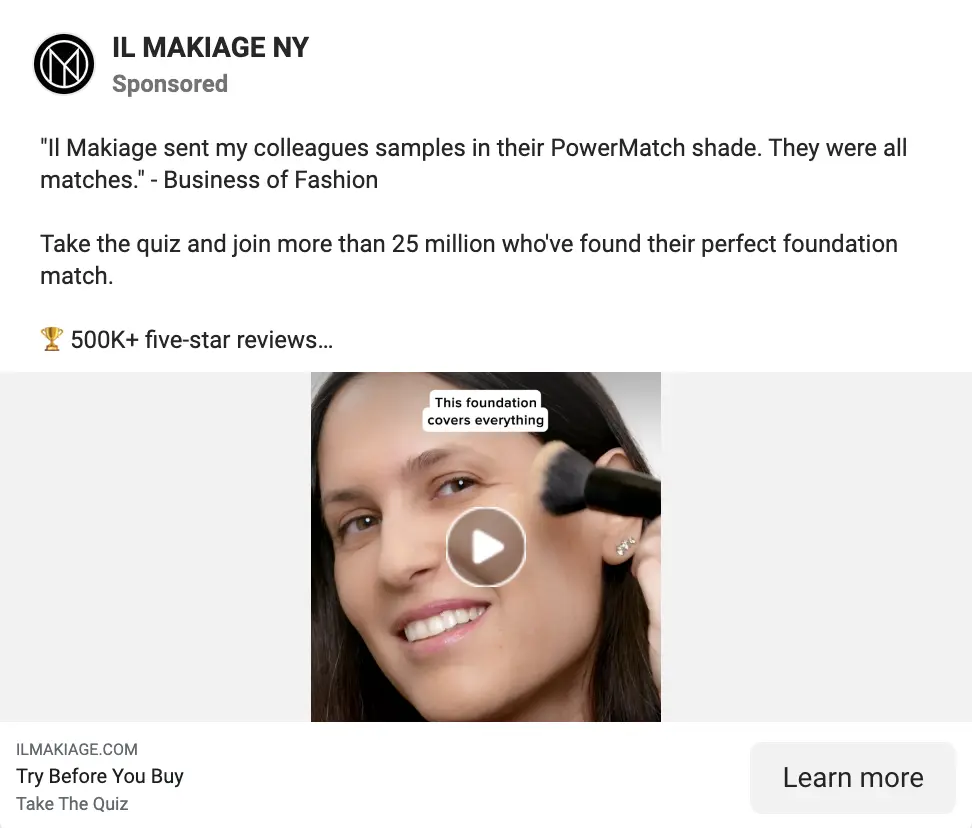
The quiz can also be a perfect ad CTA for retargeting browse abandoners. If they didn’t find what they were looking for during their first visit to your site, offering help to navigate your store might bring them back.
💡On social media profiles
Your profiles are like mini storefronts on social media. Try including a link to your quiz as your one link or in a menu of links through a “link in bio” page.
Personalized supplement brand Nourished highlights its quiz in its Instagram bio page:
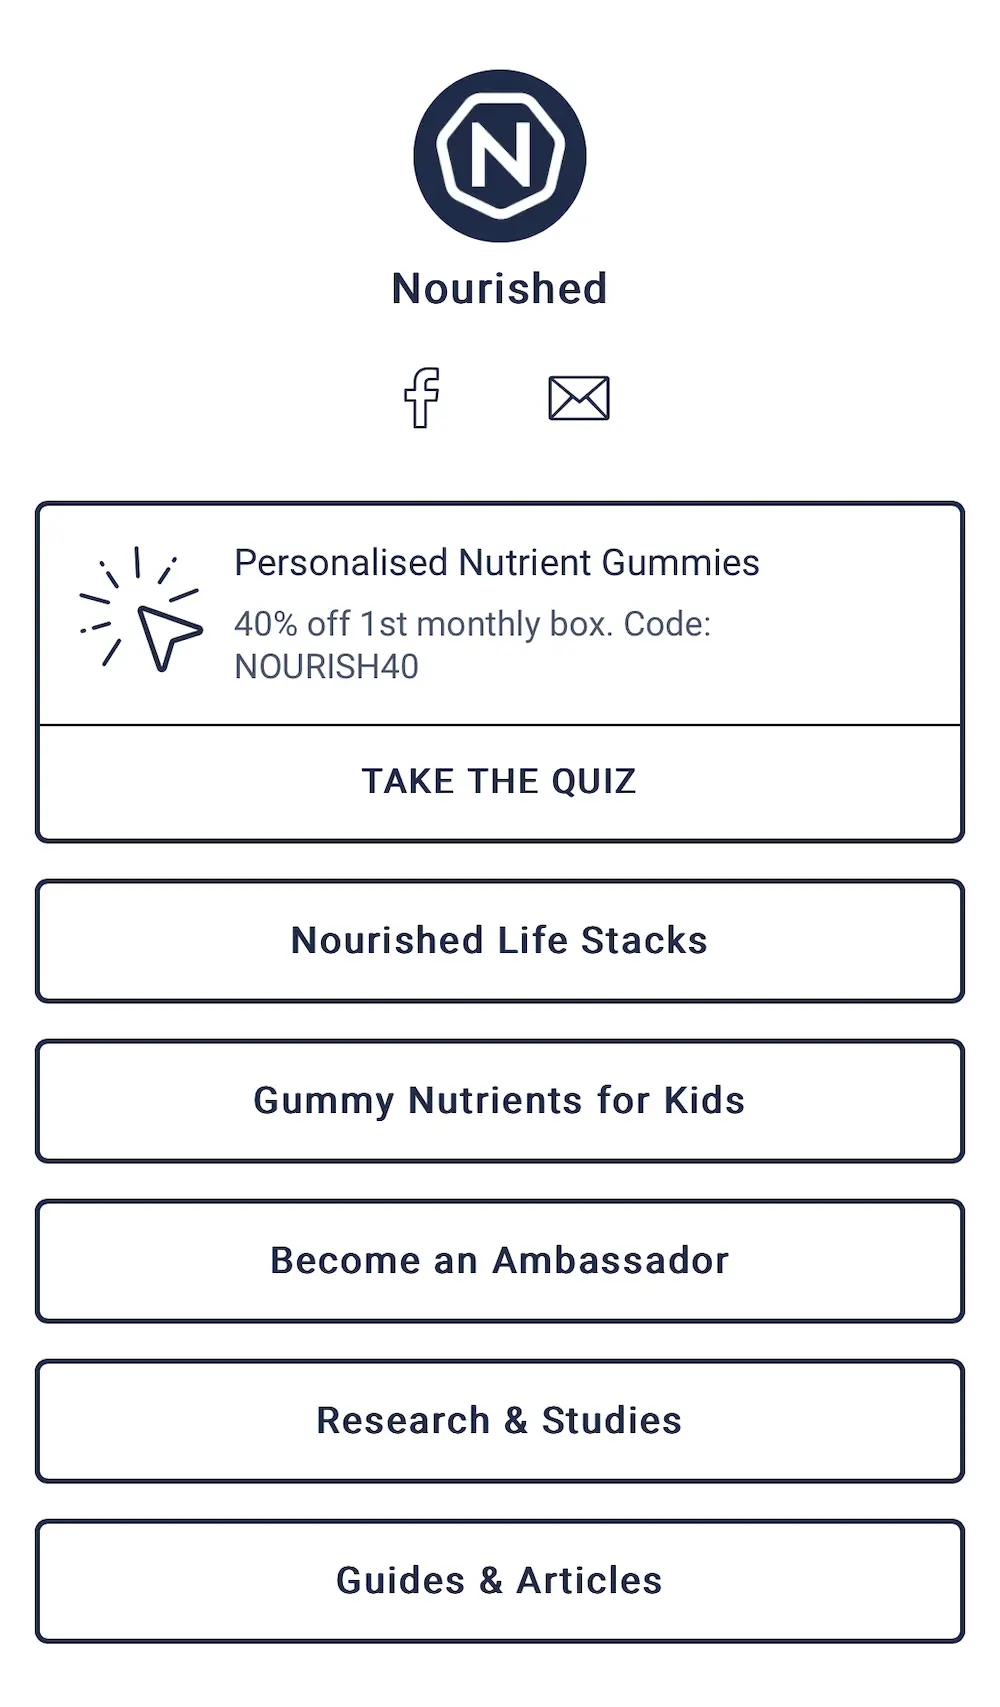
The brand also incentivizes the first purchase with a huge discount.
👉 Get the social media link in bio landing page template.
Personalize your marketing campaigns
Beyond helping customers with product discovery, quizzes give you a ton of data to personalize your marketing campaigns—ultimately making for a better shopping experience that converts more customers 🤩
The possibilities are endless in terms of how you can activate your customer data. But here are a few ways to start:
💡 Personalized on-site popups
Why only show welcome popups to new customers? Returning site visitors benefit from guidance on your store, too. So launch “welcome back” campaigns for returning subscribers and customers:
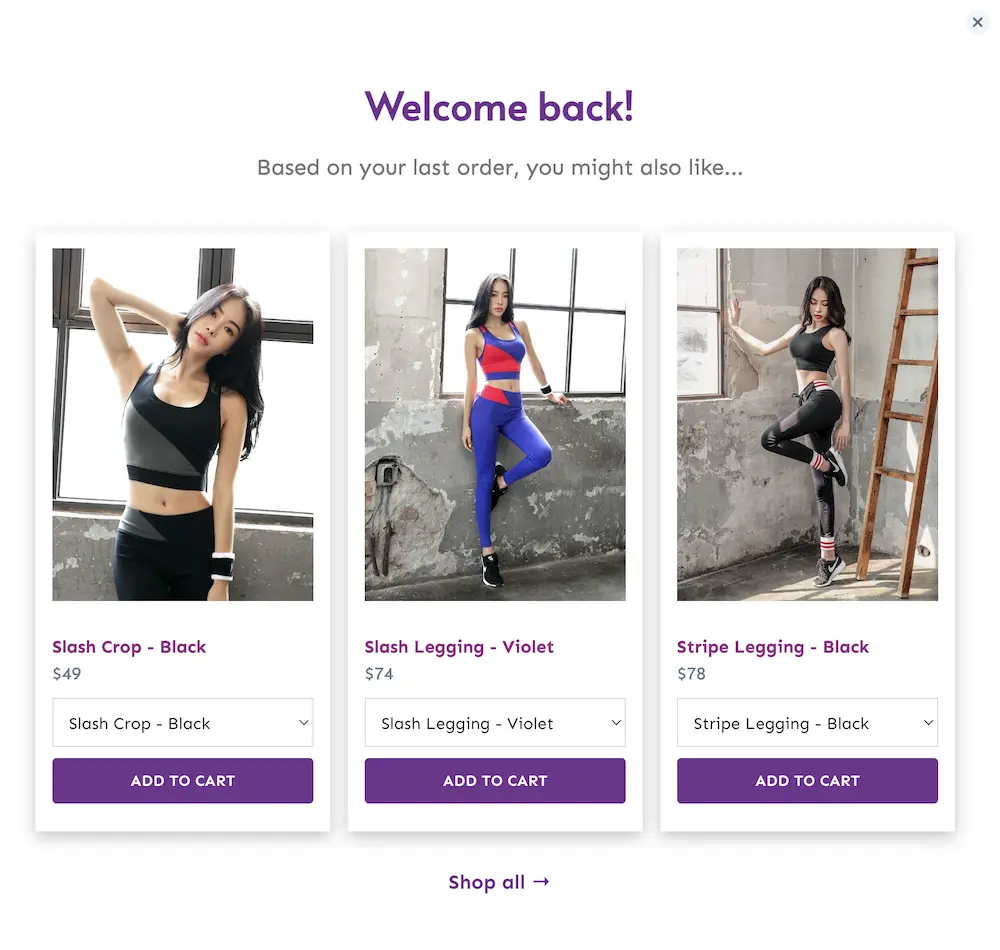
Use your quiz data to surface product recommendations for customers who didn’t buy after taking the quiz. Or show returning customers recently launched products based on their preferences.
👉🏽 Try this returning customer popup template.
💡 Retargeting ads
Use your ESP’s audience sync feature to push contacts into your Facebook custom audiences (e.g. here’s how to connect Facebook ads to Klaviyo).
Then, create Facebook ad campaigns for different shopper segments based on specific product recommendation collections.
💡 Future emails & texts
We talked about the post-quiz email/SMS sequence. But this information is invaluable for ongoing marketing campaigns.
Use your quiz data to only share launches and promotions for products your customers are likely to buy—and skip those that aren’t relevant to them.
For example, if you have an online pet shop and learn from your quiz that a shopper owns small dogs, you can skip any announcements or promos about products for large dogs or other pets.
Complete your ecommerce conversion funnel
Congrats on launching your quiz 🎉 We can’t wait to see what you build.
Quizzes increase shopper confidence, speed up buying decisions, and power personalization. Ultimately, you’ll see better conversion rates, AOV, and customer retention.
And quizzes are an essential part of the ecommerce conversion funnel.
When you’re ready to move on to your next campaign, we recommend creating one-click add-to-cart upsells and cross-sell popups to increase AOV.
Or check out all the ecommerce funnel playbooks 🔥


.svg)
