
Playbook summary
Create an overlay or corner popup that shows when someone lands on your store’s cart page. You can recommend similar/related products to what’s already in the cart and get visitors to add more items directly from the popup—without leaving the page.
- Industry:Ecommerce
- Metrics affected:AOV; LTV
- Campaign type:Popups
Tools you'll need
- ConvertFlow
- Shopify
Quick setup
- Trigger: Time-delay (0-5 seconds)
- Content: Show products related to what’s currently in cart
- Call-to-action: Add to cart
- Targeting: If visiting cart page AND cart contains at least one item
In-person stores boost revenue by placing impulse items around the cash register. You can do the same online with timely, relevant offers as shoppers are checking out.
Make it happen by:
- Triggering a popup as someone enters the cart page
- Offering cross-sells related to what’s already in the cart
This creates the same “impulse buy” effect people get as they wait in line at a physical store. Only you get to use data to make offers directly related to what they’re in the process of buying—and maybe even entice them further with a limited-time discount.
In this playbook, we walk you through how to launch one of these in-cart cross-sell popups on your store using ConvertFlow.
💡 BONUS: This playbook works well in tandem with an Add to Cart Upsell Popup
Step 1: The creative
There are two general options we suggest choosing from in terms of the type of campaign. You can either go for a full-screen overlay or a corner popup:
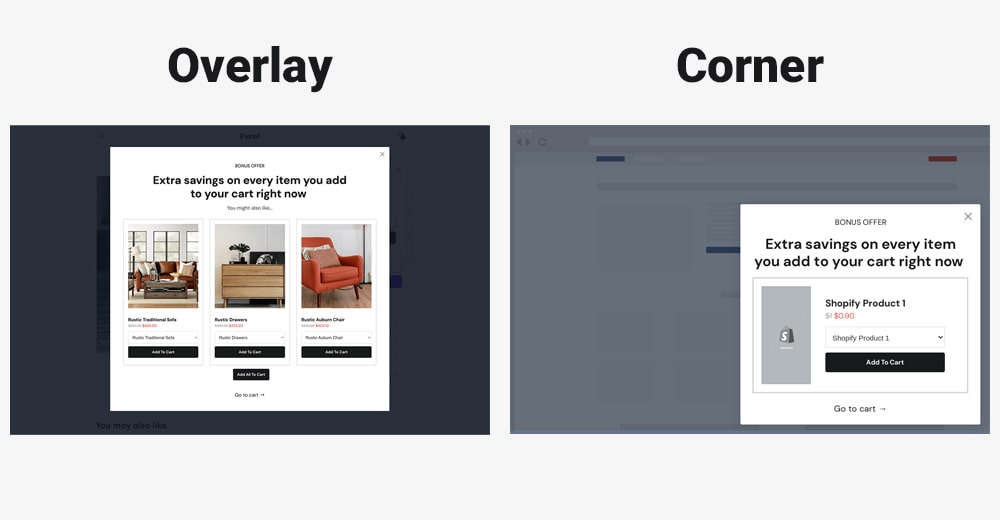
The full-screen overlay is more visible and will, therefore, likely get more interaction—it’s also bigger, and so you can display more products in it. Whereas a corner popup is more subtle, yet could be interacted with slightly less.
It’s up to you how disruptive you want the cross-sell experience to be at this point in the checkout process.
Once you’ve decided on a campaign type, you can choose a template to start customizing. Here are a few options that are best suited to this campaign:
PRO TIP:
If you opt for a corner popup, you can choose whether it appears aligned to the left, right, or center of the screen. Just go to the “Theme” tab in the builder’s side panel, open up the “Container” section, and choose your popup’s position from the dropdown:

For the customization and creative itself, you simply need to pull in products related to what’s currently in the cart. This is a straightforward task using ConvertFlow’s Shopify integration and products element.
Most templates recommended for this type of campaign will come with a products element already added. But, you can also manually insert into any campaign by adding an element and choosing “Products” from the side panel:
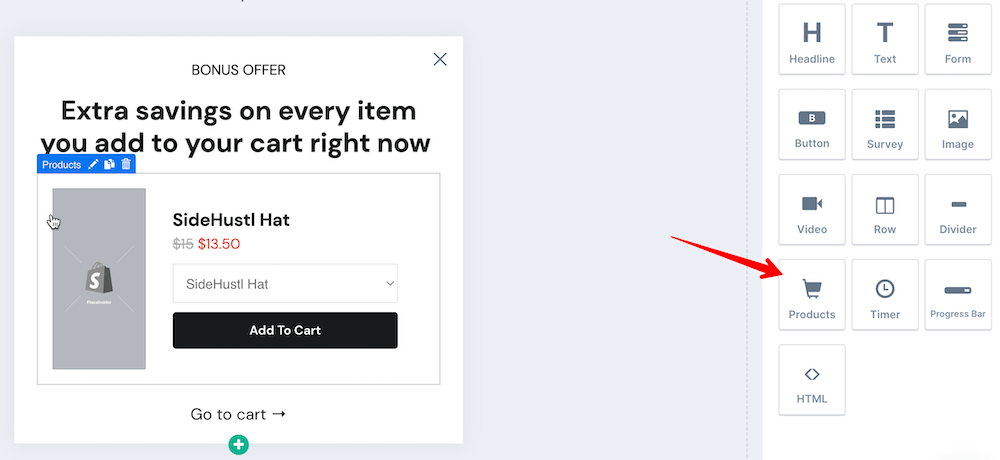
Next up, we need to get the right products to show.
Set the product source to “Shopify” (integrate your Shopify store, if not done so already). Then choose “Related to a product” as the filter and “First product in cart” as the product:
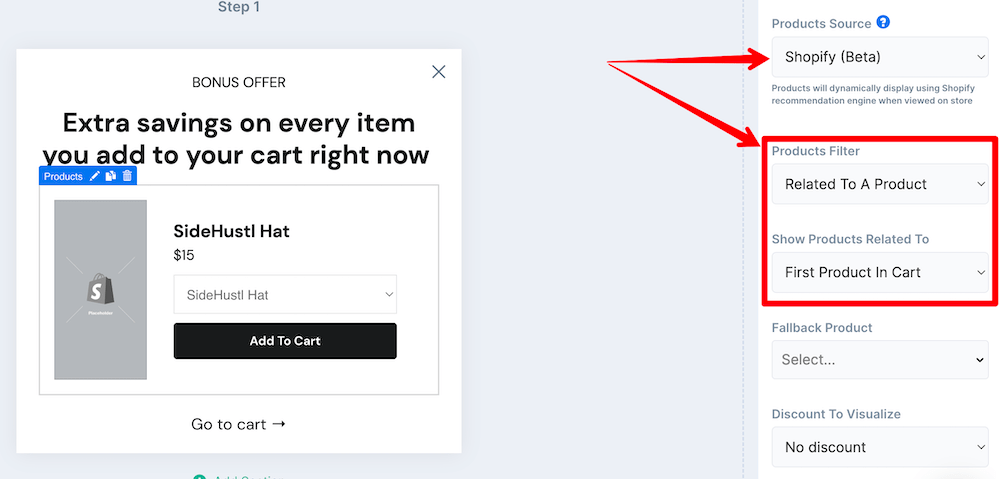
This means ConvertFlow will use Shopify’s recommendation engine to find similar products in your catalog to the first one currently in the cart. However, you can choose to manually add products from your catalog here instead, if preferred.
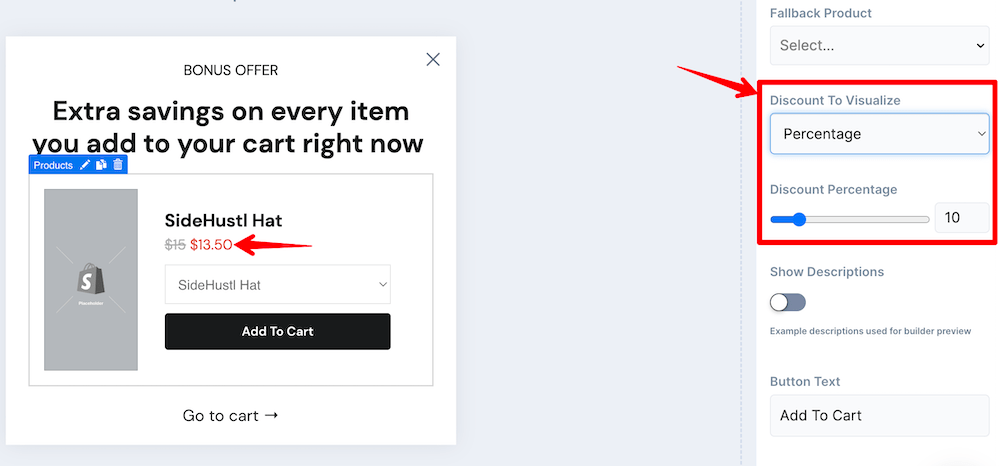
You can also easily visualize any time-sensitive discounts you’re offering:
Finally, scroll further down the side panel to customize the styling of your products in the popup—fonts, spacing, colors, etc.
You’ll also be able to control the number of products that show here as well as the format and alignment in which they’re displayed.
PRO TIP:
Consider adding a countdown timer to hammer home any urgency involved in your cross-sell discounts:

Step 2: The technical setup
We have the creative of our popup sorted. Now it’s time to hook up the technical side so it all works from a back-end perspective.
There are two key steps to this:
- The trigger
- Button actions
1. The trigger
We want to make sure this popup is seen by everyone who enters the cart page. So, it’s best to use a time-delay trigger that’s close to instantaneous.
Head to the “Settings” tab in the ConvertFlow builder’s side panel and choose the “Time Delayed” trigger type:
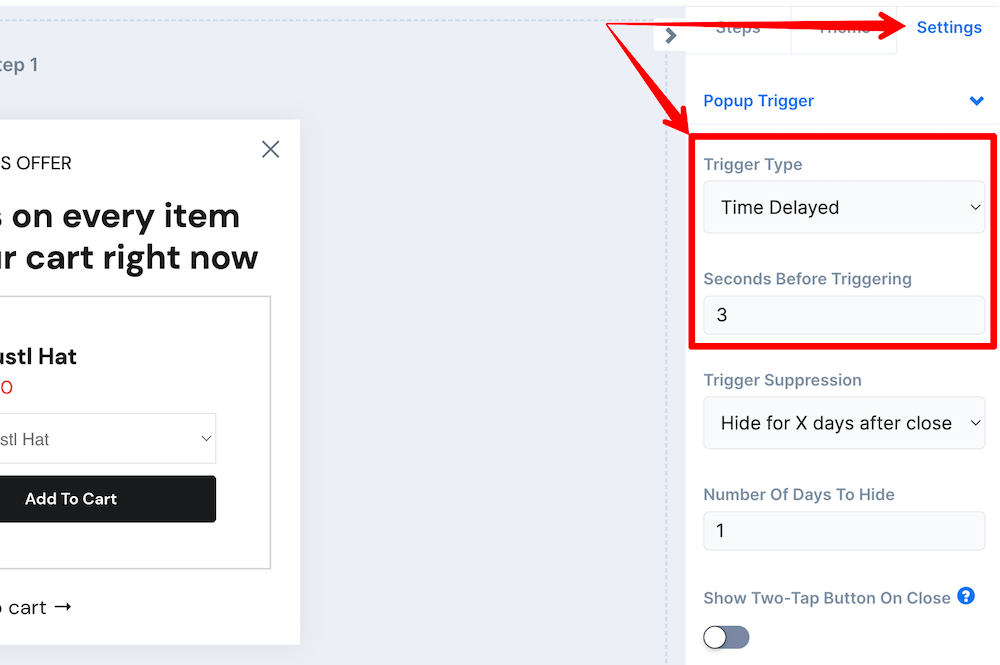
This one is set to show after three seconds, but we recommend anywhere from 0-5 seconds for this kind of popup. Also consider adding a trigger suppression if you wish to prevent the popup showing every time the cart page is loaded.
2. Button actions
We also need to set up what happens when someone clicks one of the “Add to cart” buttons in our popup.
Click on the products element we added and/or customized in the previous step. Then, click the “Confirmation Actions” buttons in the side panel:
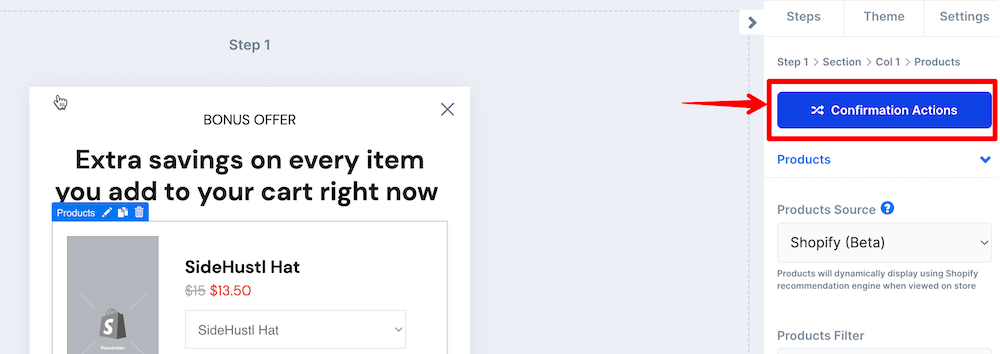
A modal box will then appear where you can customize the button actions.
We suggest using the “Add product to cart” default action, although you can choose to redirect to a product page instead:
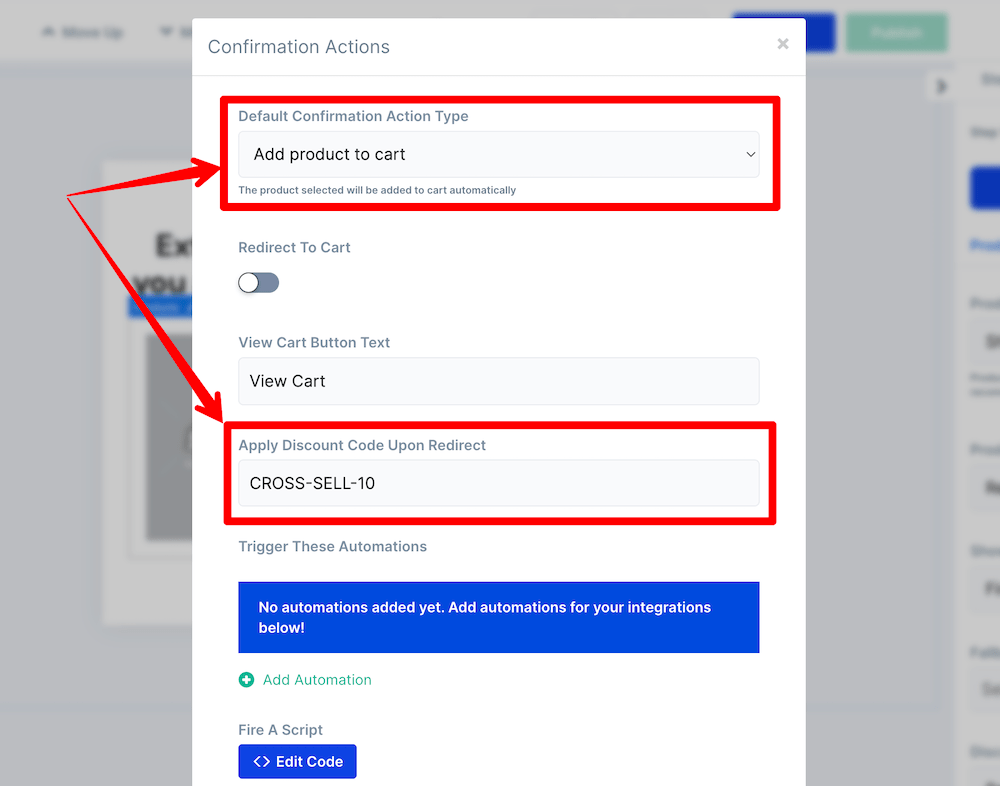
You can also enter a discount code that applies any special offers you’re promising as part of your cross-sell.
⚠️ Remember: Any promo code added to this box needs to be setup in Shopify separately in order to work.
PRO TIP:
If you’re only offering one product in your cross-sell popup, it might also be worth toggling the “Redirect to cart” switch to on in the Confirmation Action settings. This will effectively refresh the cart page with the new product in there as soon as a shopper adds it to cart:

Step 3: The targeting
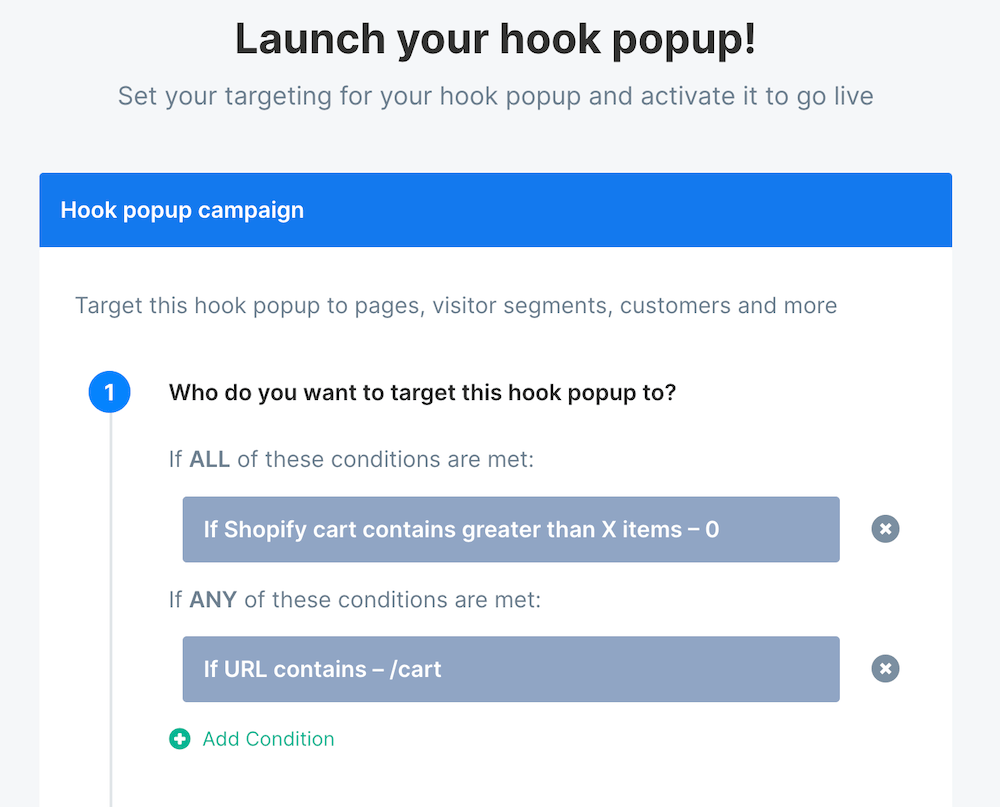
We only want this popup to show when someone views the cart page and has products added to the cart. So, we’ll add these as targeting conditions.
To do this, head to the final launch step in ConvertFlow:

Then, remove the default “Everywhere” condition from the targeting options and add a simple “If URL contains” one to ensure the popup only loads on the cart page:

⚠️ Note: This is example text based on typical Shopify store URLs. You’ll need to ensure your condition text adheres to your own store’s cart page URL.
Now add another targeting condition of “If Shopify cart contains great than X items” and set the value to 0, making sure this is added to the ALL conditions:
PRO TIP:
You could also use these targeting conditions to show different offers to shoppers with different levels of cart value. So, if someone has a particularly high value cart, you could show them a different product or discount offer.
Just create a separate popup with the special offers in the creative. Then, add a condition that targets a particular cart value of your choice:

Set the popup live
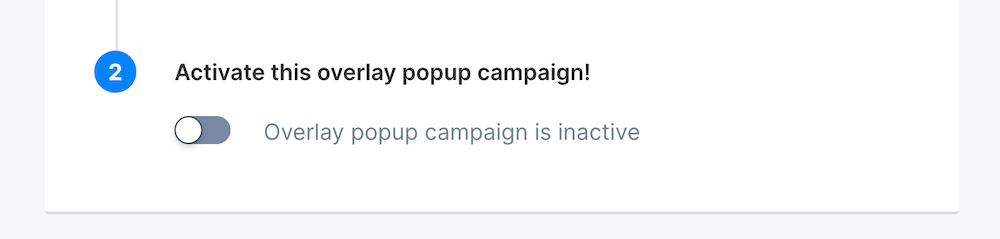
Now you simply need to activate your popup and set it live!
Make this happen by toggling the switch while still on the final “Launch” step we set the targeting conditions on:
If you’ve already got the ConvertFlow pixel installed on your website, the popup will now start showing!
First-time ConvertFlow users will be prompted to install the pixel. Simply follow the on-screen instructions to get this done in a few clicks.


.svg)
