Playbook summary
Create an overlay popup that shows as soon as someone adds a product to their cart. You can cross-sell similar/related products or upsell the visitor to buy in greater quantities, before encouraging them to complete checkout.
- Industry:Ecommerce
- Metrics affected:AOV
- Campaign type:Popups
Tools you'll need
- ConvertFlow
- Shopify
Quick setup
- Trigger: When a product is added to cart
- Content: Related products
- Call-to-action: Add to cart
- Targeting: If visiting product pages
Many ecommerce stores try to upsell visitors by recommending similar items on product pages. But, there’s no point doing this before you’ve secured the initial sale.
Instead, time your recommendations perfectly by:
- Focusing on just one item on product pages
- Triggering an upsell/cross-sell popup as soon as the item is added to cart
This means your product pages do what they’re supposed to do—showcase the value and benefits of an individual product! But, you can still maximize order values by recommending other items as soon as the “add-to-cart” is secured.
In this playbook, we walk you through how to launch one of these add-to-cart upsell popups on your store using ConvertFlow.
💡 BONUS: This playbook works well in tandem with an In-Cart Cross-Sell Popup
Step 1: The creative
The best place to start is by choosing a template to customize. Here are a few options that are best suited to this campaign:
For the customization and creative itself, you simply need to pull in products that are related to what’s been added to the cart. This is a straightforward task using ConvertFlow’s Shopify integration and products element.
Most templates recommended for this type of campaign will come with a products element already added. But, you can also manually insert into any campaign by adding an element and choosing “Products” from the side panel:
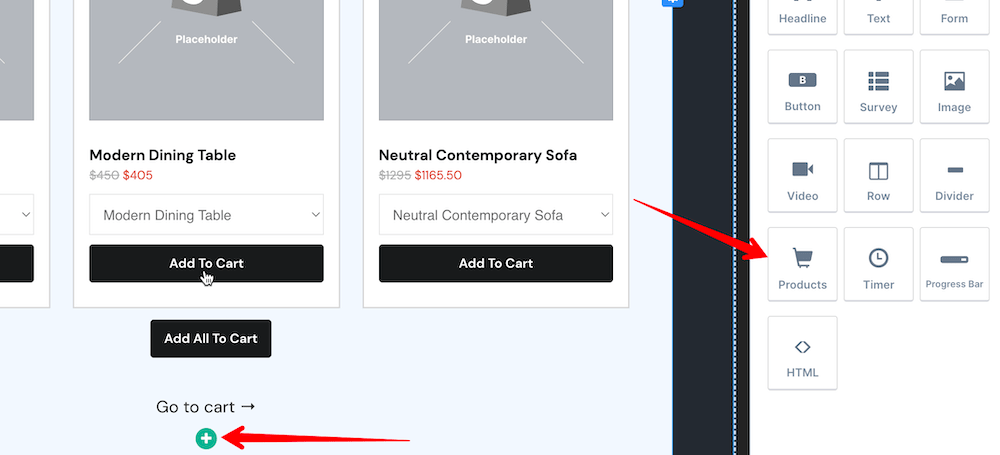
Next up, we need to get the right products to show.
Set the product source to “Shopify” (integrate your Shopify store, if not done so already). Then choose “Related to a product” as the filter and “First product in cart” as the product:
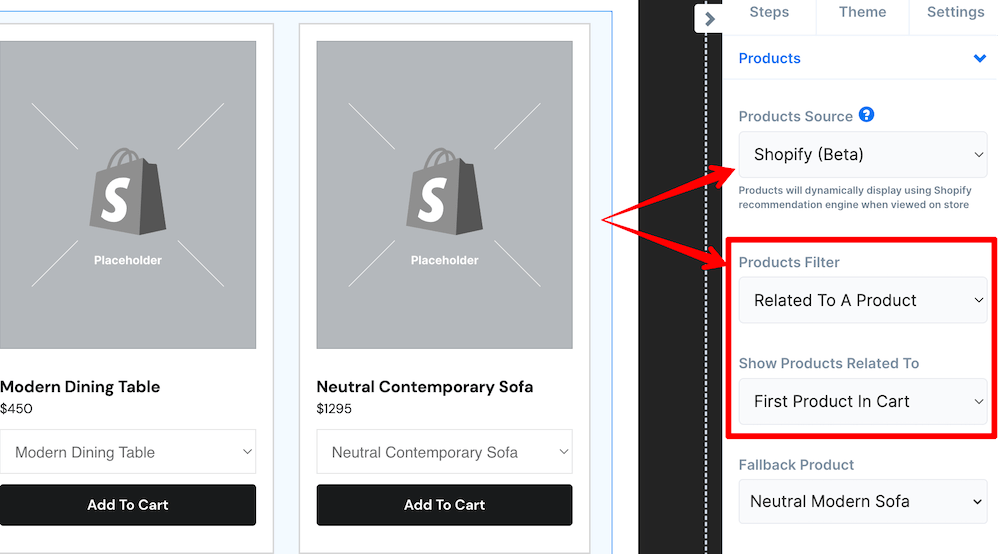
This means ConvertFlow will use Shopify’s recommendation engine to find similar products in your catalog to the one added to cart.
However, you can also choose to show products:
- Related to current product page
- Manually selected by you
You can also easily visualize any time-sensitive discounts you’re offering in your add to cart upsell popup:

Finally, scroll further down the side panel to customize the styling of your products in the popup—fonts, spacing, colors, etc:

You’ll also be able to control the number of products that show here as well as the format and alignment in which they’re displayed.
Step 2: The technical setup
We have the creative of our popup sorted. Now it’s time to hook up the technical side so it all works from a back-end perspective.
There are two key steps to this:
- The trigger
- Button actions
1. The trigger
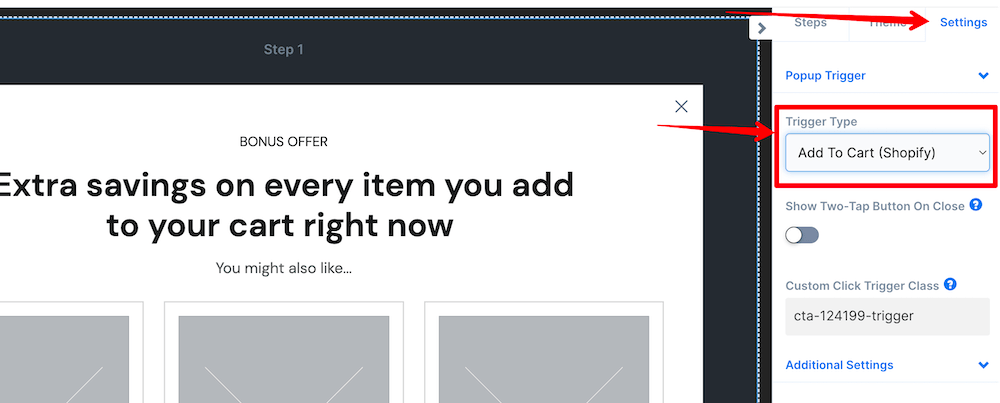
This is very straightforward for this popup campaign. We simply want to set the trigger type to be “Add To Cart.”
To do this, head to the “Settings” tab in the ConvertFlow builder’s side panel and choose the trigger type:
2. Button actions
We also need to setup what happens when someone clicks one of the “Add to cart” buttons in our popup.
Click on the products element we added and/or customized in the previous step. Then, click the “Confirmation Actions” buttons in the side panel:

A modal box will then appear where you can customize the button actions.
We suggest using the “Add product to cart” default action, although you can choose to redirect to a product page instead:
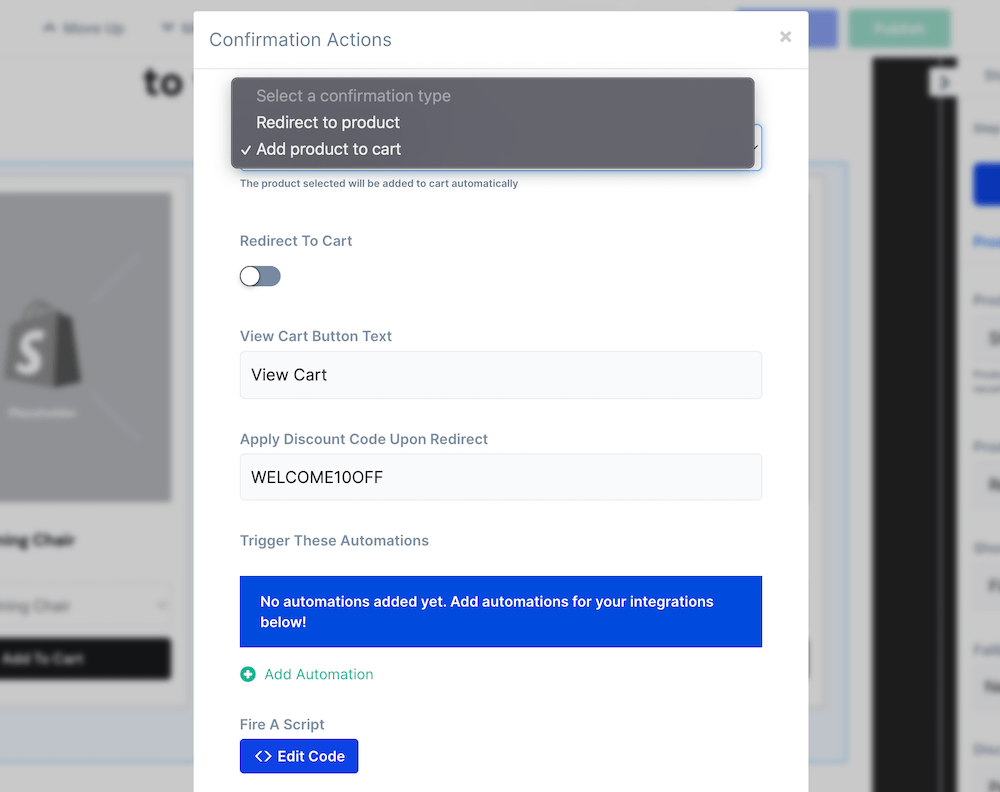
You can also setup an automatic redirect to cart as soon as the product is added and add a discount code to apply any special offers you’re promising as part of your upsell.
Step 3: The targeting
Most stores will want these upsell and cross-sell offers to show to all their website visitors. So, there’s no major targeting conditions we need to setup for this campaign.
However, it’s always a good idea for general page speed purposes to only load popups and campaigns on the relevant pages.
For this campaign, it’s likely that the popup will only need to be shown on product pages (unless you have “Add to cart” buttons elsewhere on your site).
So, head to the final launch step in ConvertFlow:

Then, remove the default “Everywhere” condition from the targeting options and add a simple “If URL contains” one to ensure the popup only loads on product pages:
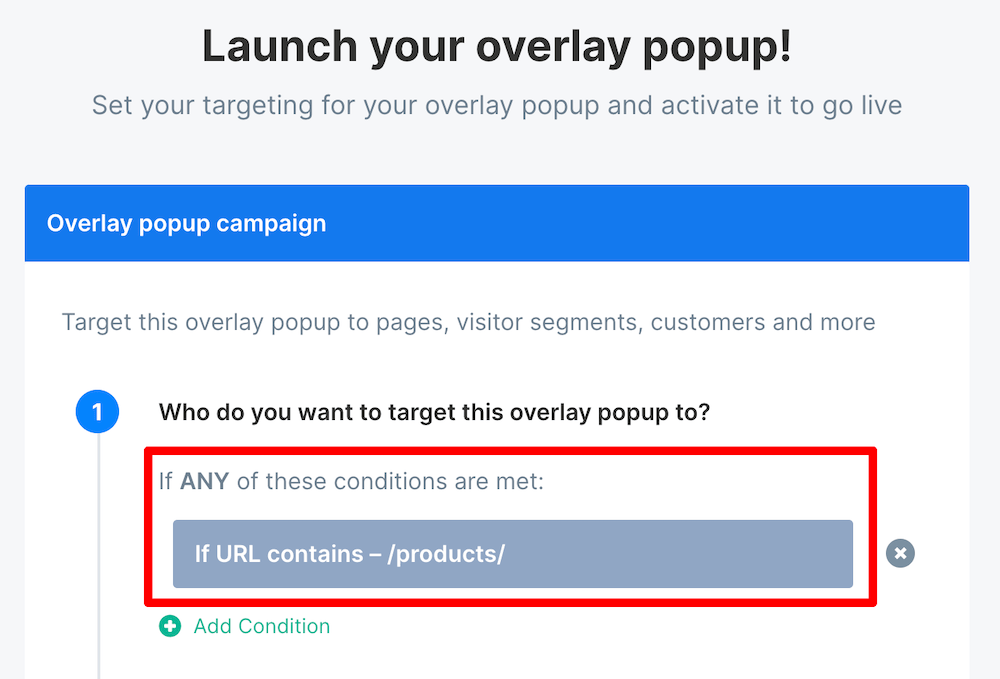
Note: This is example text based on typical Shopify store URLs. You’ll need to ensure your condition text adheres to your own store’s URL structure and naming conventions.
Set the popup live
Now you simply need to activate your popup and set it live!
Make this happen by toggling the switch while still on the final “Launch” step we set the targeting conditions on:

If you’ve already got the ConvertFlow pixel installed on your website, the popup will now start showing!
First-time ConvertFlow users will be prompted to install the pixel. Simply follow the on-screen instructions to get this done in a few clicks.




.svg)
