
Playbook summary
Create a list growth welcome popup that promotes a cashback offer instead of the more common first-order discount. You’ll increase opt-in rate, boost first-order profitability, and encourage repeat purchases.
- Industry:Ecommerce
- Metrics affected:List Growth; LTV
- Campaign type:Popups
Tools you'll need
- Funnel builder: ConvertFlow
- Ecommerce CMS: Shopify
- Cashback software: Fondue
- Email/SMS software: Klaviyo (or your provider of choice)
Quick setup
- Trigger: Time-delay (3-5 secs)
- Content: Enticing cashback offer
- Call-to-action: Enter email & phone number over two steps
- Targeting: Show everywhere; If visitor hasn't already subscribed
It’s standard ecommerce practice to run a discount popup that grows your subscriber lists. But why sacrifice a chunk of your first order margins to everyone who comes to your store?
Using a cashback offer instead can:
- Help you keep more of your first-order revenue
- Encourage shoppers to come back and buy again
All while maintaining (or even increasing!) the opt-in rate on that initial welcome popup.
In this playbook, you’ll learn how a cashback popup works and get a step-by-step walkthrough for setting one up on your store.
This playbook was designed in partnership with Fondue: a cashback software designed to help ecommerce businesses grow revenue and LTV by reducing reliance on coupons.
<what>What is a cashback offer?<what>
A cashback offer is a promotional incentive that rewards customers with their choice of store credit or cash back after purchase.
Brands replace standard discount coupons in their welcome series popup, email, and SMS with a cashback option. Shoppers may redeem this cashback post-purchase either as cash or a gift card back to the brand's store.
Since not every shopper claims their cashback, brands reinvest that money into larger offers to increase conversion and revenue.
Fondue is the leading tool for Shopify stores to run cashback offers—helping brands drive, on average, 30% more revenue and 25% greater LTV than when using discount coupons.
<why>Why use cashback offers instead of discounts?<why>
Still tied to the idea of using standard discount offers to grow your email & SMS lists? There are several compelling reasons to experiment with cashback offers.
1. Increase first-order profitability
One of the best reasons to make the switch to cashback offers? Better first-order profitability.
As an ecommerce marketer, you know you’re already running a big loss on customers’ first orders. There’s the ad costs—targeting and retargeting consumers until they finally purchase. And the incentives to buy, usually in the form of a new customer discount.
But you can make up some of that loss by replacing discounts with cashback offers.
You see, when you offer shoppers a discount, you lose that money upfront. But when you offer cashback? There’s a waiting period—usually as long as your brand’s return window. Then, the customer can either claim their cashback as a Visa card or as a gift card to your store.
From what we’ve seen at Fondue, about half of cashback offers are never redeemed at all—but your offer still did the work to win that first purchase anyways.

Then, about 20% of cashback offers are redeemed as store credit and only 30% are redeemed as cash. So you’re saving about 70% in coupon loss by offering cash back instead.
2. Boost popup signups
With more profitable orders, you can afford to offer a better deal to new-time shoppers.
So instead of offering a standard 10% discount, you can offer, say, 20% cashback, which looks all the more appealing in the eyes of the consumer.
And it helps you stand out from other options they might be considering.
3. Magnify first-order revenue
With a better discount, your customers are going to be more eager to take advantage of the cash-earning opportunity for their first purchase.
So you can grow overall cart values on that first purchase, too, as customers are incentivized to buy more.
Ultimately, the more they buy, the more products they have to fall in love with. So customers will have more reason to come back for another purchase.
4. Encourage repeat purchases & grow LTV
Giving new shoppers a discount helps you win over first-time customers, but does nothing to encourage loyalty and return purchases.
With cashback, your customers have the option to redeem their reward by Visa debit card or a gift card to your store.
Encourage them to opt for the gift card by boosting their bonus like Succulents Box does:

The brand offers customers 20% more cash if they choose a gift card to the store than if they opt for the Visa card. You can set this amount to whatever you like, so experiment with what makes sense for your brand.
<inspiration>3 ways to use cashback offer popups on your Shopify store<inspiration>
When launching your cashback welcome popup, there are several strategies you can try to inspire signups, learn about customers, and draw customers to purchase.
The two-step email + SMS popup
A two-step email and SMS popup is great for earning the privilege to reach customers in two places at once.
Leisure sports company CROSSNET surfaces a simple cashback offer popup for new site visitors:

When asking for a phone number in step two, the brand lures shoppers to become part of the “in crowd” with a VIP status. By becoming VIPs, text subscribers will be first to hear about new products, making them feel extra important.
This popup has helped the sports brand reduce welcome discount payouts by 50.8% and increase email and SMS signups by 15.9% and 43.8% respectively.
To use this strategy, you’ll want to differentiate the content on your email and SMS channels so people have a reason to join both.
Shoppers may be more reluctant to give out their phone number since it gives brands more direct access to their attention. So there should be a clear reason to join your text subscriber list over email alone.
The segmentation popup
Adding a survey to your email popup helps you personalize the shopping experience and segment your subscribers.
Birthdate Co., a DTC shop with astrology-themed products, adds a simple survey to its cashback popup:

So once a subscriber submits their email address, the brand can use that information in email follow-ups or to personalize the website experience.
This is going to be especially helpful when paired with the cashback offer.
Since the incentive encourages repeat purchases, Birthdate Co. can use a subscriber’s survey response to inform follow-up emails.
For example, if someone is shopping for themselves, the brand can send dedicated emails encouraging the shopper to pamper themselves.
Or if they’re shopping for gifts, Birthdate Co. can follow up with gift guides and messaging to nudge the shopper to treat their special someone.
The full-funnel cashback popup
Successful ecommerce stores are guiding the shopping experience to bring more customers to checkout. That means connecting the customer journey through a thoughtfully crafted ecommerce conversion funnel.
So instead of leaving customers hanging after their opt-in, you help them navigate your store and find the best products for them.
Popov Leather does this by connecting its cashback popup to its quiz.
The wallet brand starts with a clean email capture form:

It’s a generous offer—which, by the way, has increased its total net revenue by 180.17%. And the clean design focuses the customer on filling out the form.
When submitted, Popov directs shoppers to the quiz:

This helps shoppers find leather goods in line with their style and the product type they’re interested in.
Using a quiz, you can reduce overwhelm—which could cause shoppers to leave your site—and increase the chances they’ll become customers.
<how>Create your cashback popup with Fondue and ConvertFlow<how>
Inspired to launch cashback offer popups for your store? Your brand could be next in line to elevate profitability and customer retention.
Let’s create your cashback offer popup together in just a few simple steps. You’ll even get to run a test of cashback vs. discounts to learn what works best for your store.
Step 1: Get a cashback offer software
You’ll need a third-party software to handle your cashback offers. Fondue integrates with Shopify right out of the box and is easy to set up and use.
Fondue works using UTMs, which makes it quick to launch cashback offers through email, SMS, influencer links, ads, and onsite campaigns like popups.
To get started, add the Fondue app from the Shopify app store. Or book a demo if you want to learn more before signing up.
Step 2: Choose a template for your cashback popup
ConvertFlow’s popup template library is full of preset designs you can customize for your brand. You can start with any of them that pique your interest:
For this guide, we’ll use the two-step cashback offer popup template:
It’s all set for you to A/B test a discount offer vs. cashback reward.
Step 3: Customize your cashback popup’s design
When you’ve chosen your template, you’ll land in ConvertFlow’s drag-and-drop builder with Variant A showing (your cashback version):

In the builder, you can customize everything about your cashback popup including its copy, design, form fields, and images. You can even add more elements like timers and surveys.
Before adding or changing anything yet, however, it’s worth customizing your aesthetic design first.
In ConvertFlow, there are two ways to change your popup’s appearance:
- At the theme level: This determines your style across your campaign, including any new elements you add
- At the element level: This will override any theme-level settings when you want more customization
We recommend starting at the theme level for consistency. Then, change individual elements as needed.
To edit your theme, click the “Theme” tab in the right-side panel. You’ll see the full list of element types to customize:

For this example, let’s customize the button colors to match our brand.
Expand the “Buttons” menu and click “Button Color” to change it:

Continue in this way to match each theme element to your brand’s fonts, colors, and any other design preferences you have for your cashback popup campaign.
Step 4: Set the trigger for your popup
Now, determine when your popup offer will appear for site visitors.
Click the “Settings” tab in the builder panel. Under popup trigger, you’ll see a full menu of trigger types:
- Exit-intent: Shows the popup when a customer is leaving your store
- Scroll point: Makes the popup appear when a site visitor has scrolled to a specific percentage of the page they’re on
- Time delayed: Shows the popup a set number of seconds after the shopper lands on your website
- Upon click only: Makes the popup appear when the shopper clicks a specific button on the page
- On-site message: Shows a small message in the corner of the screen that the shopper clicks to get the popup to appear
- Two-tap floating button: Shows a small button in the corner of the screen which the shopper clicks to make the popup appear
- Add to cart (Shopify): Makes the popup appear when a customer adds a product to their shopping cart
For any of these triggers, you can also set a two-tap floating button to trigger after a shopper closes the popup, too. That way, if a customer wasn’t ready to give you their contact info initially, they can still access your offer when they’re ready.
Note: For advanced targeting, you’ll be able to choose what pages and visitor segments your popup appears in a later step.
Step 5: Set trigger suppression settings for your cashback popup
Below the trigger settings, determine your popup’s trigger suppression settings:

This will prevent the popup from appearing for a set time period after the shopper closes it. That way, you can avoid annoying shoppers who closed it out recently.
Note that trigger suppression won’t be available if you choose “upon click only” as the trigger settings since that’s dependent on the shopper’s action.
Step 6: Customize your cashback popup’s content
It’s time to make your cashback popup yours 🤩
Customize the content of your popup with your:
- Product photos
- Copy
- Desired form fields
- Offer
- And any other elements you want to add
When determining your copy, keep it straightforward and concise, like:
- “Unlock 20% back”
- “Get 20% in cash or credit”
That way, your offer is clear and you focus the shopper on your CTA without distraction.
To edit an element, click what you want to edit from within the builder. The side panel will show you the options you can control like the copy, padding, colors, and more:

In the second step of our popup, the button text currently reads “Send Code & Start Shopping.”
But for our offer, we want to drive home how great this offer is. So lets update the button’s copy accordingly:

That’s better.
Continue like this, editing any element you like. Add more elements by clicking on the “+” sign that shows up when you hover your mouse over different sections in the builder.
Remember: You’ll encourage more SMS signups in your second step by tacking on an additional 5-10% to the offer 🔥
Step 7: Connect your ESP or SMS software to ConvertFlow
Now you’ll want to add your ESP or SMS marketing tool so that your new subscriber data gets passed on to your customer database.
We’ll use Klaviyo as an example, but it’ll be a similar process for whatever tool you use.
Head back to the builder for your campaign and select the form element in one of your steps. Then, click “Manage Actions” in the right-side panel:

Then, select “Manage integrations.” Find your software in the menu and click “Connect”:

Verify the connection with ConvertFlow following the on-screen instructions.
Step 8: Set up automations for your ESP/SMS software
With Klaviyo (or your tool of choice) connected, there are two crucial automations to set up to make your popup campaign function:
- Linking form fields: To pass form submissions on to your database
- Tracking events: To enable your software to trigger your welcome flow
Start by linking your form fields to your database.
After connecting your software, you’ll be brought back to the “Manage Actions” panel. Click “Add automation”:

Then, choose your automation type. We’re adding a subscriber to our email list in the first step, so we’ll choose “Klaviyo - Add to list.” Then, select the appropriate list from the Lists dropdown menu:

Click “Create Automation.”
Next, create an event to track form completions in your ESP/SMS tool.
Click “Add Automation” again, then “Klaviyo - Track event” (or the equivalent for your tool). Then give your event a short descriptive name, like “Submitted cashback email form”:
When you’re finished setting up automations, click “Done.”
Now new subscribers from your cashback popup will be added to your list in Klaviyo automatically and, once you set up your flows in Klaviyo, an event can trigger your welcome flow 🔥
👉 Learn more about how to set up flows and flow triggers in Klaviyo.
Repeat this process for the SMS form in the step two of your popup, choosing the right list for SMS subscribers and a separate event name to track the submission.
Step 9: Connect Shopify to ConvertFlow
Integrating Shopify and ConvertFlow will make it possible to launch your popup on your website in just a few clicks.
Plus, you’ll be able to pull in product, collection, and customer information for your campaigns 🤓
From the website dashboard in ConvertFlow, go to “Settings,” then “Integrations” in the left-side menu. Locate Shopify in the integrations menu and click “Connect":

You'll be taken to ConvertFlow's listing on the Shopify app store. Click "Add app" and then follow the on-screen instructions to integrate ConvertFlow with your Shopify store.
That was easy! ConvertFlow’s script will be automatically installed on your store 💪🏽
Step 10: Update last-step call-to-action
The last step in the popup template we’re using has a call-to-action (CTA) for shoppers to take a quiz. This is a great strategy for guiding first-time shoppers to the right products in your online store.

But, you can also make this last step anything you want!
You can connect that button to a specific product collection or another campaign like a quiz. Or, you can remove the button altogether and make your final step a simple confirmation message.
For now, let’s assume you have a quiz and add the link.
Click the button element. Then, select “Manage Actions” from the right side panel.
Here, leave the Default Confirmation Action Type as “Redirect to a URL.” Then, we’ll enter the URL where our quiz is located into the form:

Click “Done” when you’re finished.
👉 Learn more about creating quizzes in the quiz playbook.
Step 11: Preview your cashback offer popup
When you’re happy with your popup, save and publish your changes. That won’t make it live just yet.
Now, click “Preview” to see your popup in action:
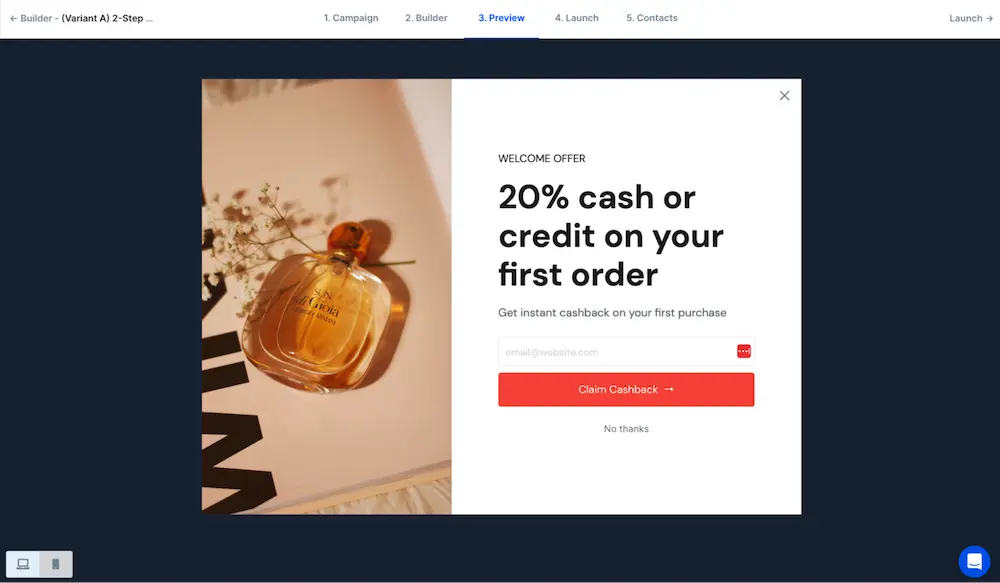
Your popup will show up based on the trigger you set earlier. You can test it out and it will work just like it will on your website.
However, testing your popup won’t count towards your campaign stats and it won’t trigger any automations, like adding an email address to your subscriber list.
<ab-test>Create an A/B test against a standard discount offer<ab-test>
Want proven results before committing to cashback offers? It’s easy to run a split-test in ConvertFlow against a standard discount offer to understand how site visitors interact with each offer.
If you don’t want to do an A/B test, head to the next section to launch your cashback popup.
Step 1: Customize your discount popup variant (Variant B)
The template includes Variant B ready-to-go with a discount offer in place of the cashback offer.
To edit Variant B in the template, head to “1. Campaign” in the top navigation.
Scroll down to “Experiments”. Find Variant B. Click the “Options” dropdown menu and click “Builder to make your edits:

Use what you learned editing Variant A to update Variant B to match in style and any copy that isn’t cashback-specific.
That means your:
- Images
- Colors
- Button styles
- Form fields
- Etc.
Be sure to choose a new event to track in Klaviyo (Step 8) so you can trigger the right version of your welcome flow (the one with the discount code).
Preview your discount offer variant to ensure it looks like you want it to.
PRO TIP:
If you made significant changes to the cashback template, we recommend instead that you copy Variant A, then edit the copy and button actions for your regular discount offer.
From the Experiments section on the Campaign page, find Variant A. Click “Options,” then “Duplicate”:

This will create a Variant C which will allow you to try creating your own split-test variant. So you'll still have the template’s Variant B in case you need to reference it.
When you duplicate a variant, you’ll be taken to the builder where you can edit the new variant.
Use what you learned editing Variant A to update your:
- Copy
- Offer
- Form & button actions
So that it’s suitable for the discount offer. Limit the changes you make so that you know you’re running a true test of cashback vs. discounts.
Step 2: Set up the parameters of your A/B test
From the Experiments section on the campaigns page, just adjust the percentage of traffic each variant will be shown to and click save:

A 50-50 split is suitable here to create a level playing field.
If you duplicated Variant A to create Variant C, you can delete the extra variant produced by the template if you’d like to minimize confusion.
Now each variant will be shown to half of your site visitors 🎉
<launch>Launch the campaign on your store<launch>
Looking good! Let's put it live 👨🎤
Click the “Launch” button from the top navigation. On this page, you can customize what pages your popup shows on and which visitor segments it appears to:

With targeting conditions added, toggle the checkbox to activate your popup:

Congratulations! Your popup is live. Watch the subscribers and orders roll in 😎
<analyze>Track the results of your A/B test to determine your winning offer<analyze>
To determine how effective your cashback vs. discount popups are, you’ll want to track performance in:
- ConvertFlow
- Fondue
- Your ESP/SMS software
These will give you a full picture of the performance of these campaigns.
ConvertFlow’s analytics dashboard makes it easy to track important conversion data for your popup campaign:

You’ll be able to determine which variant led to the most form submissions.
Use Fondue’s analytics tab for more details about your cashback popup variant. Here you’ll see a breakdown of how many shoppers opted for a gift card to your store, a Visa card, or did not redeem their cashback:

And your email/SMS software will provide data on your follow-up campaigns for both your discount and cashback variants, including:
- How many shoppers are clicking through
- How many are completing a purchase
- How much they’re spending
Ultimately, when comparing cashback to discounts, you’ll want to go with the option that has the greatest impact on your revenue and profits long-term, not just the one that achieves the most signups initially.
Cashback offers support ongoing growth
With cashback offers as the star of the show, you increase first-order profitability, boost signups with better incentives, and give customers a reason to come back to your store.
But cashback offers aren’t just limited to the welcome offer. You can support ongoing customer retention goals by using cashback incentives throughout the customer journey and during sales and seasonal promotions.
When you’re ready to try something new, try cashback offers in your:
- Cart abandonment campaigns
- Winback offers
- VIP & loyalty programs
- Sitewide sales (BFCM, summer sale, etc.)
Fondue is an easy-to-use cashback promotions software that helps you combat first-order revenue dips and boost customer retention. Get the app.


.svg)
